Tuesday, November 30, 2010

Reminder, Pick a Stocking Information, and an Upcoming Event Announcement

Just wanted to remind everyone that tomorrow starts the 20 days of Christmas here.  I will be showcasing a Christmas project each day from December 1st - December 20th.  I will also be having a fun series of giveaways called Pick a Stocking.  There will be three stockings and after the first giveaway, the winner will choose which stocking of goodies they would like to receive, then the second winner will pick a stocking and the third winner will receive the remaining stocking.  In an attempt to get the stockings to the winners before Christmas, I am doing the giveaways early in the month. 

To enter the giveaways, look for details on the posts for the following days: 
December 1st
December 5th
December 10th

Here is a picture of the stockings that are up for grabs. 

Also, on December 13th, Fantabulous Cricut will be having the Fantabulous Cricut Crawl which is our version of a blog hop and all of the design team will be featuring home decor items and prizes as well.  I will have an additional giveaway for this event as well.
Fantabulous Cricut

Monday, November 29, 2010

Fantabulous Cricut Design Team Project for Challenge # 38

The theme for this week's challenge at Fantabulous Cricut is a Ribbon Challenge.  We were asked to incorporate ribbon into our Cricut project.  Be sure to check out all of the design team's projects and enter your own ribbon project into the challenge here: http://fantabulouscricut.blogspot.com/

For me, I love ribbon. I have a ton of it.  I am bad about buying ribbon that I have no need for, simply because I think it is pretty.  And of course, instead of using ribbon that I already had, I saw this challenge as a great opportunity to go shopping for some new ribbon. :)  For my project, I made a paint pail to fill with some stocking stuffers for Kaylee.

I began with this paint pail that I found at Hobby Lobby in their Christmas area.  I loved the polka dots, and I found some great ribbon to match with pink and green dots.  I took the ribbon and cut it into strips to tie around the handle.  I just alternated the colors around the handle until it was covered.


I used pink vinyl and the Jasmine Cricut Cartridge to cut the K for the front of the pail.  Then, I filled it up with some goodies for her.  It has a small stamp set and a little mini lego set as well, but mainly silly bands.  She loves silly bands and inside here are the Justin Bieber silly bands that she is wanting so bad, so I am sure they will be more exciting to her than the pail itself, lol. 

Sunday, November 28, 2010

Hymnal Candles

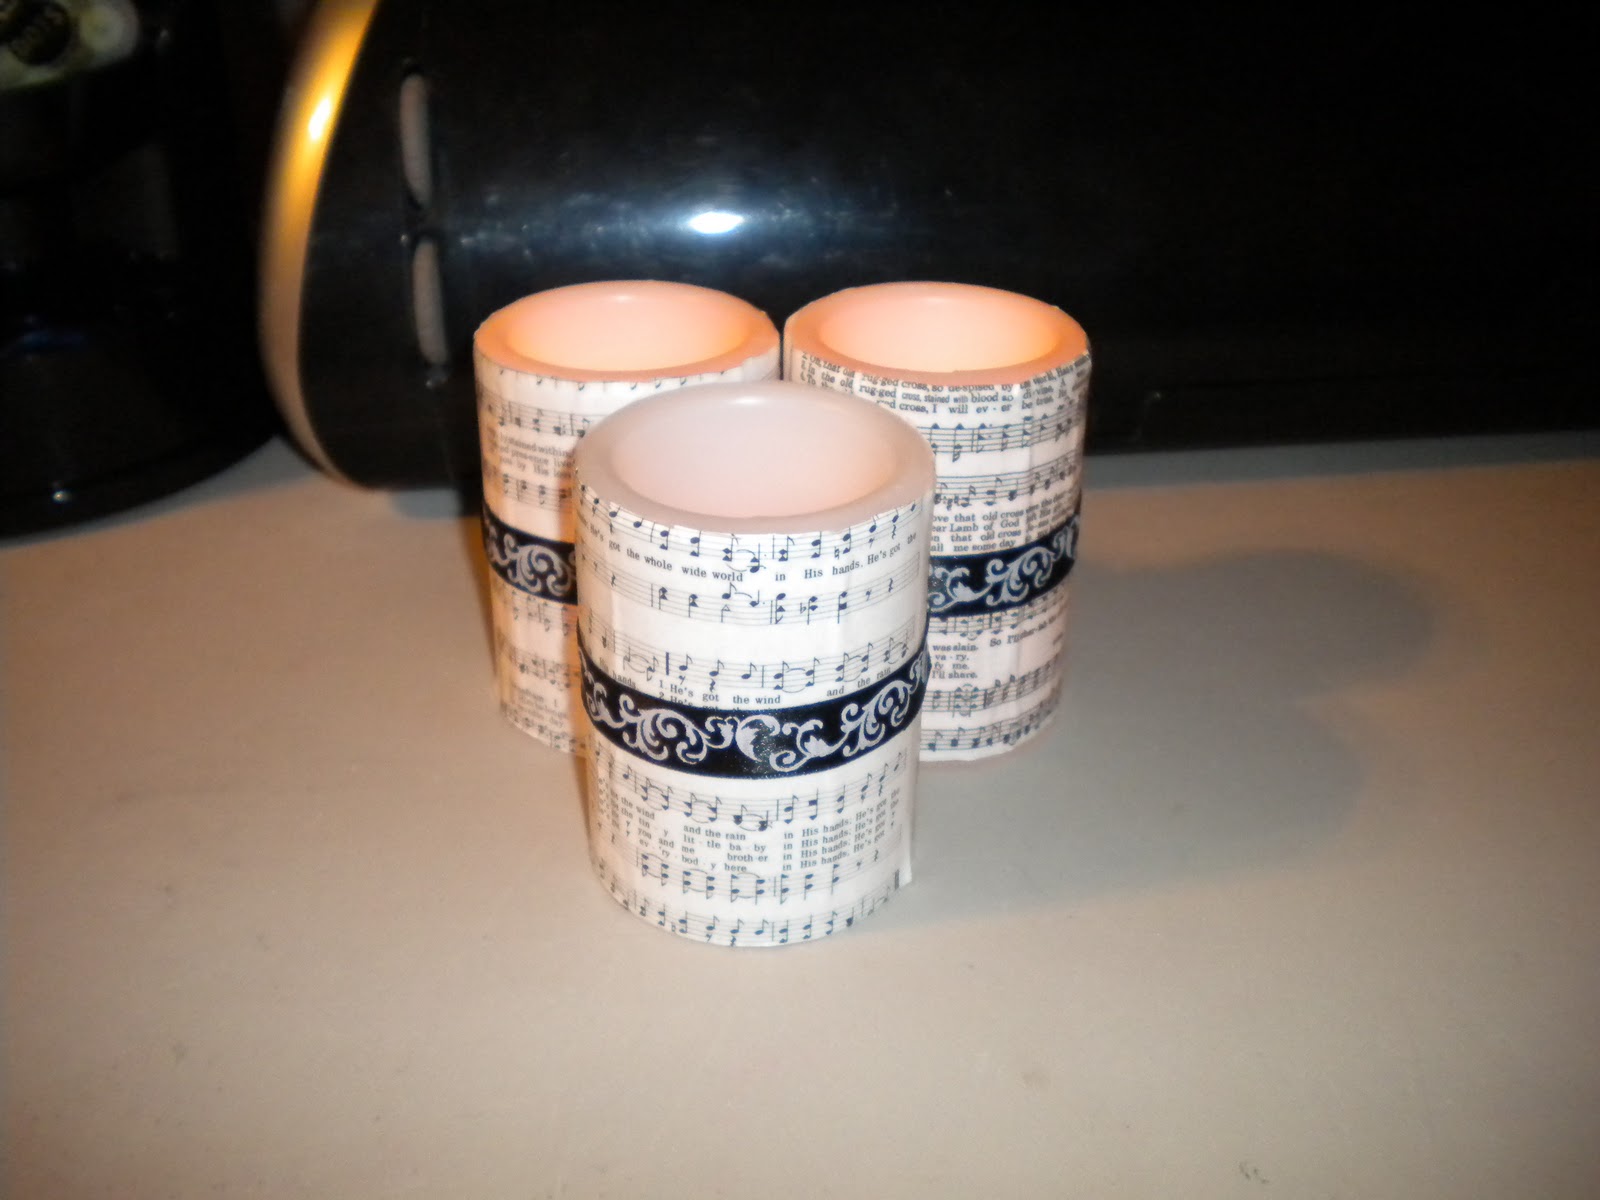
Lately, I have been loving all of the projects I have seen around the web with book pages and sheet music.  I have seen these candles on quite a few websites that are similar to the Pottery Barn candles with sheet music on them and I really wanted to make some of my own.  I saw a tutorial on how to make them here: http://thriftydecorating-nikkiw.blogspot.com/2010/11/pottery-barn-knock-off-candles.html and she also has a link where you can print out sheet music if you don't have any.  I did mine a little bit differently, but this is where this idea originated from.


These were pretty inexpensive to make and I love how they turned out, so here is how you can make your own.  First, I found these flameless candles at the Dollar Tree.  They take 3AAA batteries each, so you can also pick those up at the Dollar Tree if you don't have any on hand.  You will also need some Mod Podge, a brush to apply it with and your pages to put on the candles.  I used pages from an Old Hymnal.  I have a few of these that are just really worn, so I thought it wouldn't hurt to take out a few pages. 


Next, I pulled out two pages per candle, for a total of 6 pages and trimed the edges of them to make it straight.  I pulled out songs that I liked, so the words on the candle would be some of my favorites.
Now, I took the mod podge and added a layer onto the candle and then pressed the page onto it.  Make sure your words are facing the right direction before you adhere them.  Also, this takes two pages to cover the candle, so I only put mod podge on half of the candle at a time.

After the candle was covered, I gave it a few minutes to dry and then cut off the excess part of the pages at the top and bottom.  Then, I gave the outside a cover of mod podge to seal it and give it a nice sheen. (I always have problems with mod podge wrinkling if the paper is thin, so you can see this in the picture, but after it dried, most of them came out and I thought the few that were left gave it a sort of vintage/rustic look.)
Now, to finish them off, I added a strip of ribbon around the center.  I used my tape runner to adhere the ribbon.

Here is a picture of how they look lit up.


I am linking these up to:

Saturday, November 27, 2010

More of Last Year's Christmas Projects

We are getting really close to the 20 days of Christmas, so I have a few more of last year's projects to share with you while you wait.

First up, I made these little Reindeer Noses Bags.  The sentiment is computer generated and the reindeer is a little wooden shape from Michaels.  The bag is filled with red hots.  The little poem reads:
I wanted the perfect gift for you,
But couldn't decide just what to do
I almost sent you a dozen roses,
Instead, here's a bag of reindeer noses


Next, I have a cute little gift that we made for the lunchroom ladies at Kaylee's school.  These were kitchen whisks that we bought on sale and then filled the inside with hershey kisses.  Then, wrapped them in cellophane bags and added a little computer generated tag that says: We whisk you a Merry Kissmas!
Next, here are some ornaments that I made out of measuring spoons of all things.  Just painted the base brown, used paint pens to add the little faces and then added a ribbon through the hole at the top. I hot glued a little bow to them also.

Last year, I also made this Christmas plate out of a regular little serving tray that I found at Old Time Pottery.  It was marked down to like 40cents, and I thought okay this can be altered.  I used A Child's Year and cut the image out of vinyl.  Then, the wording was hand painted (by hubby) with blue paint and a tiny paint brush. 
Finally, the last project I have to share from last year are some little binder clips I made as gifts.  They are simply covered in patterned paper and then I added some stickers to embellish them.  These are great to hold up notes and pictures. I also think they would be cute to give with a recipe card in them if you were giving a gift of cookies or baked goods, etc.
Well, I believe that is the last of the projects from last year that I haven't shared with you all before.  Don't forget that the 20 days of Christmas begins December 1st and I will have a new Christmas project to share with you everyday from December 1st - December 20th along with some fun giveaways as well!

Friday, November 26, 2010

A Little Bit Late, but Happy Thanksgiving and A Few last minute Thanksgiving Projects

Well, all morning yesterday I had intentions of getting on here and wishing everybody a Happy Thanksgiving and the day just got away from me too fast.  So, I am here with a little bit late Happy Thanksgiving to everybody!!  Also, if you are going out to do any more shopping today, be safe and hope you find tons of more deals.  Yesterday was crazy for me, got up early to cook some crockpot mac and cheese, did some last minute turkey crafts, went to my parents house and then left from there to start shopping. My sister and me started shopping about 7pm and did not get home until 5:20am this morning, so I am wore out!!!

Yesterday morning, while I was cooking my mac n cheese, I decided that I wanted a turkey bowl to put it in, so I would have to make one.  I had this red bowl that I didn't mind altering, so I used Create a Critter and cut a turkey head and feather and hot glued them to the bowl.

Now, my husband says to me, if I had a turkey hat I would wear it today.  I told him I was sorry, I didn't have a turkey hat for him.  Then, he advised me that I could make him one just like that kid's craft when you make the Indian feathers hat.  So, I took two strips of paper and stapled them together, then cut another turkey from Create a Critter and glued it to the front and back for him.  I took some pictures of this before I glued them on.
And here you can see how happy he is with his turkey hat.  Kaylee got a big kick out of him in his hat when we got to my mom's house.

Next, I have a picture of my Pilgrim Turkeys in their cheesecakes, because I had a few people ask to see them when they were finished.


And finally, if you remeber the Thankful Turkey I made for Kaylee, she had it finished and filled up, so here is a picture of her with the finished turkey from a few days ago. There is also a picture close up of the feathers so you can see how it looked with the thankful messages wrote on them.


Wednesday, November 24, 2010

Another Cake Platter

I loved the cake platter that I made for my mom so much, that I was thinking about making one for myself.  I went to the Dollar Tree last night and could not believe it, but they had a small cake platter there.  I grabbed it up.  (They only had 1, or I would have bought a bunch of these for gifts)  So, I came home and decorated it, so I can use it to hold my mini cheesecakes tomorrow.  I used Don Juan for the letters and George and Basic Shapes to cut the circles.  Since the handle was white, I used white and black vinyl on this.


I am linking this up to:


mmm button

Got the Stylish Blog Award Again

I feel so special, because I received the stylish blog award two more times.  I want to take a second and thank both of the ladies who passed it on to me again.

A very special thank you to:
Sheryl at http://sherylscraftingcorner.blogspot.com/
Flamenco92627 at http://4goofballs.blogspot.com/

Thanks so much ladies.  If you haven't checked out these blogs before, be sure to go by and check them out for some great projects!

Tuesday, November 23, 2010

Pilgrim Birds

Yes, you read that right, I have been making Pilgrim Birds. I needed some toppers to put on the mini cheesecakes I am making for Thanksgiving, so I decided to make another cute bird from the 3 Birds on Parade Cart. I think they turned out really cute, but I would not suggest making these this small. Some of the layers were very tiny and it took a lot longer than I anticipated to get them put together. I think if they would have been just a bit bigger it would have made them a lot easier to handle. For the yellow buttons and yellow around the hat, I ended up using a gel pen, because they cut way too small to use. I cut a blackout version for the back and used hot glue to attach both sides to the skewer to go into the mini cheesecakes.


Monday, November 22, 2010

The Thankful Turkey / Fantabulous Cricut Challenge # 37 Design Team Project

For Challenge 37 at Fantabulous Cricut (http://fantabulouscricut.blogspot.com/), the theme is Thankful For.  I decided to make a thankful turkey for Kaylee.  Each day, she is writing what she is thankful for on one of the turkey's feathers and then she is going to bring the turkey with her to Thanksgiving dinner and she is going to read off all of the things she was thankful for during the month of November.

I started with two different sized styrofoam balls, spray painted them brown and hot glued them together.  I then used a piece of rolled foam to make the nose and hand cut the red for the gobbler and added google eyes and a small hat I found at Hobby Lobby.  I used pipe cleaners to make the arms and legs and painted a small piece of wood to make the Thankful For sign to put in his hand.  For the feathers, I used the Don Juan cart to cut leaves out of yellow, red and orange.  I cut the stems off of the leaves to make them look like turkey feathers.  I then hot glued these to small skewers and positioned them in the styrofoam balls.  I also added one skewer to the back to make the turkey be able to stand on his own.

The skewers pull out easily, so she can pull one out, write what she is thankful for each day and then slip it back into the turkey.


Be sure to stop by Fantabulous Cricut to see all of the other design team projects and enter your own Thankful project using your Cricut.  http://fantabulouscricut.blogspot.com/

Sunday, November 21, 2010

Gobble Till You Wobble

I have had this layout idea for a while, but I couldn't find a turkey cut that I liked for it.  I wanted my turkey to appear like he was about to fall over.  Since I couldn't find one I liked, I had George (my husband) draw and paint this turkey for me.  I think he turned out so cute.  I used the George and Basic Shapes cart to cut out the backgrounds for pictures and the backgrounds for the title.  I then cut the letters out with the Sans Serif cart.  I used pop dots to attach the turkey and then added some fall colored mini buttons around the picture areas. All of the papers on this layout are from a DCWV Fall Papers pack.


I am entering this layout into the My Sheri Crafts challenge this week for thier Harvest/Thanksgiving theme.  Be sure to check them out here: http://myshericrafts.blogspot.com/

I am also entering this into the Alphabet Challenge Blog. I have never entered one of their challenges, but the theme this week is D is for Doodling, and since I have the hand drawn turkey, I thought I would play along this week.  Be sure to check them out here: http://alphabetchallengeblog.blogspot.com/

Saturday, November 20, 2010

Ahoy Matey!

I have wanted the 3 birds on parade cart since it came out, and earlier this week, I won it off of Ebay.  It came yesterday and I could not wait to use it. 

Kaylee was a cat for the Halloween party this year, but on Halloween day she changed her mind and decided she wanted to be a pirate.  She had an outfit that came with a play set she had, so instant pirate.  I cut the title and the bird from 3 birds and then added some jewels, because every good pirate has some treasure. I had some black paper with skull and crossbones on it that I used for a frame around the picture also.


Blog Award

I want to say Thank You to Elsa over at http://cricutlvr.blogspot.com/ for passing on this blog award to me.  Be sure to check her blog out if you have not for some great projects!!


To accept this award, I must do the following:
1. Thank and link back to the person who awarded you this
2. Share 8 things about yourself
3. Pay it forward to 8 bloggers that you have recently discovered
4. Contact those bloggers and tell them about their awards

 
8 Things about me:
1) I am the oldest of 4 girls, so I have 3 sisters (two of them are twins)
2) I have been married to my husband George for 9 years, but we have been together longer than that because we started dating when I was 15.
3) I have a niece, Kaylee, who is 6 years old that I scrapbook and craft for.
4) I absolutely love my Cricut and Gypsy and could not live without them.
5) I love to read.  I have a Sony E Reader that is permanently attached to me, lol.
6) I love going to the movies and I keep all of my movie stubs.  I have a huge box full of them that I will one day scrap or do something with.
7) I like to go bowling. 
8) I love having this blog and all of the wonderful blog friends that I have made and get to share projects and inspiration with.
 
 
Now, I am supposed to pass this along to 8 bloggers that I have recently discovered.  I am always looking for new blogs, so I am going to try to pass this on to some that I have just found within the past few months or so.  It is so hard to pick, because I really love all of the blogs that I follow.
 
1) http://buzzybeedesigns.blogspot.com/
2) http://laurenscraps.blogspot.com/
3) http://ccscards.blogspot.com/
4) http://www.creatingreallyawesomefreethings.com/
5) http://alliemakes.blogspot.com/
6) http://creativeoperation.blogspot.com/
7) http://craftomaniac.blogspot.com/
8) http://kandrewdesigns.blogspot.com/

Thanks again for the blog award Elsa!!

Thursday, November 18, 2010

Cake Platter

I decorated this cake platter with vinyl to go with my mother's Christmas present.  I cut the letters for the last name out with the Jasmine cart and then I used the George and Basic Shapes cart to cut the circles.  I used Red and White Vinyl for the circles and overlapped them when I applied them to the cover. 


I am linking this up here:
http://alliemakes.blogspot.com/