Monday, February 28, 2011

Hopping By to Say Hi Layout

Over at Off the Wall Craftiness this week, the challenge is full of purple.  Here are the inspiration photo and colors for this week.  You can find them here: http://offthewallcraftiness.blogspot.com/


For my layout, I used Create a Critter for the bunny rabbit and Sugar and Spice for the picture mat.  I used a purple marker to add small dots around the mat and I also added some lavender ribbon with white dots and three small bows that matched the ribbon as well.  The title is sticker letters and I outlined them in black.


Fantabulous Cricut Challenge 49: Shaped Card: Design Team Project

My term as a design team member for Fantabulous Cricut is ending this week, so this is my final design team challenge.  I have had a lot of fun working on this team and am grateful that I had the opportunity.  (Of course, I will still be playing along with the challenges after this week for sure)

The challenge theme is a Shaped Card.  Be sure to check out the other design team members projects and enter the challenge here: http://www.fantabulouscricut.blogspot.com/.

For my project, I decided to make a card shaped like a bee hive with a pull out card.  I used Create a Critter for the hive and bees.  I then added some small bee stickers as well.  I used George and Basic Shapes for the rectangle to pull out and added a handwritten sentiment "I hope you have a bee-u-tiful day".


Sunday, February 27, 2011

Liebster Blog Award

I was passed on this award from Ashley at http://welchcreations.blogspot.com/.  Thank you so much Ashley for thinking of me for this award.


The Liebster Award is designed to bring new blogs to light.  As a recepient of this award, I need to pass it on to 3 new blogs that I have recently found.  This is the hard part, because I have so many blogs that I love and follow and I am always looking for new great blogs. 

I am passing this on to the following three blogs.  Be sure to take a moment and check them out if you haven't before for great projects and inspiration.

1- http://mommyscraftycreations.blogspot.com/
2- http://scrapinmomofoneinspiringlittleboy.blogspot.com/
3-http://creativeoperation.blogspot.com/

Saturday, February 26, 2011

Patriotic Layout for Creative Cutter Room Challenge

Over at Creative Cutter Room, they had a mini patriotic blog hop for President's Day and they are having a challenge also.  They have 4 elements that you have to include in your project.  Be sure to check the blog out here: http://www.creativecutter.org/

For my layout, I got the background sheet at Michaels.  Uncle Sam is a free file from svgcuts.com and I cut him with glitter cardstock, because I thought he would look nice sparkly.  I then used George and Basic Shapes to cut the photo mats.  For the required elements, here is what I used:
3d item: Fabric yoyo with ribbon on corner of photo mat
banner/flag: I used a mini flag pick to put in Uncle Sam's hand
metal embellishment: Two metal star brads on Uncle Sam's shoes
atleast one button: I have two white star buttons (1 on hat and 1 on fabric yoyo)


Thank You!!

I have rec'd the Stylish Blog Award from two more bloggers and I would like to take a moment to thank them.  If you haven't checked out their blogs, be sure to do so.  I have previously passed this on, but I appreciate recieving it again. 

Thanks so much!!http://mommyscraftycreations.blogspot.com/

Thanks so much!!http://lovethatbug.blogspot.com/

Friday, February 25, 2011

A layout for Kaylee's Story "Cat Was Sad"

Well, Kaylee loves cats.  She has been a cat for Halloween twice and she has a plat vet set that she loves to pretend to fix up cats with.  So, now that she has been learning to read and write, she wrote a story about a cat.  She wrote this out on a piece of paper and cut it out so that I could put it in her scrapbook.  I decided to write the story out (which she dictated to me, to make sure I had it correct, lol) and add pictures.  I added her handwritten story to the second page and added a journaling tag as well.  I used the Create a Critter cartridge to cut the cats and the ball of yarn.  I hand drew the sad face on the cats.  The title part was cut with the Don Juan cartridge.

Here is a close up of the story where Kaylee wrote it.  (You have to love how kids spell everything exactly how it sounds) :)


I am entering this layout into the Thankful Thursday challenge at Crazy about Cricut.  The challenge is for your or a child to write a story about something or someone that they love.  You can find the blog here: http://www.crazyaboutcricut.blogspot.com/

Snowbunny Layout

I used the sketch from the Frosted Designs sketch challenge for this layout.  You can find their blog here: http://www.frosteddesigns.blogspot.com/
Here is the sketch:
For my layout, I used Gypsy Wanderings for the frames, Don Juan for the snowflakes and I welded them together to make a border, Winter Frolic for the bunny, and Don Juan for the font for my title.  I also outlined the frames and the snowflakes with a blue glitter pen and covered the snow flakes with Star Dust Stickles to give them some sparkle.


Thursday, February 24, 2011

Bowling Birthday Bouquet and Pin

Kaylee has already had a familiy birthday party and I gave her present to her then, but she is having a bowling party this Saturday for her friends from school.  I wanted to take a little something for her to this party, so I decided to make her a bowling bouquet and I also decorated a little wooden pin for her as well. 

For the bouquet, I started out with a little pink bucket from Party City.  To decorate the bucket, I used white vinyl to cut the bowler girl that is from an svg file from svgcuts.com and the letters for her name from the Don Juan Cricut Cartridge.  Then, I used the Nifty Fifties Cartridge for the bowling pins and ball.  The sentiment area was cut from Plantin Schoolbook and then I printed "All Lanes Lead to you having a happy birthday" directly onto the shape using the Cena font and then I added some faux stitching with a white gel pen around the edge.  I finally glued these all to dowels, inserted them into some styrofoam at the bottom of the bucket and filled it in with some pink shredded paper.

For the bowling pin, I had some little wooden pins that came from a kid's play set.  This is how the pin looked to begin with.
The pin was spray painted white and then I hand painted a pink stripe on the top. The K is cut from pink vinyl and the font is from the Don Juan Cartridge.  


I am entering this into the challenge at Celebrate the Occassion.  The challenge is "Anyting Goes" Birthday theme.  You can find the blog here: http://celebratetheoccasion.blogspot.com/

The Apple of My Eye

For this layout, I used the Create a Critter Cartridge for the apple, George and Basic Shapes for the frame around the page, and Don Juan for the title.  I outlined everything in white and added a lot of faux stitching with a white gel pen.  (I think I might have went a little crazy with the faux stitching, lol)  This is a picture of Kaylee with her two pawpaws (my grandfather and my dad)
I am entering this layout into the Terrific Tuesday Challenge at Scrappy Moms Stamps. Their challenge is to use Create a Critter.  You can find them here: http://www.scrappymoms-stamps.blogspot.com/

I am also entering this into the challenge at The Paper Variety.  Their challenge is to use some type of sewing: hand, machine, faux etc.  You can find them here: http://thepapervariety.blogspot.com/

Wednesday, February 23, 2011

Graphic 45 Decorated Box

Over at the Creative Cutter Room, they are having a challenge to use Graphic 45 paper right now.  I just recently found a few of these at the local craft store and have been wanting to use them, so this was the perfect opportunity.  You can check the CCR out here: http://www.creativecutter.org/.

I decided to alter a small box to use for sewing needles and thread. 
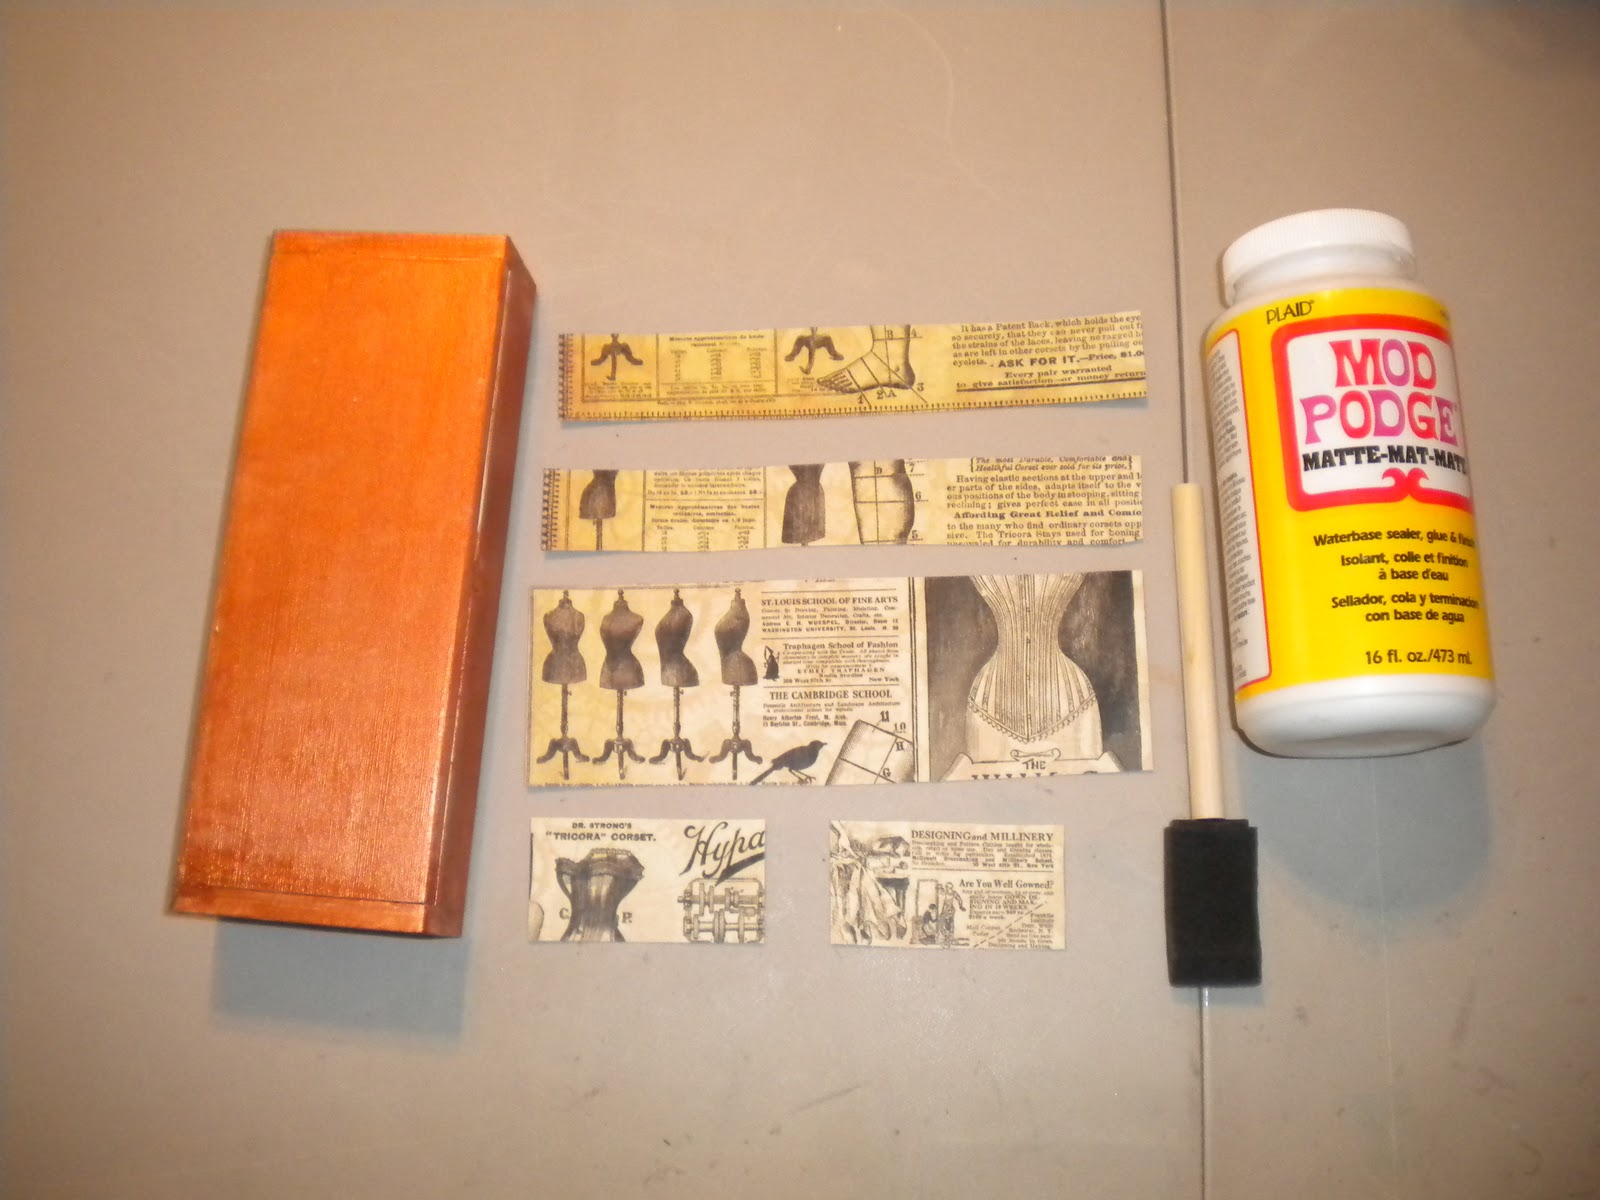
I started out with a wooden box from Hobby Lobby, I sheet of Graphic 45 Steampunk Debutante sheet of 12x12 paper, Folkart Acrylic Buttercream paint (used as a base coat), Pure Bronze Craft Paint (used as a top coat) and a Crackle Medium (I actually used this as a varnish for the top and not for crackle).
After the box was completely dry, I cut strips out of the paper to fit on the top, sides, front and back of the box from the sheet of paper.  I tried to cut the images that had dress forms and seemed to go with the sewing them.  I then used mod podge to attach these to the box and to coat them also.

Here are some more views of the box.


 Here is the box with some needles and thread inside.

You Rule The School Layout

I did this layout for the Off the Wall Craftiness Challenge.  You can check the her out here: http://offthewallcraftiness.blogspot.com/.  Here are the inspiration photo and colors for this challenge.

For my layout, I started out with a piece of Heidi Swapp paper for the background.  I used the Robotz Cricut Cartridge to cut the title out of red glitter cardstock.  I then used the Locker Talk Cartridge to cut the ruler out of the light yellow page.  I also used the yellow to put a background on each photo.  These pics are from the second awards day from school. 

Cooking with Cricut Challenge 18: Swirls and Twirls: Design Team Project

This week, at Cooking with Cricut, our challenge is Swirls and Twirls.  You will need to incorporate a swirl or twirl image on your project and remember to include a cricut cut as well.  To see all of the great projects by the Design Team and enter the challenge, click here: http://cookingwithcricut.blogspot.com/

For my layout this week, I used Melin's great Swirly Heart Frame cut file.  Be sure to visit http://www.papercraftingworld.com/ for this file and lots of other great files as well.  I sized it to fit the outside of the page.  Then, I used the Simply Charmed Cartridge to cut the wedding cake.  I then added some flowers and swirls of pearls to accent the page.  The background paper is a sheet from the SEI White Elegance stack.


Also, I have a quick tip for today.  Whenever I cut out a frame or border, I always keep the left over pieces that were cut to use also.  Here you can see the frame and inner section that was left after I removed the swirly heart frame.  These could both be used on other layouts.

Tuesday, February 22, 2011

Love me do wedding layout

Melin from Cooking with Cricut has created the greatest cut file of The Beatles called The Fab Four.  This file will soon be available at http://www.papercraftingworld.com/.  Be sure to stop by there and check out all of her files.

I was able to work with these cut files and I think they are so great.  I love The Beatles, so I decided to incorporate some lyrics from one of their songs into my layout.  I used a font called The Bootles and printed the lyrics onto a white sheet.  I then used the storybook cartridge to cut the frame for the lyrics.  I then used the George and Basic Shapes Cartridge to cut the outer frame, the inner square and the mat for the photo.  I then added The Fab Four to the bottom of the page.  I finally added a wedding picture of me and my hubby to the layout. 


I am entering this layout into the Scrappy Saturday's with my bug Challenge #2.  The challenge is: Something Lovely (use the word love, somebody you love, etc)  To enter the current challenge, go here: Scrappy Saturday's With My Bug

Birthday Chick Layout

The Tacky Tuesday challenge is to use the chick image from page 35 of Simply Charmed and use the word chick on your project.  To enter their challenge, check it out here: Tacky Tuesday Facebook Page

I started out with a green swirly background page.  I used the George and Basic Shapes cartridge to cut a thin frame out of white paper.  I then used the font from Once Upon a Princess to cut the title out of yellow vinyl.  I cut my Simply Charmed chick pretty large and then used Simply Charmed to cut a birthday hat and Carousel to cut a banner for the chicks hand. I outlined everything with a black marker, used a white pen to add faux stitching to the banner, and added some stickers to spell out party on the banner.  The picture is from Kaylee's family party of her and her scooter that she got from my sister, Britney.

Monday, February 21, 2011

Rainbow Cutie Layout

The challenge this week at My Sheri Crafts is All About Girls.  I love cutsie, girly stuff, so this challenge is right up my alley.  Be sure to check them out here: http://myshericrafts.blogspot.com/

I used the rainbow from the Simply Charmed Cartridge for my layout.  I embossed the cloud with the Divine Swirls Cuttlebug Folder and added some google eyes and a bow to dress it up.  I used a white gel pen to add faux stitching around the edges.  The frame is from Sugar and Spice and it was outlined with a blue glitter pen.  The title letters are stickers.


I am also entering this into the Creative Sister's Monday Challenge to use embossing.  You can find the challenge here: http://lindascreativity.blogspot.com/

Fantabulous Cricut Challenge 48: Emboss It: Design Team Project

It is time for another Challenge me Monday over at Fantabulous Cricut.  This week, our challenge is Emboss It.  You will need to use some type of embossing on your project and also remember to include a cricut cut as well.  Be sure to stop by the blog to see all of the great projects from the design team and enter your own project here: http://fantabulouscricut.blogspot.com/

For my project, I decided to make a layout for Kaylee's 7th birthday.  I wanted my layout to be bright and cheery, so I used a bright pink and green with some white for my colors.  I used the Birthday Bash cartridge for the 7, Sweet Treets cartridge for the title and confetti and the mouth on the seven is from Smiley Cards.  For my embossing, I used the Swiss Dots Cuttlebug folder on the title and confetti and then I used the Divine Swirls folder on the 7.  To finish it off, I outlined the title and then added a bow and google eyes to the 7. 


Sunday, February 20, 2011

Christmas from A-Z Layout

I have been trying to catch up my scrapbooking from the end of last year for Kaylee.  I had a ton of Christmas pictures that needed to be done and I found the perfect way to fit many of them into a 3 page layout.  I used the A-Z theme and let a picture represent each letter of the alphabet.  I used the Designer Calendar Cartridge for the title in the middle and the letters are stickers.  They were green with white dots and I used a red marker to color in some of the dots.  I also added some red and white dots around the page so it wouldn't be just green. Finally, I used a black pen to outline the letters and write the description for each letter under the pictures.  A few of the letters are C-cookies for Santa, I-insane socks, R-reaching to decorate the tree, etc.  You can click on each page to enlarge it if you want to see all of the picture descriptions.


 I tried to take a picture of all three layouts laying beside each other, but I couldn't get backed up enough to get all of it in there.

I am also entering this layout into the challenge over at Getting Cricky from A to Z challenge.  You have to create a project with an alphabet theme.  You can check her blog out here: http://www.gettingcricky.com/

Scrapbooking a Tornado

So, this probably seems like a really odd thing to scrapbook, but we have a lot of tornados around here.  When I was in high school, we actually had a very bad one that tore up a lot of the town and destroyed a few houses in my neighborhood.  It was really horrible.  Anyways, last year, Kaylee got to see her first tornado.  It passed right over my mom's house.  My sisters took pictures to send in to the news, and Kaylee wanted me to put it in her scrapbook.  Luckily, this one didn't touch down and didn't cause any major damage.  I used Smiley Cards for the mean cloud and the plain cloud to add the journaling to.

Saturday, February 19, 2011

Break Me Off a Piece of that Kit Kat "BARK"

Well, Kaylee's yorkie Toby got himself a Kit Kat bar, lol.  Of course, my sister got a picture of this and I thought it would be great to scrapbook.  I found the Kit Kat font online and printed the title directly onto the page.  I thought it would be funny to do a play on the Kit Kat song and change the bottom to say bark.  I then matted the picture and added some Hershey bar stickers to the page.  I really love this picture and think the page turned out so funny.


I am also entering this into the monthly challenge for February over at the Smart Buy Gal forum.  The challenge is to make a project with the theme of Chocolate.

Friday, February 18, 2011

Rock N Bowl Layout

I found a new challenge blog (new to me that is) today.  It is Frosted Designs.  You can check them out here: http://www.frosteddesigns.blogspot.com/.  The challenge is to make a project without using any patterned papers.

I made a bowling layout from pictures of the first time Kaylee went bowling.  Most of you know that we are big bowlers in my family. :)  I used a reddish-orange paper for the background.  I then used white vinyl and the Nifty Fifties Font to cut the title "Rock N Bowl". (I used vinyl so it would be easy to place on the layout).  I also used the cartridge to cut the pin and ball.  I then outlined everything in black and added some retro bowling stickers that I found at Hobby Lobby.  Finally, I added some faux stitching with a white gel pen around the outer edge of the layout.


Wedding Layout

I haven't played along with the More than Favors challenge in a while, but this week the theme was Weddings and I thought this would be a great time for me to work on one of my wedding layouts.  As you all know, I just recently started working on scrapbooking my wedding that was in 2001. Be sure to check the blog out here: http://morethanfavors.blogspot.com/

For my layout, I used a piece of paper from the DCWV wedding pack to make a frame around the outside of the page and to make a matt for the picture.  For the base page, I used a page from the SEI White Elegance stack.  I then used the Simply Charmed Cartridge for the bride and groom.  I used some Pebbles chalk on the cheeks and the flowers as well.