


I am sure most of you know we had some major weather and tornados in Alabama yesterday. We are completely without power and not expected to get it back until possibly Tuesday. My home and my family's home is okay and did not get damaged, but there is a lot of damage and many people around here who lost everything.
We have relocated to my grandparent's house in Tennessee and will be here until the power comes back. I have no crafting supplies and limited internet, so will probably not be around for the rest of the week and into next week much.
Keep Northern Alabama in your prayers and I will be back when I am able.
Thursday, April 28, 2011
Wednesday, April 27, 2011
Cooking with Cricut Challenge 27: Spring Flowers: Design Team Project
It's time for another challenge at Cooking with Cricut. This week, we are challenging you to use spring flowers in your project: daffodils, dandylions, tulips, etc. Be sure to check out all of the projects by the other design team members and enter your own project at http://www.cookingwithcricut.com/.
For my project, I decided to go with a spring sign. The base for this sign came from Hobby Lobby. I then used various colors of vinyl and the Easter 2010 Cricut Cartridge for my cuts to decorate the sign.

For my project, I decided to go with a spring sign. The base for this sign came from Hobby Lobby. I then used various colors of vinyl and the Easter 2010 Cricut Cartridge for my cuts to decorate the sign.

Sunday, April 24, 2011
Tons of Fun
Hope everybody had a Happy Easter. This afternoon, I decided to work on a layout after I got home from my parents house. This is from the circus pictures that I am still working on. I used the Batman Cartridge for the font and Paper Dolls Dress Up for the elephant.


Friday, April 22, 2011
Egg Hunt Layout
I found the cutest tiny egg embellishments at Hobby Lobby, so I wanted to make an Egg Hunt Layout using them. After the layout was finished, I added some of the eggs to the tree and around the grass as well. I added one larger, golden egg to the hole inside the tree. I used the following Cricut Cartridges for this layout:
Robotz - Font (outlined in blue)
Paper Doll Dress Up - Clouds (inked with blue and outlined also)
Zooballoo - Grass (chalked)
Live Simply - Trees
Create a Critter - Rabbit (added google eyes)
Easter 2010 - Large Egg (added gold stickles)
Frames - Storybook


Robotz - Font (outlined in blue)
Paper Doll Dress Up - Clouds (inked with blue and outlined also)
Zooballoo - Grass (chalked)
Live Simply - Trees
Create a Critter - Rabbit (added google eyes)
Easter 2010 - Large Egg (added gold stickles)
Frames - Storybook


A couple of Owl Sewing Projects
I have a couple of sewing projects to share with you all today. You know I love owls, so I am sure it is no surprise that I would be using my new sewing machine to make owl projects, lol. They are not perfect, but I am pleased with them since I have only been sewing a short while now.
First, I made this owl pin cushion. I found a video with instructions for this on the DIY network page.
 Next, I decided to try my hand at a purse and found the cutest owl fabric at Hobby Lobby. I couldn't find a pattern for a purse exactly like I wanted, so I kind of winged this. It is similar to a hobo bag.
 Earlier this week, my sister took me to a fabric outlet in Tennessee, and I got these little iron on patches that say Created by, so I put one of those inside the purse on the liner part.

First, I made this owl pin cushion. I found a video with instructions for this on the DIY network page.


Thursday, April 21, 2011
Vinyl Bucket for Easter Basket
I decided that instead of using a traditional Easter basket, I would decorate a bucket for Kaylee, so she could use it after Easter. I got this bucket at the Dollar Store. I used the George and Basic Shapes Cartridge for the circle cuts and the Storybook Cartridge for her name. All were cut out of green vinyl. I then used some green ribbon with polka dots on it to tie a bow to each handle.
 Here is a picture of the finished basket with all of the goodies I made for her. I think it is a little bit overstuffed, lol.


Wednesday, April 20, 2011
Easter Cards
I finally finished up my Easter Cards. So, I decided to just post them all together instead of a bunch of different posts.
First, the lamb card was made with the Easter 2010 Cricut Cartridge. The inside says "Hope "ewe" have a Happy Easter"
 Next, I made an Egg Shaped Card. I decided to just keep it white and add a bow to dress it up. The egg was cut from Smiley Cards. The inside of this card says "Hope you have an "egg-celent" Easter!"
 For this next card, I used Wild Card for the base and a Dustin Pike image for the middle. The sentiment says "Somebunny loves you". I added some white ribbon and a white bow.
 For the next card, I used Wild Card for the base and Create a Critter for the carrots. The sentiment says "If you "carrot" all, Have a Happy Easter."
 And for the last card, I got this idea from a card I saw over at Musings of a Craft Mom by Jen. The base is from Wild Card and the Bunnies are from the Easter 2010 Cart. I used a scallop circle punch on them. The speach bubbles are from Create a Critter and say "My butt hurts" "What? I can't hear you"

First, the lamb card was made with the Easter 2010 Cricut Cartridge. The inside says "Hope "ewe" have a Happy Easter"


Cooking with Cricut Challenge 26: Easter: Design Team Project
It's Wednesday again, and time for a new challenge over at Cooking with Cricut. This week, we are challenging you to use your Cricut and make an Easter project. Be sure to check out all of the other projects by the design team and enter the challenge here: http://www.cookingwithcricut.com/ .
For my project, I decided to make an Easter sign. I went with a bunny theme and the word hop.
 To make this, I started out with some chipboard letters from Hobby Lobby and Krylon Satin Finish purple sray paint.
 After the paint had dried, I used white vinyl and cut some circles out using the George and Basic Shapes Cartridge for the letters. I then used hot glue to attach the letters together. I wanted to add a little bit more stability, so I added some dowels to the back to give it extra support.

 Now I was ready to add my bunnies. I wanted to do something a little different for each letter. For the H, I cut my bunny out from the Paper Doll Dress Up Cartridge and then attached him to the H with hot glue. I wanted his hands to be sitting on the middle of the H.
 For the O, I used the Birthday Bash cartridge to cut a bunny to be sitting in the center of the O.
 Finally, for the P, I decided to make a little bunny that was hanging on the side of the letter. I used the Create a Critter Cartridge for this bunny.

For my project, I decided to make an Easter sign. I went with a bunny theme and the word hop.


I am also entering this into the following challenges:
Tuesday Throwdown: Polka Dots: http://tuesdaythrowdown.blogspot.com/
Wacky Wednesday at More than Favors: Easter: http://morethanfavors.blogspot.com/
Tuesday, April 19, 2011
"Peep"ing Tom Card
I love the cute peep shapes, so I wanted to make a card with one of them. I had a lot of different ideas and finally settled on a funny idea having the peep be a "Peep"ing Tom. For the base of the card, I used the Wild Card Cartridge. I used a piece of plastic to cover the window area so it would look like a real window. I used the George and Basic Shapes Card for the window seal, Plantin Schoolbook for the grass and Graphically Speaking for the arrow. I then outlined the white pieces in black, chalked the grass, and added some flower buttons and hand drawn stems to the grass area. The Peep was cut in SCAL. Finally, I used some stickers to put TOM at the top. For the inside sentiment, I wrote "Just "peep"ing in on you to make sure you have a Happy Easter!"

 I am entering this into the Peep challenge from the "Hanging with my Peeps" hop over at Amanda's Crafts and More. You can find her blog here: http://amandascraftsandmore.blogspot.com/
I am also entering this into the Bunny Challenge at Jen's Crafty Corner here: http://www.jenscraftcorner.com/?p=686


I am also entering this into the Bunny Challenge at Jen's Crafty Corner here: http://www.jenscraftcorner.com/?p=686
The Hop-A-Dile
My hubby had the idea to put bunny ears on a Crocadile and call it the Hop-A-Dile for Easter, so I decided to make a card with his idea. I used the Twinkle Toes cartridge for the base of the card and Create a Critter for my Crocaile (I think he is more of an alligator, but it works). The Ears were cut from 3 Birds on Parade. For the sentiment, I hand wrote "Move over Easter Bunny, The Hop-A-Dile is here". I then added some faux stitching around the outside of the card and also added some mini eggs and google eyes. (Sorry about the pic, I had trouble getting this to photograph good because of the bright colors)
 The challenge this week at Off the Wall Craftiness is Easter with Bright Colors. The inspiration photo is below and you can find the blog here: http://offthewallcraftiness.blogspot.com/


Monday, April 18, 2011
Bunny Paint Can
I think this is the last item that I have turned into a bunny, lol. I made this paint can bunny rabbit and filled it up with gummy bears for Kaylee's Easter Basket. I started out with a mini paint can that you can purchase at Lowes for $2.97 and spray painted it white. Next, the face was drawn on with a pencil and then filled in with paint markers. I then used the 3 Birds on Parade Cartridge to cut the ears and hot glued them to the back after added some pink to the center with a colored pencil. For the final touch, I added a little white pom pom ball to the back.

 I am linking this up to the challenge at Fantabulous Cricut. Their challenge this week is Do the Bunny Hop and you need to include a bunny or chick in your project. You can find them here: http://fantabulouscricut.blogspot.com/


Winner of Cupcake Lite Cartridge
Thanks so much to everyone who joined us for the Basket Case Blog Hop. Welcome to all of my new followers, I am so glad to have you hear.
Now, what everyone has been waiting for, the winner of the Cupcake Lite Cartridge. The winner, randomly picked using random.org is:
Anniebee said...
These are adorable! I love powdered donuts and wouldn't the kids love to find one of these in their lunch boxes? They'd be the envy of everybody at school! LOL! Thanks for sharing this awesome idea.
Anne
anniebeescraftroom.blogspot.com
Congratulations Anne! Send me an email at jean1982@aol.com and I will get this mailed out to you!
Sunday, April 17, 2011
Sew Cute Bunny Basket
I found the cutest pattern for a bunny basket over at Kiki Creates and I wanted to give it a try. I actually did my basket different from hers and only used three panels for the outside. It is not perfect by any means, but I was very happy with how it turned out since I have been sewing less than a week.
Over at Crafting Misfit, she is having a blog hop that is all about trying something new, so I am linking this up with her here: Crafting Misfit Blog Hop. Sewing is definitly a new experience for me. :)

Over at Crafting Misfit, she is having a blog hop that is all about trying something new, so I am linking this up with her here: Crafting Misfit Blog Hop. Sewing is definitly a new experience for me. :)

Bunny Popcorn
I'm keeping with the bunny theme with Easter coming up. I have a few bunny projects to share with you this week. For today, I made some Bunny Popcorn for my sisters for easter.
To make these, you will first wrap the package of popcorn in a piece of white cardstock and secure on the back with tape. Next, use hot glue to attach some google eyes in the size you like. After the eyes are in place, I used a marker to hand draw the face of the bunny. Next, I used the 3 Birds on Parade cartridge to cut a pair of bunny ears, added a pink center and then hot glued them to the back of the popcorn and folded them over and hot glued the front down so the ears to shape the ears how I wanted. To finish him off, I added a computer generated label that says "Popping by to say, Have a Happy Easter Day!".

 I am entering these into two challenges:
My Sheri Crafts: Bunnies: http://myshericrafts.blogspot.com/
Crazy About Cricut: Cricut Everyday Challenge about something you love: I love Easter, I really love popcorn and I made this for sisters that I love also: http://crazyaboutcricut.blogspot.com/2011/04/today-is-my-birthday-exclusive-cart.html
Jen's Crafty Corner: Bunny Challenge: http://www.jenscraftcorner.com/?p=686
To make these, you will first wrap the package of popcorn in a piece of white cardstock and secure on the back with tape. Next, use hot glue to attach some google eyes in the size you like. After the eyes are in place, I used a marker to hand draw the face of the bunny. Next, I used the 3 Birds on Parade cartridge to cut a pair of bunny ears, added a pink center and then hot glued them to the back of the popcorn and folded them over and hot glued the front down so the ears to shape the ears how I wanted. To finish him off, I added a computer generated label that says "Popping by to say, Have a Happy Easter Day!".


My Sheri Crafts: Bunnies: http://myshericrafts.blogspot.com/
Crazy About Cricut: Cricut Everyday Challenge about something you love: I love Easter, I really love popcorn and I made this for sisters that I love also: http://crazyaboutcricut.blogspot.com/2011/04/today-is-my-birthday-exclusive-cart.html
Jen's Crafty Corner: Bunny Challenge: http://www.jenscraftcorner.com/?p=686
Saturday, April 16, 2011
It's a Basket Case Blog Hop: Day 2: Bunny Doughnuts
Welcome back to day two of the It's a Basket Case Blog Hop hosted by Rhonda of http://scraphappenswithrhonda.blogspot.com/ If you have just stumbled upon my blog and would like to play along, please visit Rhonda to start. If you have arrived here from http://youhadmeatscrap.blogspot.com/ you are in the right place. We will be showcasing Easter baskets and Basket Filler ideas for you and have giveaways along the way.
I am so glad that you have joined us for a second day of great Easter ideas. Today, I decided to make a basket stuffer to share with you. Who wouldn't love to get a pack of white doughnuts dressed up like Easter Bunnies!

 To make these, you will need to start with the individual 4 packs of doughnuts. I used the Little Debbie Cakes brands. You get 6 packs of 4 for $1.99 and they do not have any writing on the front of the packages.
 You will turn these over and hot glue a medium sized puff ball to the back of your bunny. When attaching the items, be sure to not smash them down, because you don't won't to crush any of your doughnuts.
 Now, you are ready to make the cuts for the front of the doughnuts. For the face, I used the Create a Critter bunny rabbit and just cut the head off of the body. You will need to cut the bunny at a size of 3.56W x 4.76H and use all of the layers to complete the face. For the arms and feet, you will need ovals cut from George and Basic Shapes. You will need two of each cut as follows: arms at a size of 1.09W x 1.47H and feet at a size of .84W x 1.14H. Once these were cut, I added pink lines with a pen and some pink chalk to them.
 Now, you will just need to hot glue these onto the doughnuts to finish them up. You could also add additional embellishments if you wanted to liven them up more, like a bow on the ear, ribbon around the neck, google eyes, etc. I liked the simple look of them and decided to leave them as they were. :)
 Now, on to the blog candy. Remember, I am giving away the Cricut Lite Cupcake Cartridge to one follower that will be randomly chosen from all comments from today and yesterday's blog hop posts. To be elgible, you need to be a follower and leave a comment on this post. Be sure to leave a comment on the Day 1 post for a second chance to win. I will announce the winner on Monday, April 18th.
 Your next stop on the hop is My Fantabulous Life . Go over and see what she has in store for you. Thanks so much for hopping along with us and a special Thank You to Rhonda for hosting this blog hop also.
I am so glad that you have joined us for a second day of great Easter ideas. Today, I decided to make a basket stuffer to share with you. Who wouldn't love to get a pack of white doughnuts dressed up like Easter Bunnies!


Friday, April 15, 2011
It's a Basket Case Blog Hop: Day 1: Bunny Easter Bags
Welcome to the It's a Basket Case Blog Hop hosted by Rhonda of http://scraphappenswithrhonda.blogspot.com/. If you have just stumbled upon my blog and would like to play along, please visit Rhonda to start. If you have arrived here from you had me at scrap you are in the right place. We will be showcasing Easter baskets and Basket Filler ideas for you and have giveaways along the way.
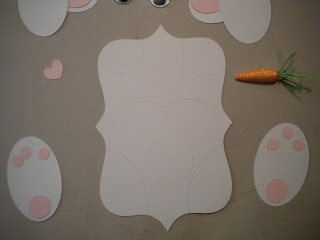
For today's project, I have a cute Bunny Bag to share with you.
 For these bags, I used the following Cartridges: Storybook, Sentimentals, Create a Critter and George and Basic Shapes. You will need the following cuts to complete this:
Storybook Marquee: For the bunny base (cut twice) at size 6.2W x 8.86H
George and Basic Shapes Ovals: You will need 4 for the base of ears cut at 2.65W x 3.59H, two in pink for the inner part of ears cut at 1.96W x 2.65H, 2 for feet cut at 2.65W x 3.59H, and two welded together for the cheeks at a size of 1.61W x 2.18H
George and Basic Shapes Circles: You will need these for the inner circles on the feet 2 at 1.07Wx 1H and 6 at .57W x .53H
Create a Critter heart: For the nose cut at a size of 1.26W x 1H
Sentimentals Scallop Circle: This will be used for the hands. You will hand cut sections of 4 scallops for each hand. Cut the circle at a size of 2.72W x 4.88H
You will also need google eyes for the face and I have used a small carrot piece and bow from Hobby Lobby to embellish my bunny.
 Next, I layed all of the pieces out to see how they would fit and used a pencil to trace around each area so I would make sure and glue the objects correctly in place.

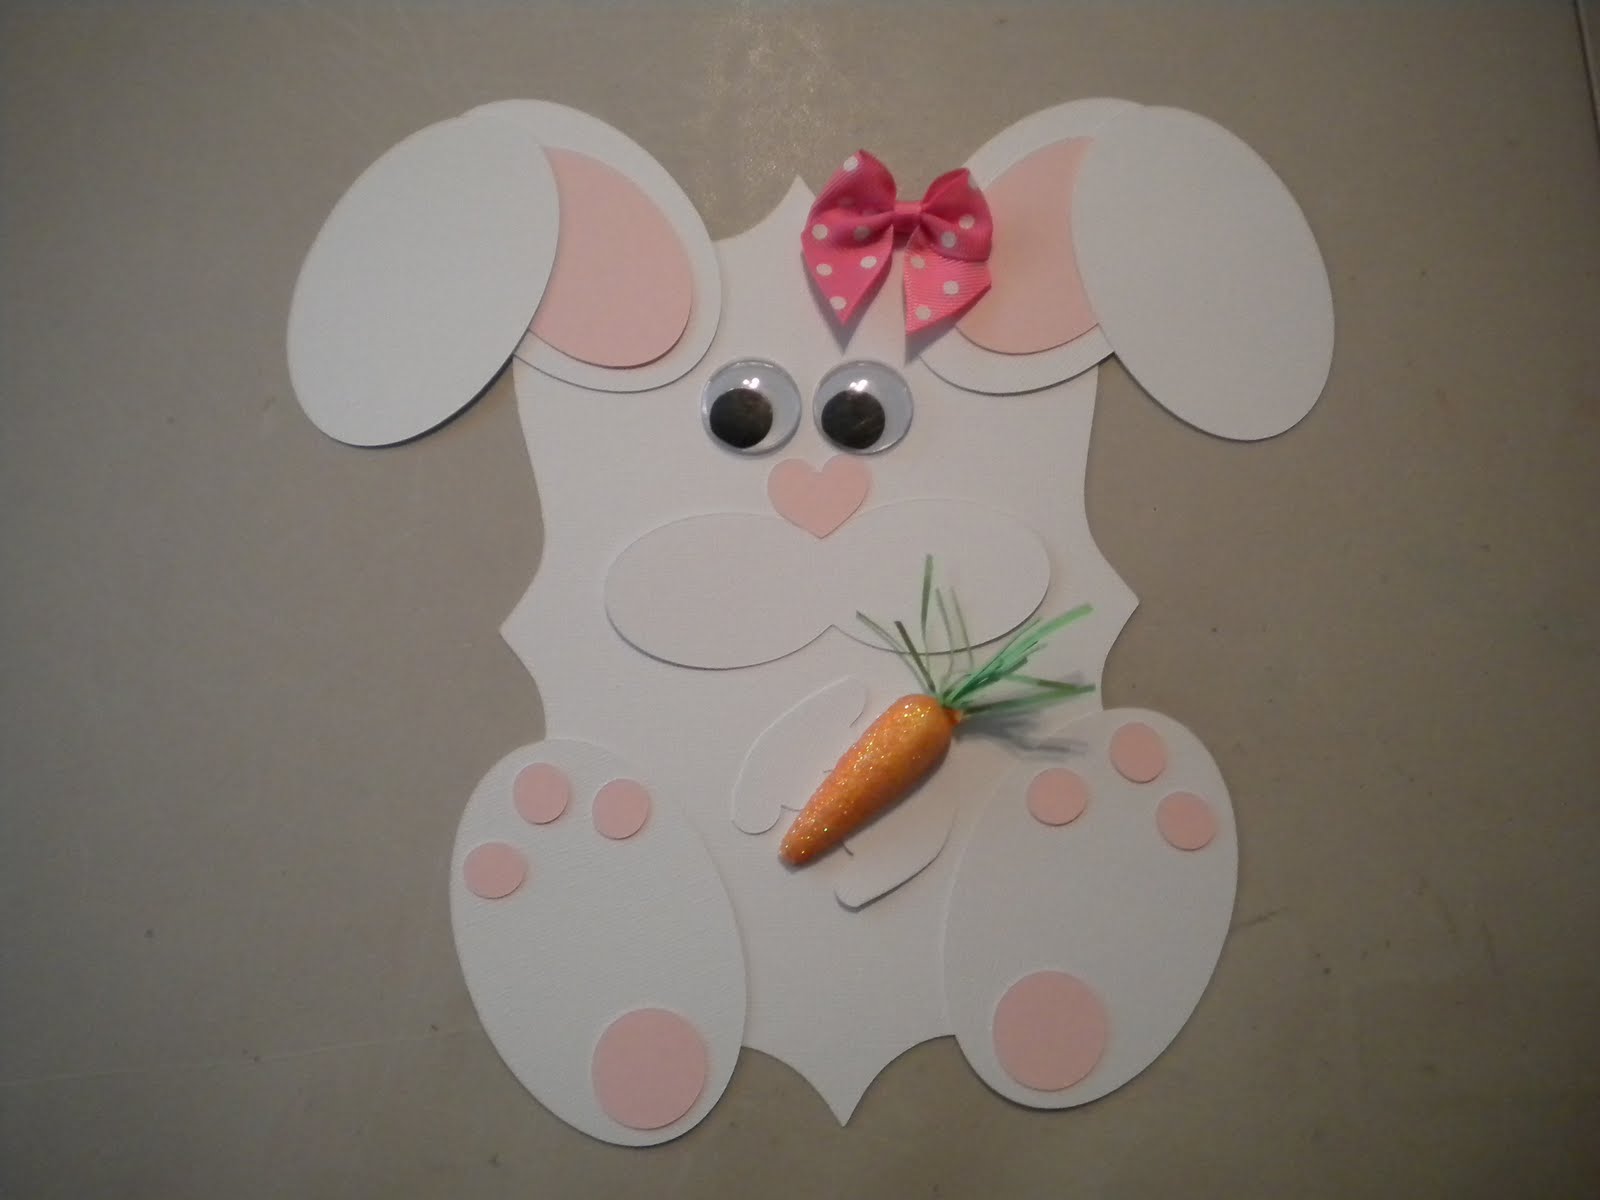
 Now, I outlined everything in black and drew the whiskars. Then, I used hot glue to attach everything to the front of the bunny and I glued a large pom pom to the back piece of the bunny.
 Next, I got a white paper lunch sack and cut it to the size that I wanted the inner bag to be. Once this was ready, I simply used hot glue to put the front and back on my bunny.
 I made three of these in total for the my sisters for Easter.
 Now for the blog candy. I will be giving away a Cricut Lite Cupcake Cartridge. To be elgible for the giveaway, be sure to become a follower if you are not already and leave a comment on this post. You can also leave a comment on tomorrow's post for an additional chance to win. I will use random.org to select a winner and announce the winner on Monday, April 18th.
 Your next stop on the hop is My Fantabulous Life . Go over and see what she has in store for you. Remember to stop back by tomorrow for a great idea for a basket stuffer I have to share with you all.
I am also linking these up to the bunny challenge at Jen's Craft Corner here: http://www.jenscraftcorner.com/
For today's project, I have a cute Bunny Bag to share with you.

Storybook Marquee: For the bunny base (cut twice) at size 6.2W x 8.86H
George and Basic Shapes Ovals: You will need 4 for the base of ears cut at 2.65W x 3.59H, two in pink for the inner part of ears cut at 1.96W x 2.65H, 2 for feet cut at 2.65W x 3.59H, and two welded together for the cheeks at a size of 1.61W x 2.18H
George and Basic Shapes Circles: You will need these for the inner circles on the feet 2 at 1.07Wx 1H and 6 at .57W x .53H
Create a Critter heart: For the nose cut at a size of 1.26W x 1H
Sentimentals Scallop Circle: This will be used for the hands. You will hand cut sections of 4 scallops for each hand. Cut the circle at a size of 2.72W x 4.88H
You will also need google eyes for the face and I have used a small carrot piece and bow from Hobby Lobby to embellish my bunny.


I am also linking these up to the bunny challenge at Jen's Craft Corner here: http://www.jenscraftcorner.com/
Wednesday, April 13, 2011
Spring into Easter
I made this card for the So Saturday Challenge at Card Creations and More by C. The challenge is anything Spring. You can check her blog out here: http://cardcreationsbyc.blogspot.com/
I think Easter and Spring go together, so I decided to make an Easter card. I used the Wild Card Cartridge for the base and used a white gel pen to add faux stitching to the edges. Next, I added some mini buttons to each scallop to give the card a punch of color. The bunny is a digistamp from Dustin Pike and I colored it with Prismacolor Colored Pencils. I used an Action Wobble to attach it to the card and then added some black lines to make it look like the bounce from the pogo stick. Finally, I cut a little white frame from the Storybook Cartridge and added the words Spring into Easter.

I think Easter and Spring go together, so I decided to make an Easter card. I used the Wild Card Cartridge for the base and used a white gel pen to add faux stitching to the edges. Next, I added some mini buttons to each scallop to give the card a punch of color. The bunny is a digistamp from Dustin Pike and I colored it with Prismacolor Colored Pencils. I used an Action Wobble to attach it to the card and then added some black lines to make it look like the bounce from the pogo stick. Finally, I cut a little white frame from the Storybook Cartridge and added the words Spring into Easter.

Hanging With My Peeps Layout
I made this layout this afternoon for a couple of challenges. For the peep shape, I found a shape online and then used the SCAL program to trace it and make in a scut file. I used the font Brush455 BT to cut out the title. I then outlined the title and the peeps and added a little nose and eyes to the peeps. For the frame, I used the Storybook Cricut Cartridge to cut the marquee shape twice and then outlined them as well.

 I am entering this into the following challenges:
Peep Blog Hop Challenge: http://amandascraftsandmore.blogspot.com/
Fantabulous Cricut: Spring Fling (Use pink, yellow and green): http://fantabulouscricut.blogspot.com/
Off The Wall Craftiness: Inspiration photo and colors below: http://offthewallcraftiness.blogspot.com/


Peep Blog Hop Challenge: http://amandascraftsandmore.blogspot.com/
Fantabulous Cricut: Spring Fling (Use pink, yellow and green): http://fantabulouscricut.blogspot.com/
Off The Wall Craftiness: Inspiration photo and colors below: http://offthewallcraftiness.blogspot.com/


Subscribe to:
Posts (Atom)