


Monday, January 30, 2012
Motivation Board
I made this motivation board last week. I am going to use this in my craft room and clip different motivational sayings to it. To make this, I started out with a piece of Artist Panel in a size of 6x12 and spray painted it black. After that was dry, I used SCAL with my Cricut and white vinyl to cut the title using Ariel Black and the Dinosaur chasing the little guy is a screensaver image that I traced in SCAL to make it into an svg. After they were on the board, I added a coat of Mod Podge to secure them and then hot glued two metal clips to the board so that I would be able to clip my sayings to it.

Friday, January 27, 2012
Melted Crayon Art
I have seen lots of things done with these melted crayons on Pinterest and I wanted to give it a try. I fell in love with the pictures that looked like it was raining from the crayons and had to make one for myself. Here is how it turned out. I love the textures of the melted crayons.
 To make this, I started out with a canvas that was size 7x9. I used black vinyl to make the cuts, the couple is from the Sweethearts Cricut Cartridge and the umbrella is from the Forever Young Cartridge. I then put a coat of Mod Podge over the image only to secure it down on the canvas.
 Now, I was ready to get set up for the crayons. I purchased one of the $3 glue guns at Hobby Lobby with a 40% off coupon for this, because you will not be able to use the glue gun for anything but crayons after this. The crayons will splatter, so you want to cover up the area you will be working in. I took two posterboards and secured them to the wall and floor in my area. I also used blue painter's tape to cover up my image. While my glue gun was heating up, I removed all of the wrappers from the crayons.
 After the glue gun was heated up, I started running the crayons through it and making drips down the canvas. I began with grey crayons and then used different shades of light and dark blues.
 You can use as many or as few crayons as you want depending on what type of look you are wanting to achieve. Once I was happy with how my canvas was covered, I removed the painter's tape and very carefully added some melted crayon in around the image.
 Once it was all dry, I cleaned up my mess and was very happy with the results. Here are a couple of pics to show you the textures better from the crayons.


Wednesday, January 25, 2012
Heart Wreath: Decorate to Celebrate Challenge 17: Valentine's Party: Design Team Project
It is time for a new challenge over at Decorate to Celebrate. Our new challenge is to create something for a Valentine's Day Party. Be sure to stop by and check out all of the projects by the design team and enter your party decoration here: http://decoratetocelebrate.blogspot.com/.
For my project, I decided to make a heart wreath decoration. I think it turned out nice and will make a great Valentine's Decoration.
 I started out with a heart shaped wreath form from Hobby Lobby, red yarn and the hot glue gun.
 I used the hot glue gun to secure a piece of yarn to the wreath and then began wrapping it tightly around the wreath. I used the glue periodically to secure the yarn and continued to wrap. The curves made it a little bit tricky and it took longer to wrap than your normal circle wreath.
 Here is the yarn after it was finished being wrapped with yarn.
 I then took a piece of fringe white ribbon and pinned it to the wreath to make a loop to hang it up. I wanted the heart to hang to the side, so that is why I placed the ribbon where I did on the wreath.
 Finally, I used the Home Decor Cricut Cartridge to cut the word love out of white cardstock. I cut it out a couple of times and glued them together to give it some stability. I then hot glued it to the wreath to finish it off.

For my project, I decided to make a heart wreath decoration. I think it turned out nice and will make a great Valentine's Decoration.


Monday, January 23, 2012
Sympathy Card
I have not been able to find much time for crafting, but I fit in some time this morning to make a sympathy card. I made this card for the "I Feel The Love Project" over at Madison's blog http://funkycards.blogspot.com/. Be sure to stop by and read more about this project here and consider making a card to send.
For this card, I used the Wild Card Cartridge for the base and the sentiment. I then used A Child's Year for the silhouette. I outlined the cuts with an art pencil and I added some small dots around the edges with a white gel pen.

For this card, I used the Wild Card Cartridge for the base and the sentiment. I then used A Child's Year for the silhouette. I outlined the cuts with an art pencil and I added some small dots around the edges with a white gel pen.

Wednesday, January 18, 2012
Countdown to Valentine's Day
I was able to fit in a small amount of crafting time and worked on this Countdown for Valentine's Day for Kaylee. I think she will enjoy the countdown and since her birthday is only two days after, she can be sort of counting down till then also.
 I had these mini clothespins with red hearts on them that I purchased at Michaels a couple of years ago and have never used them. I used a black sharpie marker to add the numbers onto the hearts.
 Next, I took an Artist Panel that was a size 6x12 and hot glued the clothes pins for the countdown onto the board.
 After they were attached, I measured the space left and used the Cricut to cut the saying out of red vinyl. I used the Batman Cartridge for the font and the Create a Critter for the heart.
 I then put a coat of Mod Podge over the vinyl to make sure it would stay down and not be peeling up off of the panel.
 Finally, I took Sixlets Candy in Valentine colors and attached them to each day of the countdown using the clothespins. Because of the clothespins, it will be easy to reuse this countdown each year.

 I am entering this into the following challenges:
Docerela Creations: Valentine's Day using Cricut Cuts: http://blog.docerelashop.com/
Whimsical Wednesday: Anything goes: http://www.whimsical-designs.com/


Docerela Creations: Valentine's Day using Cricut Cuts: http://blog.docerelashop.com/
Whimsical Wednesday: Anything goes: http://www.whimsical-designs.com/
Monday, January 16, 2012
Another Sewing Project
I have not had much crafting time lately, but I am hoping to get caught up on some layouts this week. Hopefully, I will have some to share by the end of the week. However, I do have another sewing project to share today. I made this inhaler case for Kaylee to clip onto her backpack. I just made a simple square pouch. I used flannel material for the pouch and the inside is a plain white material. I used a small piece of velcro to hold the case together and added a clip to the side so that it could be attached to her backpack. The finished pouch is about 4 inches wide and when closed about 6 inches tall.


Friday, January 13, 2012
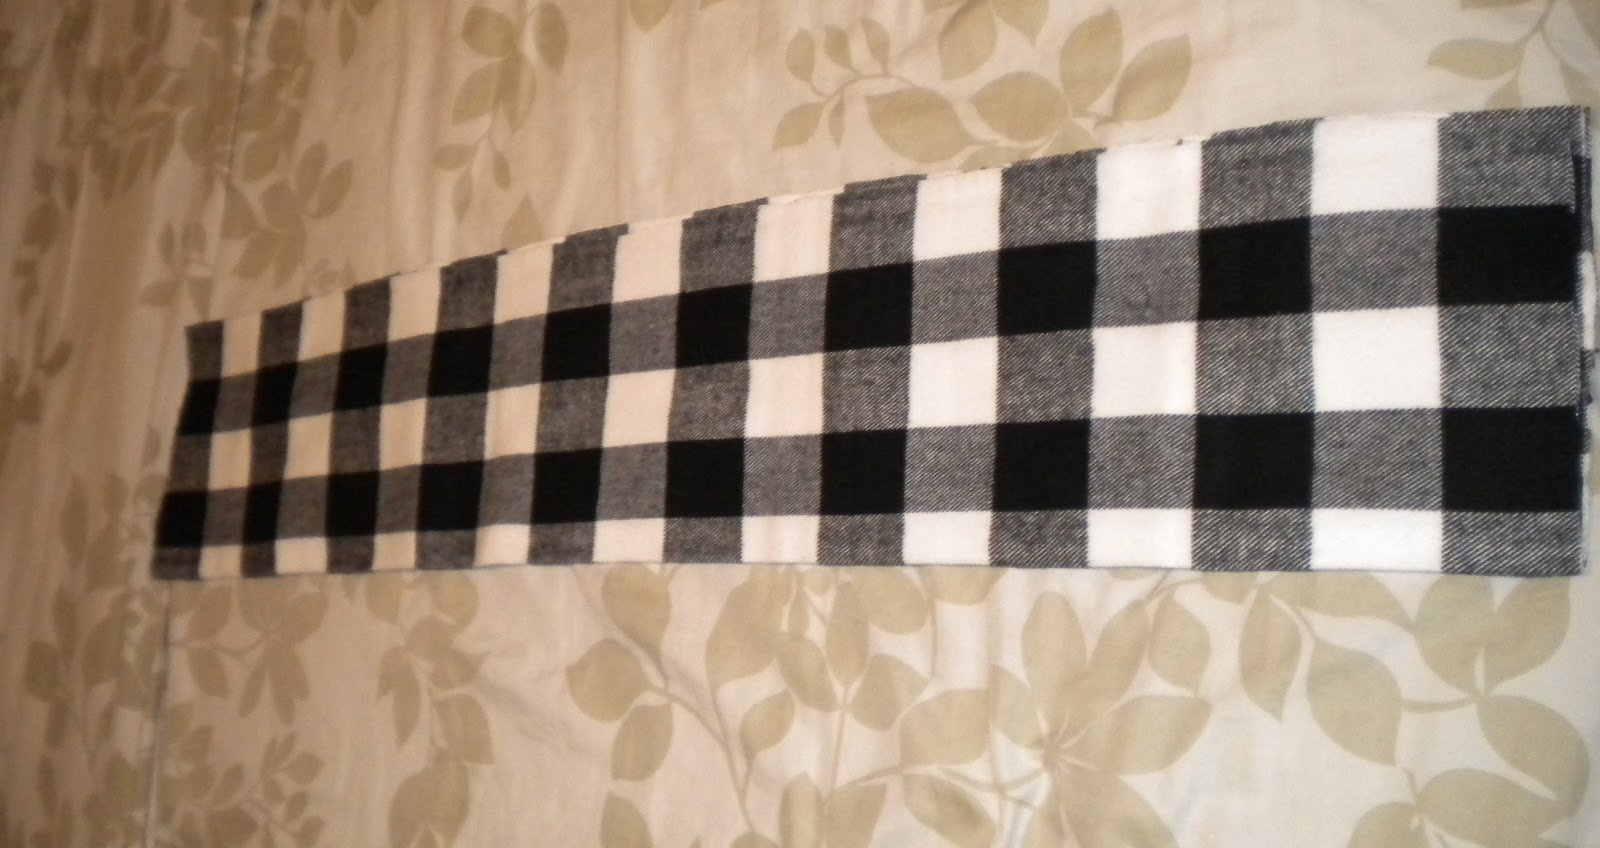
Scarves (Infinity and Regular)
I have been wanting an infinity scarf for a while now, but now wanting to pay what they were charging for them, so I decided to make one for myself. I absolutely love how it turned out. Here is a picture of the finished scarf.
 The fabric that I used is flannel and came from Hobby Lobby. I started out by cutting four strips of fabric at a size of 7 1/2 inches wide and 38 inches long.
 I then put two of the strips together with wrong sides facing and sewed up the two sides and one end. Once finished sewing, I used the open end to turn the fabric inside out and did this for the other two pieces of material also.
 Now, you need to connect the two pieces of fabric together. Be sure to pin the edges up on the inside, so you will have a clean line. Once this is ready, simply sew across to attach the two pieces of material together. Once that is attached, you can roll the fabric around and sew up the other end so that you have a loop of fabric. This is what makes this an infinity scarf.
 After making this scarf, I decided to make another scarf with some red flannel material that I found at JoAnns. For this one, I wanted to make it a regular scarf, so I followed the steps above, but I did not attach the scarf at both ends. The open ends were tucked together and sewn and that finished the scarf off.


Wednesday, January 11, 2012
Decorate to Celebrate Challenge 16: Anything Goes Party: Design Team Project
It is time for a new challenge over at Decorate to Celebrate. This week, the challenge is a decoration for Any type of party. Be sure to stop by and see all of the projects by the design team and enter your own party decoration here: http://decoratetocelebrate.blogspot.com/.
I decided to make some Valentine Party Cups. I started out by getting these red plastic cups at Walmart. The pack of 4 were only $1. You can get these cups in about any color you can think of and they are super easy to make for any occassion. I used white vinyl to decorate the cups. The cupid was cut from the Sweethearts Cricut Cartridge and the sentiment on the back was cut from the font on the Batman Cricut Cartridge. I decided to go for a more fun sentiment and spell the I Love You a little more fun and went with "I LUV U".

I decided to make some Valentine Party Cups. I started out by getting these red plastic cups at Walmart. The pack of 4 were only $1. You can get these cups in about any color you can think of and they are super easy to make for any occassion. I used white vinyl to decorate the cups. The cupid was cut from the Sweethearts Cricut Cartridge and the sentiment on the back was cut from the font on the Batman Cricut Cartridge. I decided to go for a more fun sentiment and spell the I Love You a little more fun and went with "I LUV U".

Monday, January 9, 2012
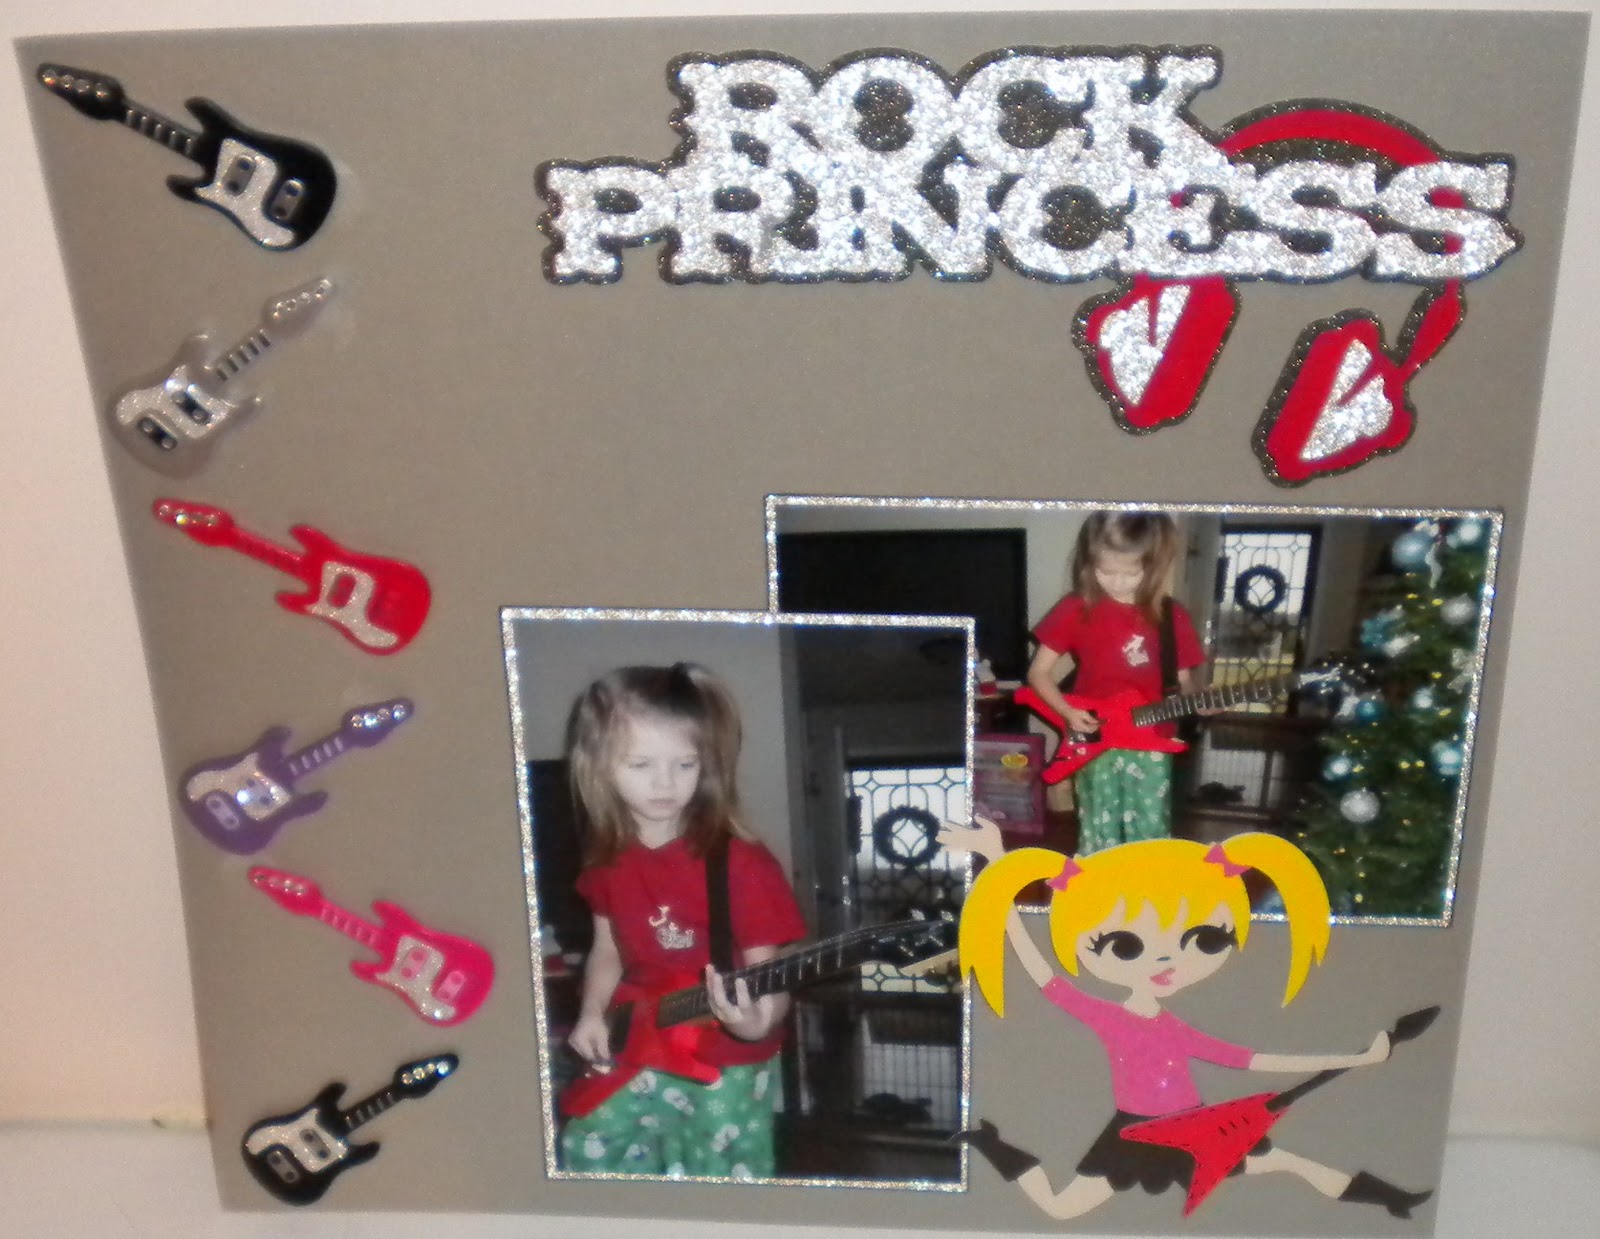
Rock Princess Layout
Kaylee got an electric guitar from Santa for Christmas and these are some pictures of her after she opened it. I used the Rock Princess Cartridge to cut the title and the rock girl. I used some glitter paper to glam the layout up a little. The guitars up the side of the page are Jolee 3D embellishments. I cut a frame for each of the two pictures out of silver glitter paper using the George and Basic Shapes Cartridge.
 I am entering this layout into the following challenges:
Getting Scrappy: Anything Goes: http://amandascraftsandmore.blogspot.com/
Frosted Designs: No Patterned Paper: http://www.frosteddesigns.blogspot.com/
Getting Scrappy: Anything Goes: http://amandascraftsandmore.blogspot.com/
Frosted Designs: No Patterned Paper: http://www.frosteddesigns.blogspot.com/
Sunday, January 8, 2012
Some Vinyl Gifts
Here are a couple of vinyl projects that I have made recently for gifts. First up, I found these little heart banks and added the names on them to give to two of my little cousins. I used the Batman Cartridge Font and black vinyl for these. I also made one for Kaylee, but she already took hers before I got a picture taken, lol.
 Second is another tumbler. I made this for my sister Britney. She wanted a Doctor Who Tumbler. If you remember I had traced some images in SCAL to make these svg files a few months ago for some blocks that I made us and I used the same file and sentiment for her cup.


Thursday, January 5, 2012
Sheek Wedding Layout
I worked on another wedding layout today and I have to say it is one of my favorite layouts. It started with this ribbon border with rhinestones on it. I saw this at Hobby Lobby and thought I have to make a wedding layout with that. It is called Prima Decorative Ribbon Border and they come in many colors. My background paper is by The Paper Studio and called Silver Wedding Texture. I used Black Vinyl and the Tie the Knot Cartridge to cut the Just Married for the corner. The frame is from the Twinkle Toes Cartridge and was cut with Black Shimmer Glitter Paper (I love how sparkly this paper is). I finally printed the picture I wanted to use out in black and white at a square size of 5x5 and matted it on a piece of paper by Karen Foster called Wedding Bliss Brocade.

I am entering this into the following challenges:
Creative Cutter Room: Sparkle Time: http://www.creativecutterroom.com/
Whimsical Wednesday: On the Edge: http://www.whimsical-designs.com/

I am entering this into the following challenges:
Creative Cutter Room: Sparkle Time: http://www.creativecutterroom.com/
Whimsical Wednesday: On the Edge: http://www.whimsical-designs.com/
Decorative Block
During the Christmas break, Kaylee came and spent a day with me. We made crafts all afternoon and this is one of the things we made. She wanted a pink block for her room, so this is what we came up with.
 I started out with a set of blocks that I had picked up at Marshall's on sale thinking I could reuse for something.
 We spray painted one of the blocks pink. The letter covered over very easily and it only needed one coat.
 Next, we used the Storybook Cartridge and white vinyl to cut a K for the front. We then put a cover of Mod Podge over the letter to seal it in.
 Finally, I tied a piece of sher ribbon around the block and then hot glued a premade bow to the top. Here is a side view of how the sheer ribbon looks around the block.


Tuesday, January 3, 2012
YourStory Photo Albums
I have the larger YourStory machine, but my hubby got me the YourStory Photo for Christmas. I decided to give it a try and make a couple of photo books for my mom. It is super easy to use and only takes a few minutes to bind the photos into the albums. These albums I used are the ones that came with the machine. They are 4x6 albums and are a little bit thicker than cardstock.
For the first one, I made an album with some of our pictures from Halloween Day. I used the Lettering Delights SVG Set Zombie Land for the the little zombie on the front. I then used the Ariel font to cut the font out of black vinyl. This album has 20 photos in it. The instructions say these can hold up to 20 pages, but there seems to be more room if you are just putting photos. I think you could probably put close to 30 in if you needed to.
 Here is a view of how the photos are attached inside. It makes a flip type book.
 For the second album, I cut some pictures from Christmas Day at my mom's house. I only put 17 pictures in this album. For the front cover, I used the Ariel Font and red vinyl to cut the 2011. The frog is from the Lettering Delights SVG Set Hoppy Holidays.
 Here is a picture showing you how thick the books are. You can see what I was talking about with the extra space where you could fit more photos in if needed.
 I have lots of ideas to try with this little machine, so you will be seeing some more to come. :)
For the first one, I made an album with some of our pictures from Halloween Day. I used the Lettering Delights SVG Set Zombie Land for the the little zombie on the front. I then used the Ariel font to cut the font out of black vinyl. This album has 20 photos in it. The instructions say these can hold up to 20 pages, but there seems to be more room if you are just putting photos. I think you could probably put close to 30 in if you needed to.


Monday, January 2, 2012
Pocket Planners
I always make my sisters and my mom new calendars to give them with their Christmas gifts. I have made them with different themes before based on their favorite sports teams, animals, etc. This year, I decided just to do basic calendars with their initials on them. I started out by getting some of the pocket planner calendars from Target. I used a tape runner and some scrapbook paper to cut and fit around the calendars to cover them. I then used the Sentimentals Cricut Cartridge to make scalloped circles for the center of the calendars. The initials were cut using black vinyl from the Storybook Cricut Cartridge. I then just put them back into their plastic covers to finish them up.


Subscribe to:
Posts (Atom)