Wednesday, September 22, 2010

OTWC Challenge #25 and Fantabulous Cricut Challenge Entry


Above is the inspiration photo and colors for the Off the Wall Craftiness Challenge this week.  When I saw the colors, I was thinking they would be pretty on a wall hanging for a little girls room.  The Fantabulous Cricut challenge this week is to make a project based on gardening, so I decided to make my project fit both challenges.

I printed the sentiment directly onto a 12x12 sheet of scrapbook paper in the pink color that I wanted to use and then used the paper inside the frame to size and cut it to fit.  (This is another $3 frame from Walmart just like I used in the Fall picture)  I then used Gypsy Wanderings to cut the swirl to go under my sentiment and I used A Child's Year to cut the girl watering her flowers.

Thanks for looking and be sure to check out both of the blogs for the challenges I have entered this in here:
OTWC Challenge # 25  http://offthewallcraftiness.blogspot.com/
Fantabulous Cricut Garden Challenge http://fantabulouscricut.blogspot.com/

Received an Award


I just received this blog award from Rhonda over at the Scrap Happens Blog.  I wanted to take a minute to thank her for passing this on to me.  She has a wonderful blog and does weekly mini album giveaways that are great, so if you haven't checked her out yet, be sure to do so here: http://scraphappenswithrhonda.blogspot.com/
Thanks again Rhonda!!!

Since I always have such a hard time picking out who to give the blog awards to and I love so many blogs that I follow, I am going to give this as an honorary award to all of my followers.  You are all great!!

Update 9/23  I just received this award again from Stacy at LovethatBug.  Be sure to check her out here: http://lovethatbug.blogspot.com/  Thanks again Stacy.

Monday, September 20, 2010

Fall Picture Frame

Here is a picture before I added the vinyl to the outside.
Here is a closeup of the vinyl details.
The challenge at My Sherri Crafts this week is to make a project for Autumn.  I immediately thought of doing a picture frame.  The frame came from Walmart and was $3.  I then bought some sets of leaves from the dollar store to go on the inside.  I cut a piece of yellow glitter cardstock for the base of this and covered it in the leaves.  I just cut them off of the stems and placed them individually on my background paper.  Then, I used black vinyl and Gypsy Font to cut the title and adhere it to the outside of the glass on the frame.  I really like how this turned out and think I will have to make some more for other holidays as well.

Be sure to check out all of the other entries and great projects over at My Sherri Crafts here: http://myshericrafts.blogspot.com/

Update 9/26: I am linking this up to the Craft-O-Maniac Link Party.  You can find the blog here: http://craftomaniac.blogspot.com/

Blue Jean Pocket Purses

These are very simple to make. I first cut the back pocket off of some old jeans. (You should be able to find some cheap at yardsales, junk stores, or if you have old jeans with holes in them etc.) I then used my cropadile to punch holes in ribbon and attach it to the inside with eyelets to make a handle. Next, just decorate the front. I used buttons on some, patches on same and decorative brads and gems on some as well. 


You can also use other pockets besides blue jeans.  For the ones below, I used some pockets off of some darker colored khaki pants.

Sunday, September 19, 2010

Placemat Pouches

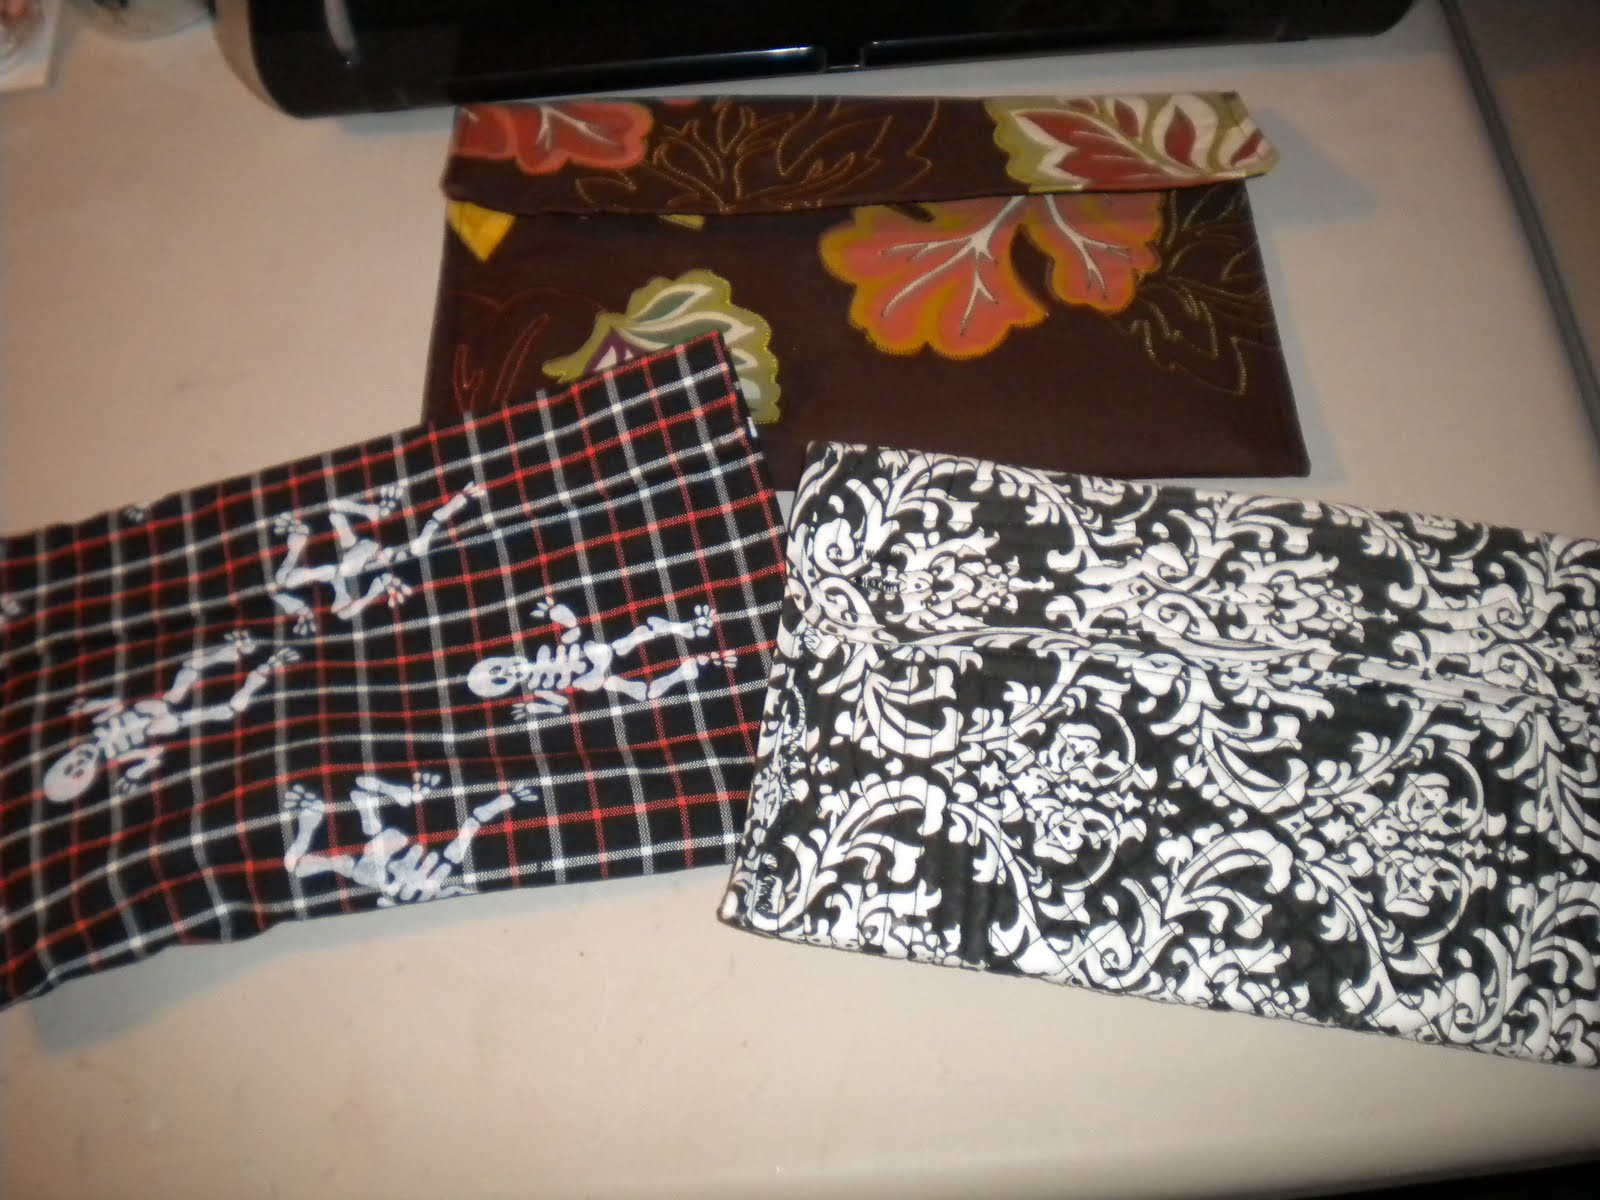
My sister Britney had the idea to make little pouches out of placemats. Originally, she sewed a couple of them, but then we decided to make them without having to use the sewing machine and they are just as durable.

You will need a placemat (you can get any design as long as it is square shape, so it will fold up into a pouch), Liquid Stitch or No Sew, Velcro and some scissors.

You need to fold your placemat up about 3/4 of the way down to get the positioning.
Now, you will need to add the liquid stitch to where your fold will be. Make sure you put a generous amount down. Then you need to refold the bottom and press down firmly. Hold in place for a few minutes until the liquid stitch is set.

After you have the pouch part, you will need to cut and add the velcro to the top so your flap can fold over and close your pouch. (You can also just use one strip in the center if you prefer as you will see in one of the pouches below)
Here is what your completed pouch will look like.
Here are two that my sister put together.
This Halloween one is holding some Halloween bows.
This one she made for me with the black and white swirls. I use it to hold my glitter and opaque markers by Martha Stewart.
Here is a picture where you can see the inside a little more.
Be sure to check back during the 31 days of Horror, because a skeleton pouch like shown above will be included in one of the giveaways I will be doing during that time.


I am linking these up to the Craft-O-Maniac Monday link party.  I just found this blog and there are tons of great projects there and you can link projects on Mondays which gives you lots of inspiration from other crafters as well. Be sure to check it out here: http://craftomaniac.blogspot.com/
I am also linking up to Making the World Cuter as well.  Another great blog that I just found that has great projects and Monday links as well.  Be sure to check it out here. http://makingtheworldcuter.blogspot.com/

Saturday, September 18, 2010

Owl Painting - Andy Warhol Style


I have always liked Andy Warhol style paintings. In an art class I had in high school, I did a painting with soup cans like his and I was thinking the other day that I wanted to make an owl type painting like this. I got an illustration board that is a size of 16x20. I then took the board and used a ruler and pencil to mark the board off into six size separate squares. I used my Gypsy and made a square the size of my marked off spaces and used the Create a Critter cart to size an owl into the square. I printed off all of the layers for the cut in white paper and used them as a stencil to trace out all of the layers onto the board. I then painted in all of the layers with acrylic paint. I really like how this turned out. I am wanting to redo some of my scrapbook area with owls, so I think this will be a good start.

From Trash Can to R2D2


This was a little garbage can for the bathroom. It started out black, but my hubby painted it white and then used foam and paint to make it into R2D2. This is something that he actually did a few years ago, but he had him out and sitting by the door today, so I thought I would share a picture of the little guy. He made this for me one year when I dressed up as Princess Leia and I used him to put candy in and give out. Everybody got a real kick out of him. I also took a small recorder and downloaded some sounds he makes from the internet to take with me and play. He was a big hit. He has been sitting in the closet in our game room, but my hubby got him out today and now he is holding the door in place in there.

Friday, September 17, 2010

Thanks to Fantabulous Cricut for featuring three of my previous Halloween projects on their blog today. If you haven't checked them out, be sure to visit there blog and get in on the weekly challenges they have as well. http://fantabulouscricut.blogspot.com/
I just found out that I won the OTWC Challenge #24 that I entered my dance layout in. I wanted to say thank you to Kim at Off the Wall Craftiness and her sponsers as well for the great challenges. If you haven't checked her blog out, be sure to do so here: http://offthewallcraftiness.blogspot.com/

Groomsmen Layout


Sorry about the glare on the top picture. I took another one without the flash, but it kept coming out blurry, so glare it is. I made this page to go besides the bridesmaids page that I posted a couple of days ago. I got these little bow ties from Walmart right by the ribbon. I thought they would be perfect for this page. For some reason, I bought a couple of packs and went ahead and opened them all before doing the layout, so now I have about 8 extra bowties, so I am going to have to think of some more ideas for them. The background paper on this and the tag paper are both from the elegant white on white paper stack I have been using. The groomsmen letters are stickers. I then used some black rhinestones in two of the corners and I added a black gem brad to the tag. The tag is cut from the Tie the Knot cart and I outlined it with a black pen to make it stand out more on the page since the papers are very similar.

Thursday, September 16, 2010

Checking In and Recipe Book (Lots of Pictures)

Just checking in. Sorry for the lack of posting yesterday and today, I have been super busy. I have been out of the house a lot, but I do have a good bit of projects in the works, just not completed. I decided to share an old project on here that I made a couple of years ago. I made 5 of these recipe books for Christmas gifts for my family the Christmas of 2008. All of the recipes are family recipes that I collected from everybody throughout the year. I created all of the pages digitally and then printed them out to create the book. I used some family pictures on some pages.

For the title of the book, I didn't just want to put family recipe book, so me and the hubby tried to come up with something unique. After thinking a little bit, my husband actually came up with the name and titles for each section that I used.

Here is the front of the book. As you can see, we went with the name: "One Word, Four Letter, GRUB" I used some recipe scrapbook paper to make the base and then printed the title onto white cardstock with a black border.

I used stickers to spell recipes down the spine of the binder.
This is the inside. It actually came out a lot thicker with more recipes than I had anticipated. However, there is still room to add more pages since it is in a binder.

The first section in the book is called Breads. I used some stickers for the measuring cup and bowl. We used the phrase"It's agaist the law not to have some" on this one, because we were thinking everybody loves bread with their meal.


Here is a sample of how some of the digitally created pages looked. I used the Scrapbook Factory Express Software to make all of these pages. Some of the picture used were ones I took of the foods after cooking them and some came from digital images.


For Main Dishes, we went with "Ditch the belt, no diets allowed!". I used a sticker of a chef's hat on this one.
Here are some more examples of a few pages. Here you can see how I used the family pictures in some of the layouts as well as digital images.


This is a page that I made with my grandfather that has passed aways favorite things to eat. I thought it would be nice to include him in the book as well, since he had specific things that he would always have.
Side Dishes has a little oven mitt sticker and we said "Don't be shy!". My hubby was on a roll with all of the funny phrases for each section and it helped him to put his input into the book as well.

One of the funnier pages was of my mom's broccolli casserole, because we had a picture of one of the dogs eating some from a Holiday dinner. I thought this would be great to include.
Every time we get together, everybody wants me to make a Crockpot Mac N Cheese that is so yummy and cheesy, but Kaylee hates it. She always tells me that it is so yucky, so I included that as well.
My grandmother has always made oven okra, so on her page, I included pics of her with my dad and uncle and grandfather when they were younger.
I love this sweets background paper, so cute. For Desserts, we just said "You're not done yet!" and I used a mixing bowl and mixer stickers.
Here is one of the layouts that I created digitally for the desserts section with my banana pudding pie recipe.
Finally, the last section was drinks and we just said wash it down.
I love this picture of the watermelon with a hat on and it went perfect with this recipe.
I love Hot Chocolate, so I had to include some recipes for that as well.
The books took a long time to create and put together since there were so many recipes and I made 5 of them, but it was so worth it when they were finished. Everybody really loved them and they loved that we can add recipes to them later as well. Now, I need to make a few more, because I didn't make Melissa one and she has her own house now and I actually never put one together for myself either.

Tuesday, September 14, 2010

News to Share!

I just found out today that I am going to have a project published in the Scrapbook Trends Create with Cricut book that will come out in March 2011. I am so excited and wanted to share the news. I can't wait until this comes out, but now I have to get on getting the items together and mailed off for photography.

Bridesmaids Layout


I saw this paper a few weeks ago at Hobby Lobby and thought it would be really pretty to use for the bridesmaids layout. I used some prima glitter flowers on the corners and added some flat back pearls to the middle of each flower. I then cut the tag from the Tie the Knot card and used a pearl brad to attach it. The tag was cut from a sheet of paper that came from the Elegant White on White stack that I have been using on some of the other wedding layouts.
I am entering this page in the More than Favors Wacky Wednesday Challenge. This week is a color challenge to use Pink, Black, Grey and White. I have Pink in the background, White in the background, pearls, flowers and tag, Black in the letters and the tag outline and the grey is very minimal, but in the design that is on the tag. Check out the More than Favors blog here: http://morethanfavors.blogspot.com/

Thank You Serenity Scrappers!

Here is a closeup of my favorite two sheets. How cute are they!
I received my prize pack from Serenity Scrappers today from the Buttons and Bow Challenge and I just wanted to say thank you to them. If you haven't checked out there blog before, be sure to. They have a challenge going on now with a weather theme, so be sure to check them out. http://serenityscrappers.blogspot.com/

Monday, September 13, 2010

Doesn't this make you smile

Every year, George paints Kaylee pumpkins with whatever she chooses, but when she was a baby he just made her smiley face ones. Melissa called me last week and said Kaylee was looking through her scrapbook from when she was a baby and she saw Halloween pictures with a baby pumpkin smiling and she loved it. She wanted to call and ask Gogo (that is what she calls her Uncle George) would he please make her another one. So, we went and got a plastic pumpkin and he painted it for her, this way she will be able to keep this one forever. Now, we will have to wait and see what she comes up with for him to paint on her real pumpkins. (I say pumpkins because she always asks for more than one. Last year, she asked for a cat and a Lego Luke Skywalker (she is specific about what she wants). Here is a pic of the ones from last year and also Elvis is in the middle, he was for my grandmother. I will have more pictures of different painted pumpkins to share during the 31 days of Horror that I am going to be doing starting October 1st here on the blog. If you missed the post about that, I will be having a Halloween project every day of October and also be doing a few giveaways as well.