Saturday, November 13, 2010

Book Page Necklace

I saw this tutorial for making a necklace out of an old book page and I loved it, so I knew I wanted to give this a try.  Here is where I got the idea from http://www.mandipidy.com/2010/11/tutorial-book-page-necklace.html  I did mine a little bit differently.


I started out with chain that I bought in the jewelry department at Hobby Lobby.  I bought a package that had a 60 inch strand and then cut one piece at 21 inches and a second piece at 17 1/2 inches.  Once these were cut, I used jump rings to attach the two together.

I then took a nickel and traced it 7 times onto a page from a book and then again onto cardstock.  I cut those out and glued the book part to the cardstock.

Now, I took a q-tip and Tim Holtz Distress Ink in black soot and used it to ink the edges to give the pages an older look.

Now, I covered them all with a coating of varnish and let it dry.  (You can find this right beside the craft paint)

Once this dried, I used the crop a dile to punch a small hole in the book pages and then used jump rings to put through them.  I also took some small pearls and put jump rings through them as well.

Finally, I put these through the loops in the chain and I attached them.  I used my bind it all wire cutters to tighten the jump rings onto the chain.
I think it looks very vintage. 


Thank You to My Sheri Crafts

Thanks to My Sheri Crafts for the Ooo-La-La Award for my veteran's layout this week.  Be sure to check their site out and enter their challenges each week.  http://myshericrafts.blogspot.com/ 

Thank You Carri

Thank you to Carri a/k/a a busy bee at http://doubleclickconnections.blogspot.com/.  She passed me on another attitude blog award.  If you haven't checked out her blog before, be sure to stop by and check out all of her wonderful creations.

Friday, November 12, 2010

My Sheri Crafts Veteran's Challenge

The challenge for the week over at My Sheri Crafts is to make a project honoring veterans and troops.  You can find their blog here: http://myshericrafts.blogspot.com/   I have been wanting to make this layout of my grandfather for a while, so I thought this would be the perfect time to do so. 

My grandfather was in the Army for years and fought in the war and it was a big part of his life.  While he served, he kept all of the stamps from his mail.  Before he passed away, he gave them to me.  I have a large amount of them, so I thought it would be nice to pull some out and make a scrapbook page with them. (After making these pages, I still have a good bit of them left, so I may do something else with some more of them)  So, here is what I came up with.


I covered the first page with stamps (I went through and tried to pick out some that I thought were the most unique), then I took a background page that had letters on it and cut this to use on the second page.  I took some more of the stamps and made a frame around it.  I then added my grandfather's picture, which I matted in camo paper and used the George and Basic Shapes cart to cut a circle out of the camo paper and a smaller circle out of an index card for my journaling.  I used Tim Holtz Antique Linen ink on this so the journaling block would look worn.
I then added my journaling about my grandfather and these being his stamps from the time he served.  Here are some close up pictures.


I really like how this turned out.  I was really close with my grandfather and that makes this layout all the more important to me. 

Thursday, November 11, 2010

Acrylic Keychain with Vinyl

I got a pack of keychains that have the paper in the center where you can add a picture to them from Oriental Trade.  I took the paper out and decided to decorate the keychain with vinyl. Here is how they looked to begin with.
I then used the Don Juan cart to cut my name out in black vinyl and then made the small circles out of white and black vinyl with the Martha Stewart Screw Punch.
I think I will be making some of these for stocking stuffers or to go with gifts this year. 

Wednesday, November 10, 2010

Smores Layout/ Doodle Dragon Studios Challenge Entry

I had some pictures of Kaylee having smores and hot dogs at a bon fire in her backyard to scrap for this layout.  She loved the smores and wants them all the time now, so I wanted to make a title that would go with the smores theme.  I came up with Smore Fun Than Ever, kind of corny I know, but it works, lol.

For the letters on this layout, I used the Don Juan Cartridge and welded them together in the Gypsy.  I then used the Swiss Dots Cuttlebug Folder to emboss them and outlined the letters with a Martha Stewart Sepia tone marker.

The dragon is a Dustin Pike Digi Stamp that I colored in with Prismacolor Colored Pencils. 

The little smiling fire is from the Create a Critter Cartridge.  I used the distressed stripes folder on the wood and then covered the flame in yellow and orange peel colored stickles.  I think the fact that the fire is smiling is too cute!

I am also entering this layout in the Doodle Dragon Studios Challenge.  It has been a while since I have played along with their challenge, but the theme this week is Anything Goes as long as you use a Dustin Pike Digistamp on your project.  Be sure to check the blog out here: http://doodledragonstudio.blogspot.com/

Tuesday, November 9, 2010

Thanks to Tip Junkie

I want to take a second and say thank you to the tipjunkie.com for showing my Goody Gobblers in their Thanksgiving Kids ideas.  You can find a ton of great projects and links to some great projects over there, so be sure to check the website out: http://www.tipjunkie.com/thanksgiving-for-kids/

Good Luck Card

My husband starting taking Ken Po Martial Arts a few months ago and he is getting ready to test for the next belt later this week.  I thought I would make him a card wishing him good luck.  I used Wild Card for the base of this card and then used the Create a Critter for the Panda and the bamboo stem.  I used a prismacolor colored pencil to add some details to the stem.  Then, I just took a black marker and wrote good luck in the bottom corner.

Monday, November 8, 2010

20 Days of Christmas Announcement

Since everyone enjoyed the 31 days of Horror here on the blog, I have decided to do a Christmas event as well.  Starting December 1st, I will have the 20 days of Christmas here with a Christmas project posted from the 1st through the 20th of December.  (I am not going through the 25th, because the week before Christmas can be pretty hectic, so that is why we are only going through the 20th) 

Also, I will have some fun giveaways that I am calling Pick a Stocking.  There will be numbered stockings with goodies inside and the winner of each giveaway will get to pick which stocking they would like to receive.  

I am working on some Christmas projects now to share with you all and think this should be fun.  Just wanted to give everybody a heads up on the event.

Pear Plate / Fantabulous Cricut Design Team Project

Challenge #35 at Fantabulous Cricut is a Color/Shape Challenge.  You have to use your cricut on a project and include a circle and the color green as well.  I decided to do a green charger plate for my color and shape and then used the Wall Decor and More Cricut Cartridge for the pear and the flourish cuts on the plate. They were cut from silver vinyl.   Be sure to join us over at Fantabulous Cricut this week: http://fantabulouscricut.blogspot.com/


Saturday, November 6, 2010

The Corn Crib Layout

This layout is of an area called The Corn Crib at Tate's Farm in Alabama.  They have a giant area filled with corn kernals for the kids to play in.  Kaylee loves going here every year in October. 


The letters for the title were cut with the Sans Serif cart and I then added some green dots to them so they wouldn't be just plain.  The corn cob is from the new Gypsy cart Smiley Cards.  I used the tiny bubbles cuttlebug folder on the corn and the distressed stripes cuttlebug folder on the green part.  I think it really made the corn look real. Then, I added some google eyes to finish it off.  I love adding google eyes and faces to just about anything to add cuteness, lol.

Thursday, November 4, 2010

Apple Plate

My sister Melissa has apples in her kitchen and she asked me a couple of days ago to make her a plate to put on a plate stand in her kitchen.  I got the red charger plate at Hobby Lobby and I used silver vinyl to cut the design.  The apple is from the Doodlecharms cart.  I took a black paint pen and added the lines at the top of the stem and leaf to give it more dimension.  Then, I cut the two leaf flourishes from the wall decor and more cart.  I think it turned out really pretty and will look great in her kitchen.
I am also linking this page up to the following:
mmm button

Name Frame

I wanted to make a frame with our last name in it for a while, so I figured I would check this off of my to do list today.  The frame is a $3 frame from Walmart.  I then cut a piece of beige paper 12 inches wide x 4 1/2 inches tall to fit inside.  I used the Jasmine cart for all of the cuts on this project.  I cut the Knox and est. 2001 out of black pearlescent cardstock and put them on my paper to go inside the frame.  I then used silver vinyl to cut Jean and George for the oustside of the frame (directly on the glass). 

Wednesday, November 3, 2010

A Haunting We Will Go/OTWC Challenge #31

I have not printed Halloween pictures yet, but I thought this challenge would be a good time to make a layout for one of them.  The Off The Wall Crafiness Challenge (http://offthewallcraftiness.blogspot.com/) this week is to use the colors Orange, Black and White.  Here is the inspiration photo and colors for this week.

For my layout, I used a sheet of Recollections orange paper with white dots for the base.  The ghost is a premade cardstock shape from Michaels and I added google eyes, a bow and a mouth to her.  I then used the Gypsy and the Don Juan Cartridge to weld the letters together for the title.  Once the title was cut, I used a white opaque pen to add some dots to the letters.

GIR Layout

Not sure if all of you guys are familiar with Gir from Invader Zim, but I know that I have shared a few projects with him, since we are fans here.  I had this really cute picture of Kaylee in a Gir hat, so I had to make a scrapbook page for it.  I printed out a 12x12 page that I digitally did in the Scrapbook Factory with Gir.  Then, I added a green background to the picture and then added some green and white buttons to finish it off.  Very simple, but cute!

Tuesday, November 2, 2010

Tu-Tu Cute

My sister Britney made some tutus for Kaylee, so I thought Tu-Tu Cute would make a good title for a scrapbook page.  This is a pretty simple layout.  I used some shimmer background paper and then used the Sans Sarif Cricut Cartridge for the title.  Added some glitter flowers and rhinestones to complete it.


A Funny, But Cute Turkey to Share: Reese Cup Turkey

So, I am working on some little candy turkeys and I thought this guy was really cute, but also funny as well.  I am thinking about making these for our bowling league to give out, since getting 3 strikes in a row is a turkey in bowling.  Thought it would be a fun treat to share.  I started out with a mini reese cup for the base.  I used the My Community cart to cut a small turkey and then cut his head and feet off.  I added a google eye and used glitter pens to add red and yellow to the head and feet before attaching them with glue dots.  Then, I used a scallop circle punch to cut three different colored circles for my feathers.  I also attached these with glue dots as well.  Thanks for looking.  I am working on some layouts now and should have some to share soon.

Monday, November 1, 2010

Blog Award

Thanks so much to http://just2ducky.blogspot.com/ for passing on this blog award to me.


All I have to do is tell you 3 things that make me different and nominate 5 blogs. So... What gives me the `Tude?

1) I try to think outside the box and come up with unique ideas to make to share with you all.
2) I have a 6 year old diva, Kaylee, who approves all of my projects, so they have to have attitude, lol.
3) I have great family and friends who help me have the right attitude as well.

Now for the hard part, I love all of the blogs I visit, so it is hard to pick just 5 to pass this on to.  Please check out these wonderful blogs for some great projects and inspiration.

1) http://carsonscricutcreations.blogspot.com/
2) http://cuteandsome.blogspot.com/
3) http://amandascraftsandmore.blogspot.com/
4) http://cricutprojectoftheday.blogspot.com/
5) http://fundamentalchange.blogspot.com/

Please display this badge proudly and link it to the Digi's With Attitude! Challenge Blog. To qualify for the $5.00 Digi's With Attitude! Store Gift Certificate please read the guidelines @ http://digiswithattitudechallenges.blogspot.com/p/i-got-attitude-blog-award.html

Bird Bonanza/Fantabulous Cricut Design Team Challenge #34

I am so excited to be a part of the design team for the Fantabulous Cricut Challenge Blog.  The challenge this week is called Bird Bonanza and you must make a project that has something to do with a bird and includes a cricut cut somewhere on your project.  Be sure to check the blog out and enter the challenge to play along here: http://fantabulouscricut.blogspot.com/

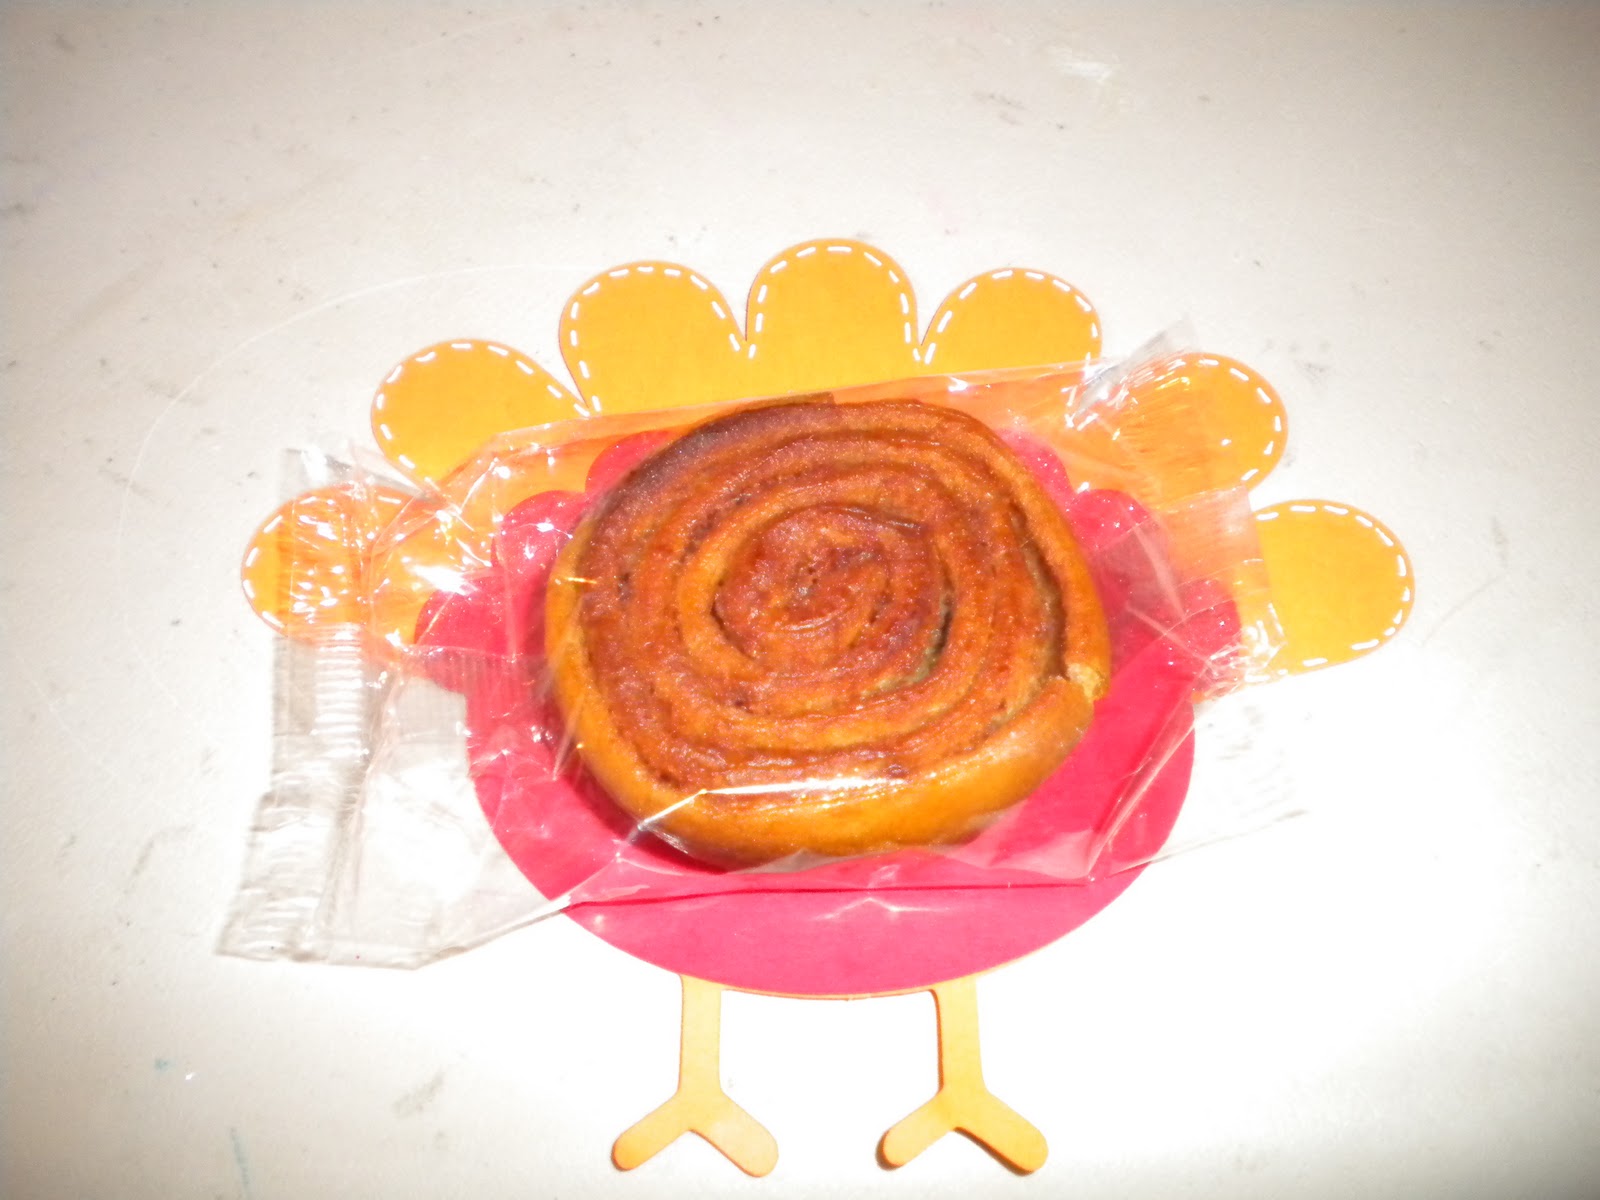
For my project, I made these turkey treats for Kaylee's class for Thanksgiving.


I used the Create a Critter Cartridge to cut the turkeys.  I cut the front layers and back layers separately and did not connect them.  This way, you can put the treat in the middle for the body of the turkey.  To spruce the turkey up, I added some google eyes and tiny bow ties and used a glitter gel pen on the top of the red feathers and the turkeys face and also used some a white opaque pen to make faux stitching lines on the orange wings.  I used the Little Debbie Pinwheel treats, since they are brown and worked for the turkey color, but you could use any circle shaped cake that you would like. (The little bowties came from the Walmart Craft department, you get 6 in a pack for $1.97 if you are interested in getting some of them)
I used hot glue to attach the cake to the turkey body.  This way they can be securely attached, but the kids can also still open the side of the pack and not mess up the turkeys when they get the cakes out.


I made 24 of these total.  I sometimes have people ask how I transport the items I make, so I thought I would show you.  I stacked 12 of these into a box, so there will be two boxes to carry into Kaylee's school.

Don't forget to stop by the Fantabulous Cricut Challenge Blog and enter your own Bird Project into this week's challenge:  http://fantabulouscricut.blogspot.com/

11/11/10 I am also linking this up with Making it with Allie.

Party Button