


Sunday, April 15, 2012
Just checking in to let everybody know that I have been sick and had a lot of family stuff going on, so not much time for crafting. I am not going to be posting as much with everything going on, but I will share as I have time for crafting. I hope to be back in full swing soon, but I will still be checking in with everybody as I have time. Hopefully things will get back to normal soon, because I am really behind on scrapbooking at the moment.
Tuesday, April 10, 2012
Batgirl Shirt
It seems like all I have been making lately are t-shirts. Here is another shirt that I made for Kaylee. She loves Batman, so I wanted to make her a pink Batgirl Shirt. I used the Batman Cricut Cartridge for all of the cuts on this. I put the Bat Symbol on the front and I then put Batgirl across the back of the shirt.
Here is the front of the shirt.


Here is the front of the shirt.

Here is the back of the shirt.

Saturday, April 7, 2012
Easter Bunny T-shirt
This is the second easter shirt that I made for Kaylee. I used the Doodlecharms Cricut Cartridge for the base of the bunny and used white fabric paint for it. I then used George and Basic Shapes to make the ovals and triangle for the nose. The eyes and mouth were freehanded with a paintbrush and the fabric paint. I then used the Don Juan Cartridge for the font to put her name under the bunny face.


Thursday, April 5, 2012
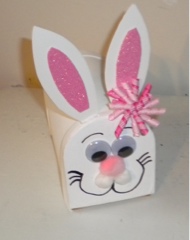
Bunny Mailbox
I bought one of the unfinished mailboxes at Hobby Lobby and turned it into a little bunny box for Kaylee to put some Easter stuff in. I removed the flag off of the side and painted the whole box white. I used fun foam to freehand and cut the ears and used hot glue to attach them. I then hot glued google eyes and some puff balls to the box for the details. Finally, I used a black paint pen to add the mouth and lines above the eyes.

I am entering this into the following Challenges:
Creative Cutter Room: Easter Challenge: http://www.creativecutterroom.com/
Scrappy Moms: Terrific Tuesday Easter Challenge: http://www.scrappymoms-stamps.blogspot.com/
My Craft Spot: Easter Challenge: http://craftspotbykimberly.blogspot.com/
Wednesday, April 4, 2012
Decorate to Celebrate Baby Shower Challenge: Design Team Project
It is time for a new challenge over at Decorate to Celebrate. This time, we are challenging you to make a decoration or party supply for a baby shower. Be sure to stop by and see all of the projects by the design team and enter the challenge here: http://www.decoratetocelebrate.blogspot.com/.
For my project, I made a little table decoration for a baby shower. I found these little mini lanterns at hobby lobby and decorated them to look like hatching baby chickens. I used the Create a Critter Cartridge to cut the face and egg shell and then used hot glue to attach them. I also added a small premade bow with hot glue to the front. For the sign, I used the Storybook Cartridge and welded the marquee shape in the Gypsy to make it stand up and used the Batman Cartridge for the font. This was cut with white vinyl and outlined in black. I finally added some faux stitch lines around the edge of the marquee shape.


For my project, I made a little table decoration for a baby shower. I found these little mini lanterns at hobby lobby and decorated them to look like hatching baby chickens. I used the Create a Critter Cartridge to cut the face and egg shell and then used hot glue to attach them. I also added a small premade bow with hot glue to the front. For the sign, I used the Storybook Cartridge and welded the marquee shape in the Gypsy to make it stand up and used the Batman Cartridge for the font. This was cut with white vinyl and outlined in black. I finally added some faux stitch lines around the edge of the marquee shape.


Sunday, April 1, 2012
Homemade Bunny Ears
I broke out the sewing machine this week and made these bunny ears for my family. I made the grey ones for my hubby, the pink with a bow for Kaylee, the white with a bow for me and the rest are for my three sisters. I used the pattern and directions for these over at http://www.finleyandoliver.com/. The only thing I did different, was that I used a pipe cleaner inside the ears so they would be easy to fold and I used hot glue to attach them to the headbands. I bought the headbands at Hobby Lobby.


Friday, March 30, 2012
Love Bunny Shirt
I made this shirt for Kaylee. I took the picture while it was still drying, so you can see the cardboard through it on the pic. I used vinyl and fabric paint for this. The bunny on the corner is from the Create a Critter cartridge and I freehanded the face. For the words, I used the Batman cart for the font and Create a Critter for the heart.
Sunday, March 25, 2012
Workout Shirt
I have been wanting some new workout shirts and decided I would make some. So this is the first one I made. I used the Batman Cricut Cartridge for the font to make a stencil and used black fabric paint to put the saying on.
Wednesday, March 21, 2012
Decorate to Celebrate Easter Challenge: Bunny Suckers with Centerpiece
It is time for a new challenge over at Decorate to Celebrate. The new challenge is to create a project for an Easter Party. Be sure to head over to http://www.decoratetocelebrate.blogspot.com/ to check out all of the projects by the design team and enter your own project into the challenge.
I made a centerpiece with bunny rabbit suckers for Kaylee to take to school for the class Easter party. I really love how this turned out. I had the idea for a while and wasn't sure if it was going to come together as I imagined it, but I was so glad it did!

 To make this, I started out with a styrofoam circle that was 12inches wide x 1inch high. I covered it with green spraypaint to be the base.

 To make the bunnies, I used the Simply Charmed Cricut Cartridge and cut a front and back for them at a size of 2.88inches wide x 3.82inches high. I added a small puff ball to the back for the tail. For the front of them, I added google eyes and a small puff ball, drew in the mouth and used a pink color pencil to add the remaining details. Once they were finished, I used a small dab of hot glue to attach the front and back to Tootsie Roll Pops.
 I made 25 of the bunnies in all and then added them to the centerpiece by pushing the sticks into the styrofoam base.
 To finish it off, I used a sample piece of vinyl siding from Lowes and a white dowel stick to make the sign. The Happy Easter was cut using the font on the Batman Cartridge and pink vinyl. I then went over it with a thin coat of Mod Podge to make sure the vinyl did not peel up. Then, I had some small, flat backed carrots from Hobby Lobby that I glued to the about 6 of the bunnies hands.

I made a centerpiece with bunny rabbit suckers for Kaylee to take to school for the class Easter party. I really love how this turned out. I had the idea for a while and wasn't sure if it was going to come together as I imagined it, but I was so glad it did!


Once that was dry, I used the Zooballoo Cartridge and some glossy green paper to cut out a grass border to go around the base. I cut four of these at a size of 11.03inches wide x 5inches high and hot glued them around the edge.


Friday, March 16, 2012
Just checking in
Once again the week has gotten away from me without finding time for crafting. I did start working on a design team project that I will be sharing next Wednesday and I am hoping to get to some layouts soon. Just wanted to check in and say hello to everybody.
Sunday, March 11, 2012
Pinch On Card
Today I made a quick card for St. Patrick's Day. I used the Wild Card cartridge for the base and George and Basic Shapes to cut the green rectangle. Then, I used Paper Doll Dress Up for the shamrock and Batman for the font. These were cut from white vinyl. I am giving this card to my hubby.


Wednesday, March 7, 2012
Decorate to Celebrate St. Patrick's Day: Design Team Project
It is time for a new challenge over at Decorate to Celebrate. This time we are challenging you to share all of your party supplies and decorations for a St. Patrick's Day party. Be sure to check out all of the projects by the design team and link up your own projects to share here: www.decoratetocelebrate.blogspot.com.
For my project, I made Kaylee a shirt to wear for St. Patrick's Day! She wanted a shirt that said pinch proof. I used the Batman Cricut Cartridge for the font and the Paper Dolls Dress Up Cartridge for the shamrock. I used vinyl to make a stencil for the shirt and filled it in with black fabric paint. It looks so cute, I think I may have to make a few more before the 17th!

For my project, I made Kaylee a shirt to wear for St. Patrick's Day! She wanted a shirt that said pinch proof. I used the Batman Cricut Cartridge for the font and the Paper Dolls Dress Up Cartridge for the shamrock. I used vinyl to make a stencil for the shirt and filled it in with black fabric paint. It looks so cute, I think I may have to make a few more before the 17th!

Sunday, March 4, 2012
St. Patrick's Day Purse
I finally had a chance to work on some crafting, and I made this little bag for Kaylee to use on St. Patrick's Day.
 I started out with the felt bag that I found at Hobby Lobby in their Summer Crafts area.
 I then used the Paper Dolls Dress Up Cartridge to cut a shamrock stencil and filled it in with black paint on the bag. After that was dry, I took a white paint pen and added a mouth to the shamrock and then used hot glue to add a bow and some google eyes to finish it off.
 I think it turned out so cute and was super simple to make.


Thursday, March 1, 2012
Still here
Just wanted to check in and say hi to everybody. I still have not been able to work on any crafts this week, but I have some time set aside over the next few days to work on some and should have them ready to share soon. I hope everybody is doing good this week. See you all later.
Sunday, February 26, 2012
Batman IPad Cover
Sorry I have not been around much this last week, but I caught something and was in the bed sick for the majority of the week. I do have one project to share with you today, but I haven't had much crafting time. My hubby bought me an IPad and I wanted to personalize it, but I did not want to put anything directly on it. So, I found this snap on cover at Walmart and used white vinyl to decorate it. You may remember I used this same saying on some cups a few months ago. I used the Batman Cartridge to cut everything out for this. I like how it turned out. I am still getting over the end of this sickness, but hopefully it will be cleared up in the next day or two and I will be able to catch up on some crafting. See you all later. :)


Wednesday, February 22, 2012
Decorate to Celebrate Boys Party Challenge: Design Team Post
It is Wednesday and time for a new challenge over at Decorate to Celebrate. This week it is all about the boys, we want to see your party decorations for a boy's party and you must use the color blue. Be sure to check out all of the projects by the design team and enter you own project into the challenge here: http://www.decoratetocelebrate.blogspot.com/.
For my project, I wanted to make something for a super hero party. I decided to make some cute party hats. I started out by getting the blue party hats at Party City and then used white vinyl to decorate them.
I used the Batman Cricut Cartridge for the words and the Graphically Speaking Cartridge for the stars.

Tuesday, February 21, 2012
A Lego Shirt
I cut this Lego guy out with an 8 in the center using SCAL and Kaylee's mom Melissa painted him onto her shirt with black glitter fabric paint. We forgot to take a picture while making it, so I had to get her to let me take a pic at the party.

Saturday, February 18, 2012
Lego Plates
Here are some plates that I made for Kaylee's party tomorrow. The square plates came from Target and I used black vinyl for the face. I used the same face from the Smiley Cards Gypsy Cartridge for these that I have used on the other Lego projects.


Friday, February 17, 2012
Lego wrapped present
Here is another Lego project I have to share, it is Kaylee's birthday present that I wrapped to look like a Lego block. I bought solid red wrapping paper at Hobby Lobby and wrapped the box. Then, I used a red cardstock that was slightly lighter than the paper and cut circles out with the George and Basic Shapes Cricut Cartridge for the top. I used pop dots to attach these to the top of the present.


Wednesday, February 15, 2012
Lego Cups
Here is another Lego project for the party. My sister got these cups at the Dollar Tree and I used yellow and black vinyl to make the Lego heads for the front of the cups. These heads were made the same as the cupcake toppers using George and Basic Shapes to make the head and Smiley Cards for the face. She is putting these into the goodie bags for the party. I made 24 of these.


Monday, February 13, 2012
Lego Man Cupcake Toppers
Kaylee's lego themed party is on Sunday, so this week, I will have a few of the items I made for the party to share. First up, I have some cupcake toppers for the party. I used the George and Basic Shapes Cartridge to weld and manipulate cylinder shapes together to make a lego head. I then used the emoticons on the Smiley Cards Gypsy Cartridge to cut the faces for them. I made a front and back for the toppers and hot glued them to mini skewers to put in the cupcakes. I made 36 of these for the party.
 Here you can see how I put an extra lego head on the back to give them a finished look.


Friday, February 10, 2012
Valentine Cards
I needed eight Valentine Cards and I decided to make all of the same design this year. I started out with a white card base that was 4 inches wide x 5.5 inches high. I then used the George and Basic Shapes Cartridge and glossy cardstock to cut a red square that was a size 3.5 inches wide x 5 inches high. I then used white vinyl to cut the sentiment using the Batman Cartridge for the font and the Doodlecharms Cartridge for the heart.
 I am entering these into the following challenges:
Scrappy Moms Terrific Tuesday: Hearts Galore: http://www.scrappymoms-stamps.blogspot.com/
My Craft Spot: Valentine's Day: http://craftspotbykimberly.blogspot.com/
Fantabulous Cricut Challenge Blog: Love is in the Air (use a heart): http://fantabulouscricut.blogspot.com/

Scrappy Moms Terrific Tuesday: Hearts Galore: http://www.scrappymoms-stamps.blogspot.com/
My Craft Spot: Valentine's Day: http://craftspotbykimberly.blogspot.com/
Fantabulous Cricut Challenge Blog: Love is in the Air (use a heart): http://fantabulouscricut.blogspot.com/
Wednesday, February 8, 2012
Decorate to Celebrate Diva Party Challenge: Design Team Project
Hey everybody!! It is time for a new challenge over at Decorate to Celebrate. This week we are asking you to create a project for a Diva Themed Party and you must use the color pink! Be sure to stop by and see all of the projects by the design team and enter you project here: http://www.decoratetocelebrate.blogspot.com/.
For my project, I decided to make a table decoration fit for a Diva. I started out with a $1 pink bucket from Party City and used white vinyl and the Batman Cricut Cartridge to cut "You're the Bomb" for the front of the bucket. Next, I used the Indie Art Cartridge for my bomb and the Batman Cartridge for the word Boom. I used pink glitter paper for the main cuts and white for their bases. I put a styrofoam base in the bucket and covered it with pink shredded paper. Next, I took two wooden dowels and covered them in pink ribbon, once they were covered I used hot glue to attach my cuts to them and then placed them in the bucket to finish it off.

For my project, I decided to make a table decoration fit for a Diva. I started out with a $1 pink bucket from Party City and used white vinyl and the Batman Cricut Cartridge to cut "You're the Bomb" for the front of the bucket. Next, I used the Indie Art Cartridge for my bomb and the Batman Cartridge for the word Boom. I used pink glitter paper for the main cuts and white for their bases. I put a styrofoam base in the bucket and covered it with pink shredded paper. Next, I took two wooden dowels and covered them in pink ribbon, once they were covered I used hot glue to attach my cuts to them and then placed them in the bucket to finish it off.

Saturday, February 4, 2012
Lego Man Bucket
Kaylee is having a lego theme for her birthday party this year, so I wanted to make a little bucket that looked like a lego man's head to fill up with the lego minifigures to go along with her gift. This was so simple to make. I started out with a yellow bucket from Party City that was $1 and used black vinyl to put the face on. I used a face from the Smiley Cards Gypsy Cartridge for the eyes and mouth.


Thursday, February 2, 2012
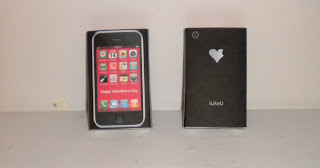
I-Pod Valentine Treats
I found this adorable printable over here: http://www.livinglocurto.com/2011/01/iphone-valentine-free-printable/ and I just had to make these for Kaylee's class. I printed them out on white cardstock and used the Martha Stewart Score Pal to score them and then cut them out. I used a stip of glue to attach them on the edges around a box of Brach's Sweetheart Candies. Kaylee loves them and I think they will be a huge hit for the kids. They were very simple to put together and I am sure you could get them printed or copied if you didn't want to print them at home. I made a total of 24 of these. Here is a picture of the front and back of the finished treats.
 Here is a close up of the fronts of the I-Pod printables.
 Here is a pic showing what they look like before being wrapped around the candy box. Make sure you use the 1 ounce size candies so they will fit. I purchased these at Target and they were 8 in a package for $2.


Monday, January 30, 2012
Motivation Board
I made this motivation board last week. I am going to use this in my craft room and clip different motivational sayings to it. To make this, I started out with a piece of Artist Panel in a size of 6x12 and spray painted it black. After that was dry, I used SCAL with my Cricut and white vinyl to cut the title using Ariel Black and the Dinosaur chasing the little guy is a screensaver image that I traced in SCAL to make it into an svg. After they were on the board, I added a coat of Mod Podge to secure them and then hot glued two metal clips to the board so that I would be able to clip my sayings to it.


Friday, January 27, 2012
Melted Crayon Art
I have seen lots of things done with these melted crayons on Pinterest and I wanted to give it a try. I fell in love with the pictures that looked like it was raining from the crayons and had to make one for myself. Here is how it turned out. I love the textures of the melted crayons.
 To make this, I started out with a canvas that was size 7x9. I used black vinyl to make the cuts, the couple is from the Sweethearts Cricut Cartridge and the umbrella is from the Forever Young Cartridge. I then put a coat of Mod Podge over the image only to secure it down on the canvas.
 Now, I was ready to get set up for the crayons. I purchased one of the $3 glue guns at Hobby Lobby with a 40% off coupon for this, because you will not be able to use the glue gun for anything but crayons after this. The crayons will splatter, so you want to cover up the area you will be working in. I took two posterboards and secured them to the wall and floor in my area. I also used blue painter's tape to cover up my image. While my glue gun was heating up, I removed all of the wrappers from the crayons.
 After the glue gun was heated up, I started running the crayons through it and making drips down the canvas. I began with grey crayons and then used different shades of light and dark blues.
 You can use as many or as few crayons as you want depending on what type of look you are wanting to achieve. Once I was happy with how my canvas was covered, I removed the painter's tape and very carefully added some melted crayon in around the image.
 Once it was all dry, I cleaned up my mess and was very happy with the results. Here are a couple of pics to show you the textures better from the crayons.


Wednesday, January 25, 2012
Heart Wreath: Decorate to Celebrate Challenge 17: Valentine's Party: Design Team Project
It is time for a new challenge over at Decorate to Celebrate. Our new challenge is to create something for a Valentine's Day Party. Be sure to stop by and check out all of the projects by the design team and enter your party decoration here: http://decoratetocelebrate.blogspot.com/.
For my project, I decided to make a heart wreath decoration. I think it turned out nice and will make a great Valentine's Decoration.
 I started out with a heart shaped wreath form from Hobby Lobby, red yarn and the hot glue gun.
 I used the hot glue gun to secure a piece of yarn to the wreath and then began wrapping it tightly around the wreath. I used the glue periodically to secure the yarn and continued to wrap. The curves made it a little bit tricky and it took longer to wrap than your normal circle wreath.
 Here is the yarn after it was finished being wrapped with yarn.
 I then took a piece of fringe white ribbon and pinned it to the wreath to make a loop to hang it up. I wanted the heart to hang to the side, so that is why I placed the ribbon where I did on the wreath.
 Finally, I used the Home Decor Cricut Cartridge to cut the word love out of white cardstock. I cut it out a couple of times and glued them together to give it some stability. I then hot glued it to the wreath to finish it off.

For my project, I decided to make a heart wreath decoration. I think it turned out nice and will make a great Valentine's Decoration.


Subscribe to:
Posts (Atom)