Sunday, October 23, 2011

Spook-tac-u-lar Day 23: Mr. and Mrs. Spider

Welcome back to Day 23 of the Spook-tac-u-lar Halloween Crafts.  Be sure to stop by and see what Rhonda has to share with you at http://www.scraphappenswithrhonda.blogspot.com/ when you are finished visiting here.

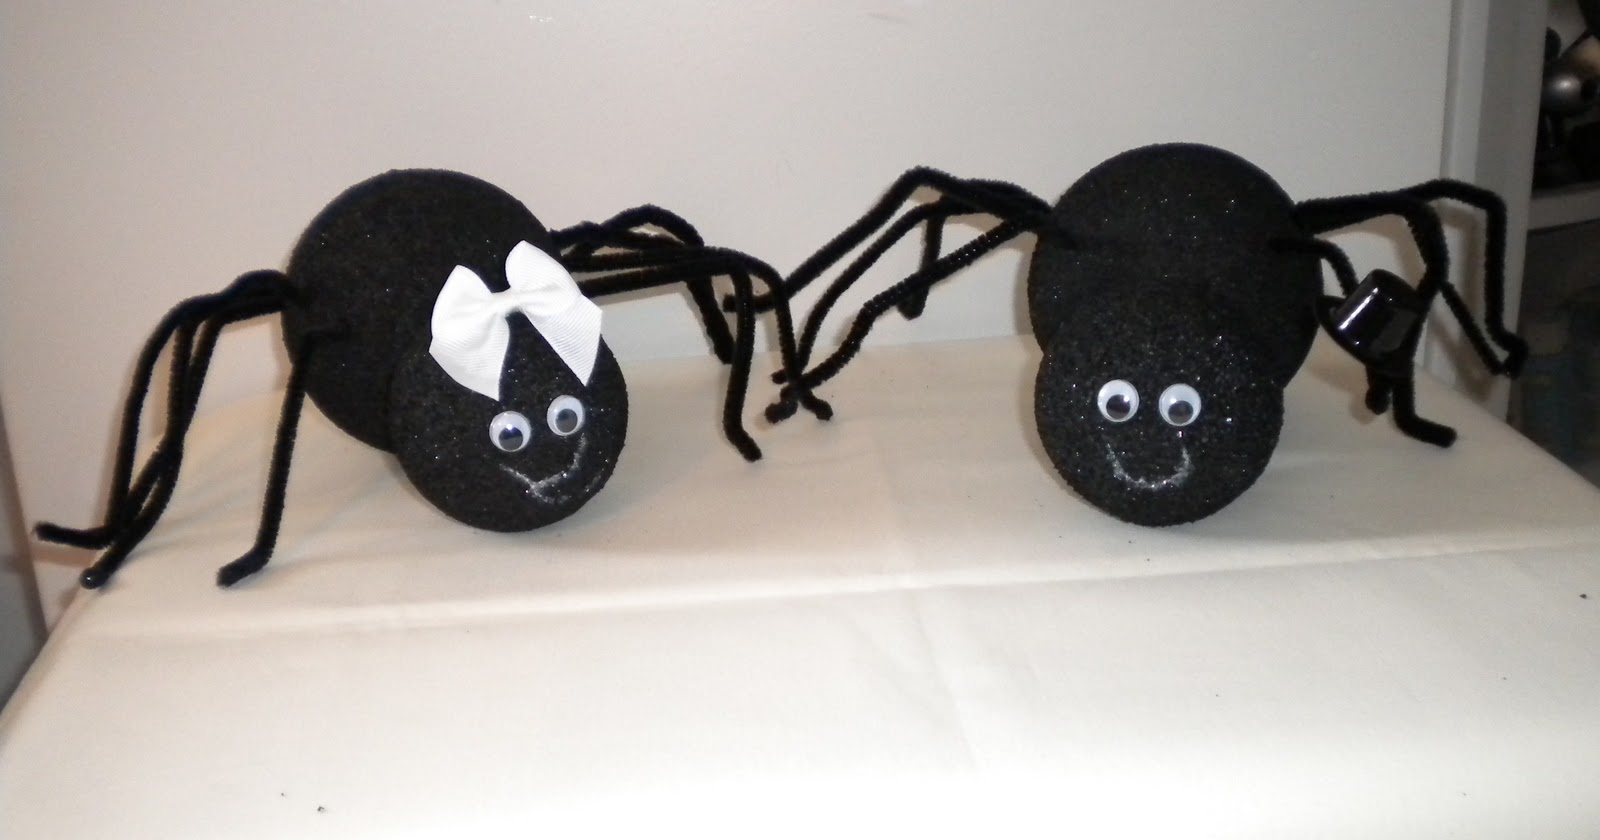
Today, I have two little spiders to share with you. 
The inspiration for this project came from a picture my hubby drew a few month's ago.  He is the Sales Manager of Cook's Pest Control and one of his sales men was talking to a customer about "Mr.Spider" and he thought it was funny and drew this little picture.  I saw it and wanted to make him and a girl spider as well.  Here is the picture he had drew. 

I started out with 2 stryofoam balls that were 4 inches and 2 styrofoam balls that were 3 inches and spray painted them black.  (The balls were put on skewer sticks to hold them up while being painted and drying).
Next, I used a small skewer stick and a small bit of hot glue to attach the smaller balls to the larger ones to make the spider's body.
For the legs, I used black pipe cleaners.  I took 4 of these and cut them in half.  Then, I took each half and placed it into the side of the larger ball and bent them down to make the legs.

I did this for both spiders on each side.  Once the legs were finished, I hot glued a bow to the top for the girl and I hot glued a mini top hat that came from Hobby Lobby into the arm of the boy spider and bent it up towards the head.  I also used hot glue to attach some google eyes to them.
Finally, I used a white paint pen to add a little mouth to each spider.


Saturday, October 22, 2011

Spook-tac-u-lar Day 22: Crackle Boo Sign

Welcome back to Day 22 of Spook-tac-u-lar Halloween Crafts with Jean and Rhonda.  Be sure to stop by and see what Rhonda has to share with you at http://www.scraphappenswithrhonda.blogspot.com/ when you are finished here.

For today, I have a Crackle Book Sign to share with you. 
To make this, I used another wood block piece that I found marked down.  I also used Folkart Crackle Medium, Titanium White Paint and Metallic Gun Metal Paint.

To begin with, I coated the block with the gun metal gray paint and let that dry.

Next, I used the Crackle Medium and applied a thick coat over the gray paint and let that dry.
Finally, I applied the top coat of white.  As this coat dries, the crackle will begin.

Once this was completely dry, I used the Don Juan Cricut Cartridge to cut the word Boo out of black vinyl and apply it to the block.

Next, I took a piece of black ribbon with white stitch lines and a premade bow and hot glued them to the block to finish it off.

Friday, October 21, 2011

Spook-tac-u-lar Day 21: Spider Plate (And a Winner)

Welcome back to Day 21 of the Spook-tac-u-lar Halloween Crafts.  Be sure to stop by and see what Rhonda has to share with you at http://www.scraphappenswithrhonda.blogspot.com/ when you are finished visiting here.

Before we get to today's project, I would like to announce the winner of this week's giveaway.  The winner picked by random org is Comment 16, which belongs to Cricut Couple!  Congratulations, I will be sending you an email and get this mailed out to you once I get your address.  Also, remember there will be a new giveaway on Monday, so everyone will have another chance to win next week. :)

Now, for today's project I have a Spider Plate to share with you.  This is a simple and cute decoration that we will be using on the dessert table at our Halloween Party.


To make this plate, you will need:  a black charger plate (bought at Hobby Lobby), a small black bowl (bought at Target), two medium sized google eyes, eight black pipe cleaners, and a hot glue gun to attach everything.

First, I glued the two google eyes to the top of the large plate.

Next, I took my pipe cleaners and glued them to the bottom of the small bowl.  I glued four on each side to make the legs.  To begin with, just glue them down and leave them pointing straight out.

Next, use the hot glue to attach this bowl to the large plate (you can tell mine is not exactly center, but it works fine).  Once that is down, you can bend the pipe cleaners to be folded like legs and then glue them down to the bottom of the place to keep their shape where they bend around it.

When you turn your plate back over, you can finish shaping the pipe cleaners so that they fold down to the ground like legs.
And that is all there is too it.  You now have a cute spider plate for your Halloween treats.  You could also use smaller bowls and plates to make these in various sizes or even use other colors to have green or purple spiders if you wanted to.

I am adding this to the following challenge:
Decorate to Celebrate: Halloween Party Decorations: http://decoratetocelebrate.blogspot.com/


Thursday, October 20, 2011

Spook-tac-u-lar Day 20: Trick or Treat Sign

Welcome back to day 20 of the Spook-tac-u-lar Halloween Crafts.  I can not believe it is October 20th already.  Our Halloween party is this Saturday and it seems like it got here so fast!  Be sure to stop by and see what Rhonda has to share with you at http://www.scraphappenswithrhonda.blogspot.com/ when you are finished visiting me here.

For today's project, I have a cute little sign decoration.  This was really simple to make and cost very little also, since I had most of the items on hand.

To make this sign, I started out with a wood sign that I had purchased on clearance at Ross a little while ago for $1.  (whenever I see these sayings on wood marked down, I purchase them to use for my projects later).  I used Krylon spray paint to cover the block.
Once it was painted Orange, I cut white circles in two sizes (.6 inches and .9 inches) out of vinyl and placed them on the block.  (For the ones that are folding over the top, I ended up cutting the circle in half because I was worried about those coming up in time).
Now, I used black vinyl to cut the words Trick or Treat.   These were cut at a total size of 10.88 wide x 1.23 high using SCAL and the Cheri Font.  I placed them over the block and white circles.
Finally, to finish the block off, I put a coat of Mod Podge over the top to seal everything in.
I am entering this into the following challenge:
Whimsical Wednesday: Halloween Home Decor: http://whimsicalwednesdays.blogspot.com/
I am also sharing this over at:
Show and Tell with The Crafting Misfit: http://craftingmisfit.blogspot.com/

Wednesday, October 19, 2011

Spook-tac-u-lar Day 19: Candy Wrappers

Welcome back to Day 19 of Spook-tac-u-lar Halloween Crafts.  Be sure to stop by and see what Rhonda has to share with you today at http://www.scraphappenswithrhonda.blogspot.com/ when you are finished here.

For today's project, I have some little candy wrapper treats.  At our Halloween party, we have the adults all bring treats or candy and let the kids go trick or treating after the costume contest.  This is what I have made for my treats this year.  I used a free candy wrapper svg file to cut the base of these and then decorated them.  They have a tootsie roll inside each wrapper.  The sides were tied with glitter craft cord in white and black.  I made bats, ghosts, Jack Skelingtons, witches, pumpkins and Frankensteins.
For the bats, I used George and Basic Shapes to cut the triangles for ears, a white pen to draw the mouth and fangs, and added google eyes.

For the ghosts, the face was drawn with a black sharpie marker.

For the Jack Skelington Face, I also used a black marker to draw the face.


For the witches, I drew the mouth with a black marker, added google eyes and used Paper Doll Dress Up for the hat.  I also used a white pen to add a line across the hat.
For the pumpkins, the face was hand drawn with a black marker.

For the Frankensteins (which are my personal favorite), I used the Martha Stewart Ice Cycle Punch and trimmed it down for his hair.  I then added google eyes and hand drew his face.
I am entering these into the following challenge:
Getting Cricky With K. Andrews: Simply Sunday Challenge/Treats: http://www.gettingcricky.com/
Fantabulous Cricut: Purple with a Monster: http://www.fantabulouscricut.blogspot.com/

Tuesday, October 18, 2011

Spook-tac-u-lar Day 18: Witch Book Decoration

Welcome back to day 18 of the 31 days of Spook-tac-u-lar Crafts.  Be sure to stop by and see what Rhonda has to share with you at http://www.scraphappenswithrhonda/ after you are finished visiting me here. :)

For today, I made a Witch Book to share with you.  If you remember last year I made the pumpkin, Frankenstein and monster books.  This is the new addition to add with them.  You can view last year's books here: http://jeanscraftycorner.blogspot.com/2010/10/day-4-of-halloween-crafts-paperback.html if you would like to see them.

I started out with a book that I bought from the junk store and hot glued the front and back cover together.  Then, I folded the pages in half for the entire book so it would form the circular shape I needed.  Once the book was completely folded, I used green paint to cover the edges.
Now, I took green foil shreds and to make hair for the witch.  I hot glued them to the top and sides.  I got the small witch hat from Hobby Lobby and hot glued it to the top of the book.
For the nose, a piece of plain white paper was crushed up to look like a nose and then I painted it green.  I also added a flat back black pearl to the nose also. 
Finally, I hot glued two google eyes to the face, hot glued the nose and cut a mouth from the Pumpkin Carvings Cricut Cartridge and hot glued it to the front also.
I am entering this into the following challenge:
My Craft Spot: 3D Halloween Project: http://craftspotbykimberly.blogspot.com/

Monday, October 17, 2011

Spook-tac-u-lar Day 17: Monsters Live Here Sign and A Giveaway

Welcome to Day 17 of the Spook-tac-u-lar Halloween Crafts.  Scroll down to the bottom of this post for this week's giveaway details and be sure to stop by and see what Rhonda has to share with you today at http://www.scraphappenswithrhonda.blogspot.com/ when you are finished here.

For today's project, I have a sign I made for my mom to hang on her door.
To make this sign, I started out with a square piece of wood and spray painted it white.

Next, I found this adorable free clip art image and traced it into SCAL to convert it to an svg file.  Once it was converted, I cut it using the Cricut and black vinyl.  The image was cut at a size of 5.12 inches wide x 6 inches high.

After placing it on the square, I put a coat of Mod Podge over the top to seal the image onto the wood.

Then, I used hot glue to attach a piece of ribbon to the back to form a hanger for the picture to finish it up.


Now, for this week's giveaway, I have the Cuttlebug Folder Set "Plum Blossom". (pic below)  To be elgible, you will need to 1) Become a Follower if you are not already, 2) Leave a comment on this post.  I will take the comments through Thursday, Oct. 20 and use random.org to select a winner.  The winner will be announced on Friday, Oct. 21.  Good Luck!!

Sunday, October 16, 2011

Witch and Moon Layout

If you are looking for today's Halloween Project, scroll down to the previous posting. :)

Here is a Halloween Layout I worked on.  I used George and Basic Shapes for the moon.  The witch is from the Pumpkin Carvings Cartridge and I cut her out of metallic velum.  For the bats, I used the Happy Hauntings Cartridge and cut them out of black glitter paper. 

I am entering this into the following challenges:
Getting Scrappy at Amanda's Crafts and More: Kooky and Spooky (Halloween Layout): http://amandascraftsandmore.blogspot.com/
Paper Cutz: Halloween Layout with stars, circles or diamonds: http://papercutzchallenge.blogspot.com/

Spook-tac-u-lar Day 16: Bat-o-Lanterns

Welcome back to day 16 of the 31 days of Spook-tac-u-lar Halloween Projects.  I hope you have enjoyed the first half of the month's projects.  Be sure to stop over and see what Rhonda has made to share with you at http://www.scraphappenswithrhonda.blogspot.com/ when you are finished here.

For today, I have some Bat-o-Lanterns to share with you.
To make these, I started out with 4 inch plastic pumpkins from the Dollar Tree.

I removed the tags from these and pulled the stems out.  Then, I used black spray paint to cover them.
Next, I cut the wings for my bats by cutting the bats from the Simply Charmed Cartridge at a size of 11.53 wide x 6.41 high and cutting the wings off.

I then folded the wings slightly and hot glued them to the side of the bats.  Finally, I hot glued two google eyes on the front to finish them off.