Monday, January 31, 2011

In 1492, Columbus Sailed the Ocean Blue

Kaylee went on a field trip to learn about Columbus and his ships at the first of the school year.  I had already scrapbooked one page, but needed another to go with it.  I found the full poem about Columbus online and printed it directly onto the page.  Then, I used the Paper Dolls Dress Up cart to make a little Columbus with a map in his hand for the layout.  For his hat, I took the pirate hat and welded an oval to it to make an explorer type hat.


Two Upcoming Blog Hops

Just wanted to give everybody a heads up about two blog hops that will be coming up soon.

First, on February 7, will be the Fantabulous Cricut Share the Love Blog Crawl.

Then, February 12th and 13th, will be the Cooking with Cricut Sweet Shop Blog Hop.

The buttons for both of these hops are on my sidebar to remind you as we get closer to them.  Be sure to plan on coming by for both of these.  There will be tons of great inspiration from all of the participants and chances to win prizes as well!

Fantabulous Cricut Challenge 45: Support the Cause: Design Team Project

For Challenge 45 at Fantabulous Cricut, our theme is Support the Cause.  You can make a project for any cause that is important to you and you will need to use a Cricut cut somewhere on your project.  Be sure to stop by the blog to check out all of the wonderful projects by the design team and to get in on this weeks challenge here.

For my project, I decided to go with a project for Breast Cancer Awareness.  Cancer has been something that has affected a lot of my family members and my husband's as well, so this is a cause that is important to us.  I had this small frame that I had purchased a while back that I used as the base of my project.  I then cut the bee from Create a Critter and the ribbon from Stand and Salute.  I cut a small ribbon for the bee and a larger one to go in the corner.  I hot glued these onto the frame and used a pink marker to draw the little swirl lines from the bee.  For the inside of the frame, I took a pink sheet of paper and added some faux stitching and the words "Bee-lieve in a Cure" with a white gel pen.  I think it turned out nice and the frame had a white ribbon on it, so it can be hung up.


Saturday, January 29, 2011

Out of this World Layout

I have had this layout idea in mind for a while, so I decided to use it for Kaylee's pictures from the award's day of the first 9 weeks of school.  I started out with some pearlescent black paper for the background and cut a circle on the edge of the page out of red glitter paper for Mars.  The rocket and the alien are from Everyday Paper Dolls.  I used the diamond plates embossing folder on the wings of the rocket and added some stretched cotton balls for the smoke.  The star on the bottom is from Robotz and says Perfect Attendance and Honor Roll.  I then used the Robotz cartridge to cut the title out of green vinyl and then outlined the letters in white.  I used the I-Rock to add rhinestones in two different sizes around the page for stars.


Friday, January 28, 2011

Stupid Cupid, Stop Picking on Me Layout

This is my first time playing along with the Terrific Tuesday Challenges with Scrappy Moms over at Scrappy Moms Stamps.  You can check their blog out here.  The challenge this week is to use the Sweethearts Cartridge. 

Well, I have had that song Stupid Cupid, Stop Picking On Me stuck in my head for the last two days.  I heard it on a commercial and that was that.  So this morning, as it was still stuck in my head, I thought it would make a great scrapbook layout, so that is where the inspiration for this page came from.  I used the Sweethearts cartridge for the cupid and the arrows and then I also used the Don Juan cartridge for the title (See below the pic for how I did the title on this page). The photo matt is a precut piece that came from the Target $1 area.  I really love how this turned out, so I guess the song getting stuck in my head wasn't all that bad, lol.

To make the title on this page, I set the title up on my Gypsy and then cut it out on the pink paper that I was going to use for my layout.
 I then glued a strip of white paper to the back and added all of the insides of the letters from the cuts.

A Moo-velous Valentine!!

The challenge over at Cricut Cardz Challenge this week is to create a valentine card for a child.  Check their blog out here. 

I used the Live Simply cartridge and welded two of the frames together for my base.  Then, I used the Create a Critter cartridge for the cow.  I used the Gypsy to add hearts from the Create a Critter cartridge to the cow, so his spots would be heart shaped.  I then hand wrote the sentiment Have a Moo-velous Valentine's Day at the top and added three heart shaped buttons.  Finally, I used a white pen to add some faux stitching around the edge of the card.

Thursday, January 27, 2011

Boomer The Yorkie

Kaylee got another Yorkie this year in December.  He was a rescue pup that they adopted as part of her Christmas.  For Christmas, I got this really cute animals paper stack, so I decided to use a page out of it to scrapbook this.  The photo mats are from a page out of the pack as well.  I added a chipboard cut out that says Woof to one of the clouds and then added some journaling about the puppy to the top cloud with a blue sharpie.

Thankful Layout

Well, I know it is nowhere near Thanksgiving, but I am trying to catch up layouts from 2010.  With that in mind, you will probably be seeing a few Halloween and Christmas layouts coming up as well.  If you remember the thankful turkey that I made Kaylee at Thanksgiving, we took the feathers out of it to make a scrapbook page and I will make her new ones for next year so she will be able to use the turkey again.  The turkey body on this page is from Create a Critter.  I thought this would be a great thing to scrapbook, so she would be able to look back and see all of the things she said she was thankful for each day.

Wednesday, January 26, 2011

Friends Layout for OTWC Challenge

I made this layout for the current OTWC challenge.  Be sure to check out the blog here.  This week's colors are orange, white and teal.  Here are the inspiration photo and colors.

For my layout, I used A Child's Year for the letters to spell out friends.  I then outlined the letters in white and added some white dots to them.  I cut the frames for the pictures from the Live Simply Charmed.  I then outlined these in white and added some small dots around them also.


Butterfly Layout for BBTB Challenge

The challenge this week over at Bitten by the Bug is to use the butterfly on page 59 of the Once Upon a Princess Cartridge.  Be sure to check them out here.  I had these pictures of Kaylee from when me and her went to the butterfly house at the Botanical Gardens in October that I needed to scrap (I am trying to catch up on layouts for pictures from last year), so they worked perfect for my layout.  I cut the butterflies in pink and green and then used some diamond stickles to add some sparkles and also used a white opaque pen to add some faux stitching lines around them.  I really liked how the stickles turned out over the green, I thought it looked kind of stained glass like. 


Valentine's Bag for Kaylee

Well, Kaylee's old box that she uses for getting Valentine's at school is now worn out, so she had to have a new one.  I found this cute zebra purse like bag at Hobby Lobby and thought it would be perfect to decorate for her.  I used Pink Vinyl and cut her name with the Don Juan cartridge and the little hearts from Create a Critter.  I used a white gel pen to outline her name so it would show up a little better.  I then hot glued on some foam hearts that I found at Hobby Lobby in the Valentine's section. 


Cooking with Cricut Challenge 14: Birthday Blessings: Design Team Project

It's time for a new challenge over at Cooking with Cricut.  Our theme for challenge 14 is Birthday Blessings.  Be sure to stop by the blog to check out all of the great projects by Melin and the rest of the design team and enter your own birthday themed project.  This week, the challenge is being sponsered by the wonderful Peachy Keen Stamps. They will be offering a $25 gift certificate to winner of the challenge, so be sure to get your projects in here: Cooking with Cricut.

Now, on to my project.  For this card, I used the Wild Card Cricut Cartridge for the base and then used one of the new digital stamp releases, So Many Candles, So Little Cake, from Page-Kits.com. (How cute are these little candle people!!)  I used a combination of Prismacolor colored pencils and markers to color this in.  I hand cut little strips out of scraps of glitter cardstock to make the confetti.  I then ran ribbon through the slits in the card and added a bow to the top.  I used a stamp to add Happy Birthday to You to the inside of the card.


Tuesday, January 25, 2011

Owl Candle

I found this really cute candle marked down at Target that looked like it had woodgrain around it.  I thought it would be super cute with an owl on it, so I used the Gypsy Wanderings Cartridge to cut the owl out of black vinyl and applied it to the candle. 

Another Stylish Blogger Award

I wanted to take a minute to thank Cathie over at The Creative Cutter Room for passing on The Stylish Blogger Award to me.  Be sure to check her blog out for great projects and inspiration here.  I have previously received this award, to see who I passed it on to see this link.  Thanks so much!!!

Monday, January 24, 2011

Steelers Layout

As most of you know, I am a huge Steeler's Fan.  I have Steelers items all around my house and I was so excited with the win yesterday, so I decided to make a layout.  I printed this picture from yesterday's game and printed the symbol.  For the 7, I used the Graphically Speaking cartridge.  The footballs on the two corners are patches. 

Fantabulous Cricut Challenge 44: Neglected Cricut Cartridge / Design Team Project

This week, for challenge 44 over at Fantabulous Cricut, our theme is Neglected Cartridge.  We were asked to use a cartridge that we haven't used in atleast 6 months.  Be sure to stop by the blog to see all of the other projects by the design team and get out your neglected cartridges and play along with us this week: http://fantabulouscricut.blogspot.com/

For my project, I knew exactly what cartridge I would use.  I am a little embassed to admit this, but I got the Pagoda cartridge in December 2009 and had never used it.  I really liked all of the images on it, but never had a reason to use them.  So, I pulled it out and decided to go with the cute panda cut.  I wanted to put something in his hand, so I looked through the cartridge handbook and found the cutest flower that looks like the petals are little hearts.  I used the Gypsy to weld two of the pandas together to make a shape card.  Once the card was finished, I decided to use the same flowers and panda to make a layout for a picture that I had of Kaylee by the fountain at The Botanical Gardens.

Saturday, January 22, 2011

Bananas For You Card / My Sheri Crafts Challenge Entry

The challenge over at My Sheri Crafts this week is Organic. You can find their blog here: http://myshericrafts.blogspot.com/  I was thinking that a banana is organic and it would make a cute Valentine's Day card, so I got my Create a Critter Cartridge out and used the Gypsy to weld two bananas together.  I then finished cutting all of the layers and added a hand tied bow from some small ribbon and two google eyes.  I used a pencil to write I'm Bananas For You! along the side and then went over it with a black marker.  I think it turned out so cute.

Thursday, January 20, 2011

Basketball Candy People for Valentine's Day

I made these for Kaylee to give out to her basketball team for Valentine's Day.  I love how cute they turned out.  I found the Valentine's colored sixlets, so I thought they made them look more girly.  I used the Basketball Cricut Cartridge to cut these out of glitter cardstock and then I added google eyes and a hand drawn mouth.


I am linking these up here:

NightOwlCrafting


Party Button

Wednesday, January 19, 2011

I "Whaley" Love You Card and Layout

I found this great new challenge called Tacky Tuesdays.  For the current challenge, you were to make a card using the whale cut from the Create a Critter Cartridge and also use the word whale on your card. You can find the challenge here: Tacky Tuesday Challenge 

I had been thinking about making a card with this saying for a while, so this was the perfect chance.  I liked the card so much, I decided to make a matching layout as well.
For the card, I used Wild Card for the base, Create a Critter for the whale, and George and Basic Shapes for the hearts.  I printed the sentiment and then used a scallop circle punch to punch it out.  I also used a white opaque pen to add some faux stitching lines around the card and around the whale.  Finally, I used a Martha Stewart sepia pen to outline the whale and the hearts.

 For the layout, I began by printing the title directly onto the 12x12 page using a font called Adlib.  I then took a white opaque pen and added some small dots to the letters and then also added some faux stitching lines around the layout and the whale.  The whale came from Create a Critter, the hearts came from George and Basic Shapes.  The photo mat is a precut background that came from Target.  For the final touches, I added 3 heart buttons to the photo area and used a glitter gel pen to color in the hearts and a white gel pen to add some lines to the corners of the hearts.

Cooking with the Cricut Challenge 13 - Flowers - Design Team Project

For Challenge 13 at Cooking with the Cricut, our theme this week is Flowers.  You must use atleast 3 flowers on your project.  Be sure to stop by the blog to check out all of the DT's projects and get your flower project entered into the challenge here: http://cookingwithcricut.blogspot.com/,

I decided to make a layout for my project.  I used a background paper from the Songbird paper stack that had three flowers printed on the bottom.  I then used the Walk in my Garden Cricut Cartridge to cut flowers out of glitter cardstock to make a border around the picture.  I hand drew the stems in to match the ones that were on the printed flowers and added buttons to the center of the flowers.  I then used the Once Upon a Princess Cartridge to cut the title, outlined it with a Martha Stewart sepia marker and filled in the butterfly wings with a green marker.  (If you look closely, you can see the remains of a Star Wars temporary tatoo on Kaylee's arm, lol.  When I was making this layout, I was thinking what has she got on her arm, and upon closer investigation I realized what it was.)


Tuesday, January 18, 2011

Basketball Layout

Kaylee just started playing basketball this year.  She has had two games and I have to brag on here a minute, at the first game she made 6 baskets and got the best defensive player award and at her second game she made 10 baskets.  I haven't printed any of the pictures from her games yet, but I went ahead and made a layout for a few of them today.

I also Created this for Getting Cricky Challenge, For the Birds.  You can find the blog here:  http://kandrewdesigns.blogspot.com/.  For this challenge, you have to use a bird in your project.  She is featuring the 3 Birds on Parade cart right now, so I decided to use that cart, because it is one of my favorites. I used that cart for the bird and the title and then I used George and Basic Shapes to cut some photo mats out of a piece of basketball scrapbook paper.  The #4 is a sticker and then I cut a circle for journaling in the bottom.

I am also entering this into the challenge over at Bitten by the Bug this week.  You can find their blog here: http://heather-bittenbythebug2.blogspot.com/  There challenge is to use the Bird or Armadillo from Birthday Bash or you can use another bird cut.


Another Necklace

Well, I have been doing a little more jewelry making again.  I think this turned out pretty cute and sort of vintage looking. 

 I started out by drawing three freehand circles on a piece of felt.  (Make one a little larger than the others) Then, I cut them out. (Sorry about the lighting in these pics, not sure what was going on with the camera)

 Next, I took lace that was on a roll (came from the ribbon dept. at Hobby Lobby) and began twisting it around the felt.  I used hot glue to attach it as I wrapped it around the felt.
 Once it was fully wrapped and began to look like a flower, I added a small pearl to the center with the hot glue.
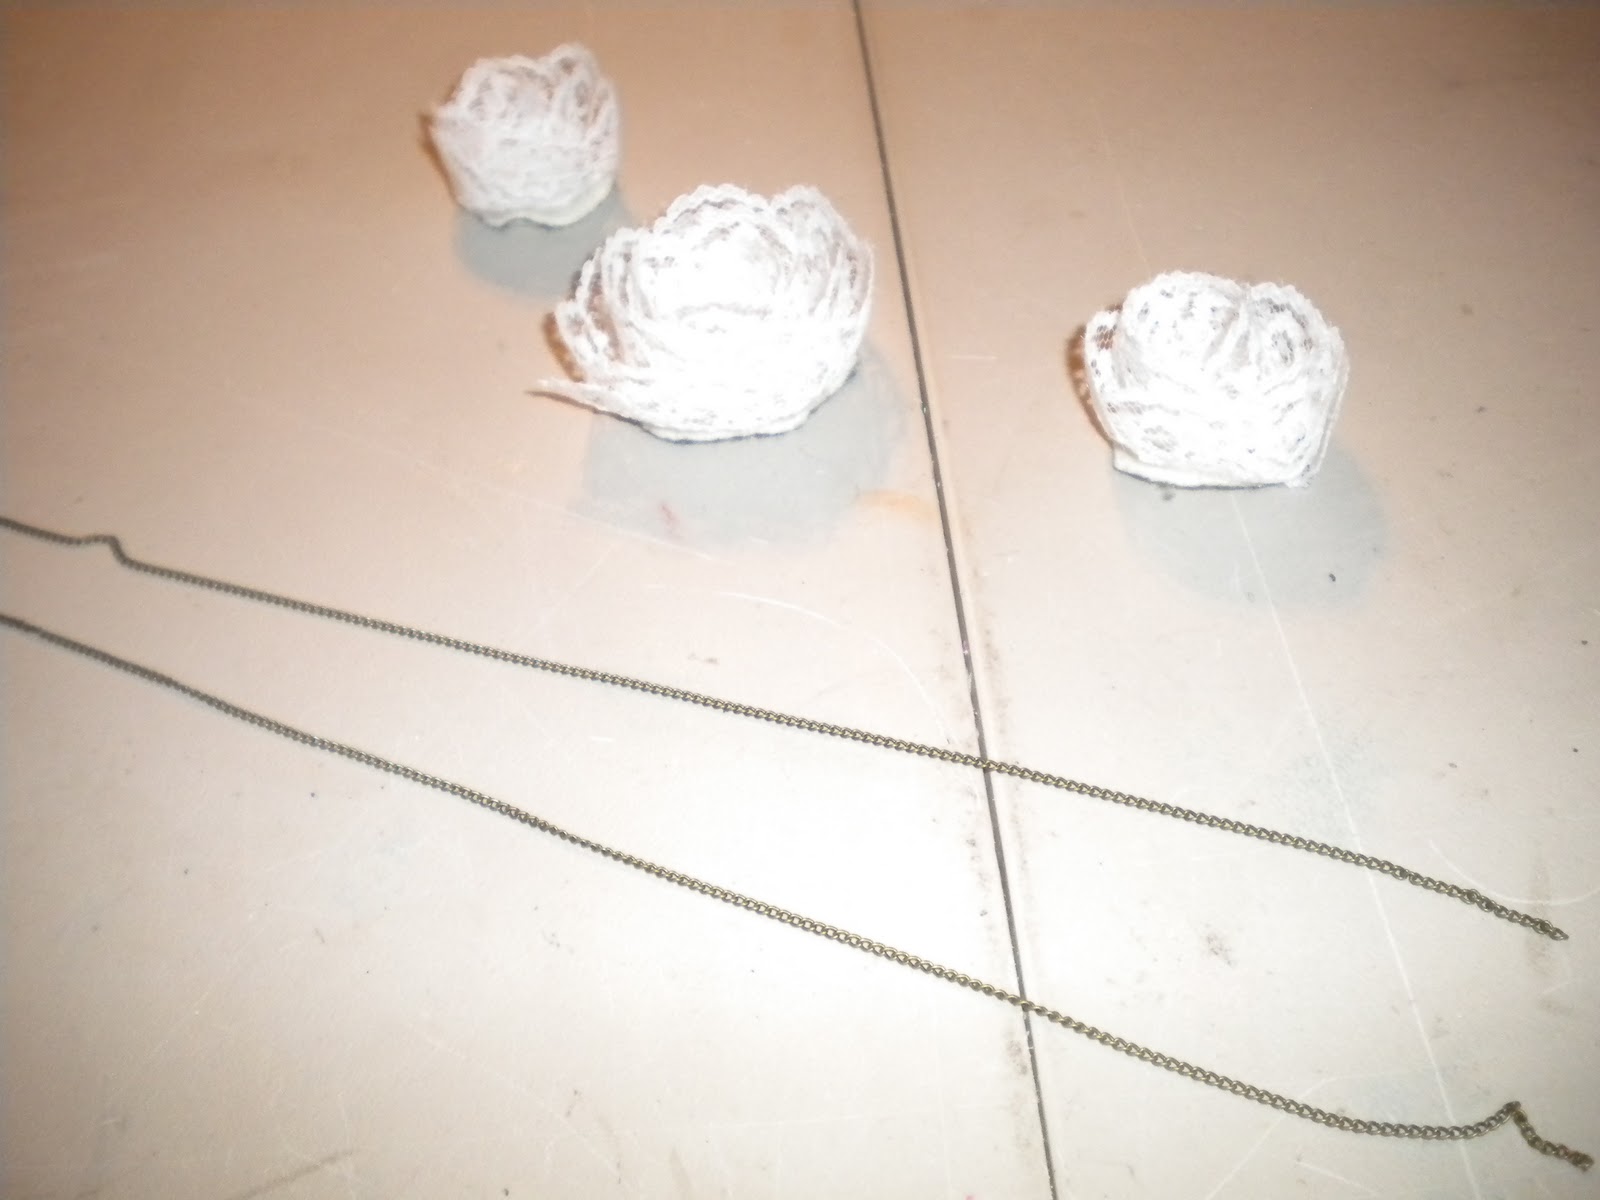
 Now, do this three times and then get your chain to make the necklace.  I measured the chain to the length that I wanted my necklace.
 Next, I hot glued all three of my flowers together.
 Now, I hot glued the chain to the back of the flowers. 
 Finally, I added a jump ring and latch to the necklace to finish it off.