


Saturday, December 31, 2011
Have a Safe and Happy New Year's!!!
I will be back with new projects next week, but I wanted to stop in today and wish everybody a safe and fun New Year's Eve!! I hope you all have a great time however you may be celebrating. Me and the hubby are just staying in and having a quite New Year's. I will see you all next year. :)
Friday, December 30, 2011
Grenade Card
My hubby's birthday was on December 11th and this is the card I made him. I used the Indie Art Cartridge and the Gypsy to make a shape card of the grenade. I think it turned out pretty neat and makes a good man card. I love sparkly girly stuff, so it is hard for me to come up with what to make for a guy sometimes. For the sentiment, I wrote: "Happy Birthday to a man that I would catch a grenade for, or throw one at depending on the day." We have been married 10 years and he thought that was very funny.

Wednesday, December 28, 2011
Decorate to Celebrate Winter Wedding Challenge: Design Team Project
It is time for a new challenge over at Decorate to Celebrate. This time, the challenge is to make a decoration for a Winter Wedding. Be sure to stop by and check out all of the projects by the design team and enter your own project into the challenge here: http://decoratetocelebrate.blogspot.com/.
For my project, I decided to make some table place settings. I had gathered some pinecones from behind my house a while ago and wasn't sure what I was going to do for them. When this challenge came up, I knew they would be perfect for the occassion. This is what I came up with.
 To begin with, I started out by taking some of the pinecones and some fake snow spray that I purchased at Hobby Lobby.
 I covered the pinecones with the snow spray and let them dry.
 Once they were dry, I used the Cricut to cut the labels for them. I used the Storybook Cartridge to cut a white marquee shape and a smaller blue marquee shape. I then used the Batman Cartridge to cut the font for the labels using white vinyl. I then used a small dot of hot glue to attach these to the top of the pinecones.
 I think these would look great on the tables at a Winter Wedding. You could also do names on them and use them at the actual seats for each person if you wanted.

For my project, I decided to make some table place settings. I had gathered some pinecones from behind my house a while ago and wasn't sure what I was going to do for them. When this challenge came up, I knew they would be perfect for the occassion. This is what I came up with.


Tuesday, December 27, 2011
Sock Snowmen (No Sewing Needed)
I have been making these sock snowmen lately and I think they are just adorable. I originally saw some similar to these on Then She Made and had to give them a try. Mine are a little bit smaller than hers. I started out to just make a couple, but I can't quit making them because they are so easy and so adorable. I have the tutorial for how I made them to share with everybody today also. My mom gave me the idea to make a penguin with a black sock, so I may be giving that a try soon too.

 To begin with, I took a white tube sock and cut the tube part off of the top. (You can usually find these at the $1 store, or you can also use old socks you may have if they had a hole in the foot part.)
 Now, you will need to turn the tube part inside out and use a rubber band to secure one end of the sock. Be sure to put the rubber band around enough times that it will be a tight and secure hold. After you have this secure, turn the sock back right side out.

 Now, for the next part you will need a pair of ankle socks. I bought these at Target for $1.50. They have many different colors and styles in their sock area to choose from so you can make your snowman your own. You will need to take one sock and cut the toe and heel off. This will be the sweater for your snowman. On the next sock, you will need to remove the heel, this will be your hat for the snowman. Depending on how big you want the hat to be, you can determine how far up you want to cut from the heel of the sock.
 Once those socks are cut, You will need to put the sweater part over your sock and use a small bit of twine to tie it around. This will secure the sweater on the snowman and help you shape the body also. For the hat, You can pull it over the top of the sock and use a small amount of hot glue to attach the hat down around the top. I tucked this hat in some to make a hem like and keep the sock from fraying also. I then used a small bit of twin to tie up the end of the hat. This is not required, depending on how you want your hat to look. (I did not use any twine and made the hat a little smaller on one of my snowmen wearing a blue hat pictured above.)
After the decorative socks are attached, you are ready to add the details. I hot glued two small buttons to the face for eyes and two small buttons on the shirt part also. Then, I had a small carrot nose that was purchased in the Christmas section of Hobby Lobby. I pushed this into the sock and used a dab of hot glue to secure it also.
 Here is a front and side view of two of the snowmen I made.


When your sock is turned right side out, fill it up with polyfil pebbles and use another rubber band to secure the top of the sock. You will also want to get this secure so you won't loose any of the filling.


After the decorative socks are attached, you are ready to add the details. I hot glued two small buttons to the face for eyes and two small buttons on the shirt part also. Then, I had a small carrot nose that was purchased in the Christmas section of Hobby Lobby. I pushed this into the sock and used a dab of hot glue to secure it also.


Friday, December 23, 2011
Reindeer Pancakes and wishing everyone a Merry Christmas!!
I wanted to wish everyone a very Merry Christmas!! I am going to be busy with family stuff for the next few days and won't be around much, but I wanted to stop in and share one last Christmas idea. We had this at my house earlier this week, but it would be great for Christmas morning. It is reindeer pancakes. To put these together, I just stacked two pancakes up on each other to create the face and cut the ears from another pancake. I used bacon for the antlers and small sixlets candies for the nose and the eyes. I added the black on the eyes and the mouth with some decorating gel. They go together really quick and I think they turned out super cute!!
Hope everyone has a wonderful Christmas and Santa brings you everything you asked for. :)

Hope everyone has a wonderful Christmas and Santa brings you everything you asked for. :)

Wednesday, December 21, 2011
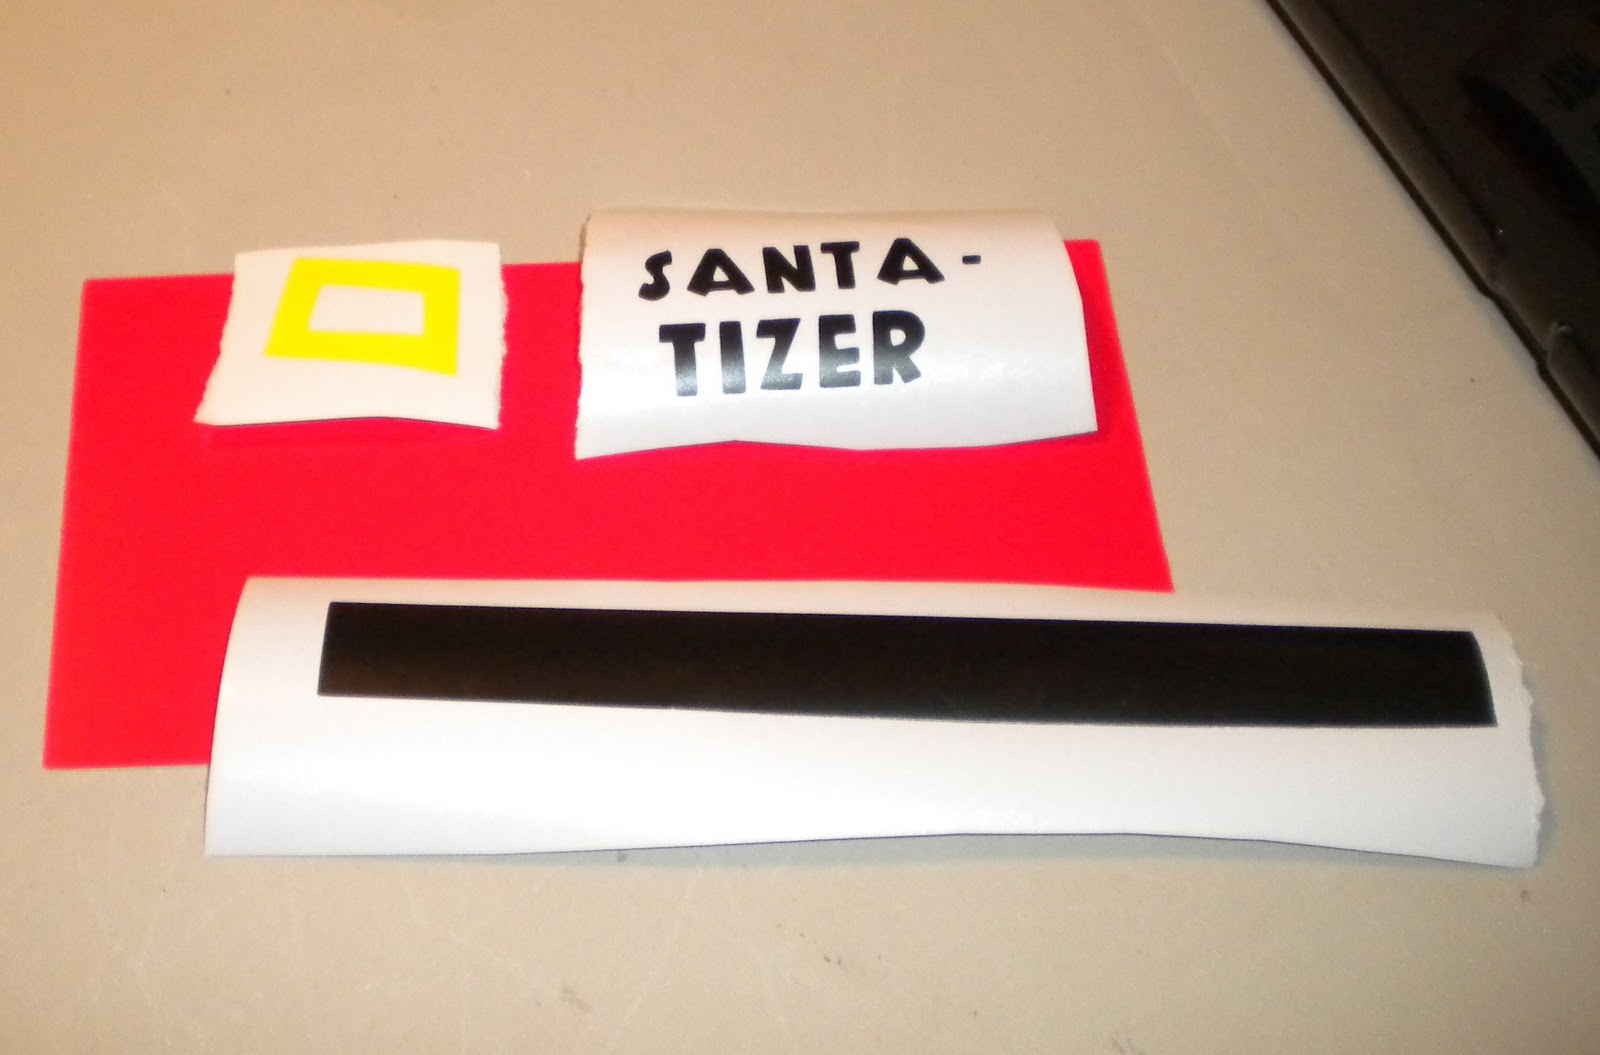
Santa-Tizer
I am so excited to share this project with everybody today, because I love how they turned out. I made these for Kaylee's teacher. They are very easy and inexpensive to put together if you need a last minute gift. And, we can all use sanitizer around the holidays with the cold weather and so many people coming in and out. Got to keep everybody healthy. :)
 To make these, I started out by getting by plain bottles of hand sanitizer from the Dollar Store.

 Now, I took these pieces and put them onto the red paper to make the cover for the bottle. I went ahead and removed the label off of the front of the hand sanitizer, but this is not really needed. (I am not sure why I was thinking about removing it, because you will be covering it up).


Then, I made my cuts for the bottle. I used George and Basic Shapes to cut a rectangle out of shiny red paper at a size of 8 inches wide x 4 inches high. I then used vinyl for the other cuts. I cut a black piece for the belt at a size of 8 inches wide x 1 inch high from George and Basic Shapes. I then used yellow vinyl and the Winter Frolic Cartridge to cut the buckle at a size of 1 1/2 inches. For the font, I used the Robotz Cartridge and cut the saying at 2 1/2 inches wide x 1 1/4 inches high.

I wrapped this label around the bottle and used a line of hot glue to attach the back and finish it off. Here is a picture of the front and back of the bottles.

Tuesday, December 20, 2011
Cutting Up With Class Gingerbread Challenge/Design Team Project
It is Tuesday and time for a new challenge over at Cutting Up With Class. This week, the challenge is gingerbread. Be sure to stop by to check out all of the projects by the design team and pick up the file so you can play along here: http://www.cuttinupwithclass.blogspot.com/.
The gingerbread file with santa hat worked great for me this week, because my Christmas wrapping paper has gingerbread men on it. Because they went together so well, I decided to make my gift tags with the file. I added some google eyes and mini puff balls to the tag and I used a white gel pen to add some details around the gingerbread cut. I love how these tags worked out and how good they go with my wrapping paper. I am also happy to say I am finished wrapping all of my Christmas presents, thank goodness. :)

The gingerbread file with santa hat worked great for me this week, because my Christmas wrapping paper has gingerbread men on it. Because they went together so well, I decided to make my gift tags with the file. I added some google eyes and mini puff balls to the tag and I used a white gel pen to add some details around the gingerbread cut. I love how these tags worked out and how good they go with my wrapping paper. I am also happy to say I am finished wrapping all of my Christmas presents, thank goodness. :)

I am also entering these into the following challenges:
My Craft Spot: Tags: http://craftspotbykimberly.blogspot.com/
Fantabulous Cricut: Tags: http://fantabulouscricut.blogspot.com/
Sunday, December 18, 2011
Reindeer Candy Tube
I made this little Reindeer to cover up a pack of the large Smarties that I got for my hubby. He likes these and I saw them while I was checking out at JoAnn's and thought it would be cute to dress them up a little bit, lol. I started out by cutting a piece of brown glitter paper to roll around the outside of the candy and taped it in place on the back. Then, I used brown pipe cleaners to make the antlers and glued them on also. Finally, I hot glued on two google eyes and a large red puffball for the nose. I think he turned out really cute and he was super simple to put together.


Friday, December 16, 2011
Snowman Cups
Here are some snowman cups that I made for my sisters and for Kaylee. I started out with a plain white plastic cup. I bought these at Walmart and got a pack of 4 for $1. I then used some vinyl scraps in black and orange to cut my face out. I used circles from the George and Basic Shapes Cartridge for the eyes and mouth and the nose is from the snowman on the Doodlecharms cartridge. The red and white straws in the cups came from Party City.


Wednesday, December 14, 2011
New Year's Party Challenge #14 at Decorate to Celebrate/Design Team Project
It is time for a new challenge over at Decorate to Celebrate. This challenge is all about New Year's Party Decorations. Be sure to check out all of the projects by the design team and enter your own project here: http://decoratetocelebrate.blogspot.com/. Remember to create a new project and link back to DTC in your post.
For my project today, I decided to make some toasting glasses with a little treat. I started out by picking up some champagne glasses and ribbon at the Dollar Tree. I filled the glasses with Hershey Kisses, because the silver color worked well with my theme and I was thinking about it being a play on the kiss at midnight for New Year's also. I used black vinyl and the Don Juan Cricut Cartridge to cut the 2012 to put on the front of the glasses. Then, I tied the ribbon around the base of my glasses and then used the Tags, Bags, Boxes and More Cartridge to cut a tag and the Wild Card Cartridge and more black vinyl to cut the sentiment for the tag. I simply threaded the tag up onto my ribbon that was attached to the glass to finish these off. I think they will make great treats for New Year's!

For my project today, I decided to make some toasting glasses with a little treat. I started out by picking up some champagne glasses and ribbon at the Dollar Tree. I filled the glasses with Hershey Kisses, because the silver color worked well with my theme and I was thinking about it being a play on the kiss at midnight for New Year's also. I used black vinyl and the Don Juan Cricut Cartridge to cut the 2012 to put on the front of the glasses. Then, I tied the ribbon around the base of my glasses and then used the Tags, Bags, Boxes and More Cartridge to cut a tag and the Wild Card Cartridge and more black vinyl to cut the sentiment for the tag. I simply threaded the tag up onto my ribbon that was attached to the glass to finish these off. I think they will make great treats for New Year's!

These cups were also featured on: http://www.allfreeholidaycrafts.com/
Tuesday, December 13, 2011
Cutting Up With Class Snow Challenge/Design Team Project
It is Tuesday, and that means it is time for a new challenge over at Cutting Up With Class. This week the challenge is snow. Be sure to stop by and see all of the projects by the design team and pick up this week's cut files to play along here: http://www.cuttinupwithclass.blogspot.com/. (Remember you will need to create a new project for this challenge and link it back to the CUWC Blog.)
For my project, I decided to make a snow themed layout. I used the snowman, snow and snowflake files that are all from Cutting Up With Class. I added some puffy paint and used the heat gun to get a snowy effect on the snow at the bottom of the page. I also added some diamond stickles to the snowflakes to give them a little sparkle. To give my snowman a little personality, I used google eyes and buttons on him and cut his hat and scarf from glitter paper. For my title, I used the Grilled Cheese font and cut the title out of blue vinyl. The background page I used for my layout is a pearlescent paper with a nice sheen to it.

For my project, I decided to make a snow themed layout. I used the snowman, snow and snowflake files that are all from Cutting Up With Class. I added some puffy paint and used the heat gun to get a snowy effect on the snow at the bottom of the page. I also added some diamond stickles to the snowflakes to give them a little sparkle. To give my snowman a little personality, I used google eyes and buttons on him and cut his hat and scarf from glitter paper. For my title, I used the Grilled Cheese font and cut the title out of blue vinyl. The background page I used for my layout is a pearlescent paper with a nice sheen to it.

Monday, December 12, 2011
Blinged Up Gloves
Since it is getting colder, we have to keep our hands warm with gloves. Last year, I saw a lot of people making gloves with some bling on them, so me and my sister, Whitney, decided to make us a pair. We were at JoAnn's a few nights ago and they had some cute pink gloves in the $1 section while we were checking out. So, we grabbed a pair and came back to my house to look through my stash. She picked out a little flower embellishment and I chose a jewel embellishment. We used hot glue to attach these to the finger of the glove. (I put a small wooden piece inside the finger while attaching them, so it wouldn't stick the two fingers together). Super easy and inexpensive, but now we have some cute, unique gloves for the winter. :)


Saturday, December 10, 2011
Snowman Mini Doughnut Toppers
I made these to put in doughnut holes, but could not find any, so I went with mini powdered doughnuts instead. I think it still worked out. I wanted to make it look like the doughnut was the bottom of the snowman. I used the Doodlecharms Cartridge to cut the snowman and hot glued them to toothpicks.


Friday, December 9, 2011
Berry Merry Christmas Cards
I made 10 of these Christmas Cards yesterday.To make these, I started out with a blank card base and cut a pink square at a size of 3.5 wide x 5.25 high to put on the front of the card. I then used the Lettering Delights Stuck on You Set to cut the strawberry at a size of 3.25 and embossed them with the Swiss Dots Cuttlebug Folder. The santa hat is from a Cutting Up With Class cut file. I outlined everything in black and then added google eyes and a piece of mini snowflake confetti to the strawberry. I printed the sentiment on an address label in red using the Balloon font.
 I am adding these to the following challenge:
Docerela Creations: Pink Christmas: http://docerelacreations.blogspot.com/

Docerela Creations: Pink Christmas: http://docerelacreations.blogspot.com/
Thursday, December 8, 2011
Snowman Pen Toppers
It seems as though snowmen have been a big theme around here this year and I have made a ton of snowmen crafts. One reason being that was the theme for my ornament party. This is a little craft that we made at my party (not an ornament though).
These little snowman pen toppers were super easy to put together and everybody really liked them.
 To make these, you will need: a pen, a styrofoam ball sized 1 1/2 inches, a mini light bulb and mini hat (from Hobby Lobby), sharpie marker, google eyes and a glue gun. You just need to push the ball onto the pencil, push the light bulb in for the nose, glue on the details and use the marker to make the little dots for his mouth.
 Here is a picture of my three sisters and Kaylee with their completed pens from the party.

These little snowman pen toppers were super easy to put together and everybody really liked them.


Wednesday, December 7, 2011
Snowman Clothespin Clips
Yesterday, I spent the day making Snowman Clothespin Clips. Two of my sisters wanted these to clip onto some treats they are giving out at work. They both needed 30 each, so I ended up making 60 of these. I have to give a little shout out to my hubby, because he helped me glue them to the clothespins to finish up. :)
I used the Christmas Express Set from Lettering Delights to cut the little snowman at about 3 inches high. Then, once he was put together, I hot glued him onto the front of the clothespin to finish them off. Now they can be clipped right onto the little treats they are giving out.

 Here is a picture of all 60 finished. I took pieces of comic board and cut them in half and then clipped 4 snowmen on each of these to transport in the box to my sisters.
 I am entering these into the following challenges:
Scrappy Moms: Christmas: http://www.scrappymoms-stamps.blogspot.com/
Celebrate the Occassion: Christmas (no green): http://celebratetheoccasion.blogspot.com/
I am also linking these up at:

I used the Christmas Express Set from Lettering Delights to cut the little snowman at about 3 inches high. Then, once he was put together, I hot glued him onto the front of the clothespin to finish them off. Now they can be clipped right onto the little treats they are giving out.


Scrappy Moms: Christmas: http://www.scrappymoms-stamps.blogspot.com/
Celebrate the Occassion: Christmas (no green): http://celebratetheoccasion.blogspot.com/
I am also linking these up at:
Tuesday, December 6, 2011
Santa Chimney Candy Holder/ Cutting Up With Class Fireplace Challenge/ Design Team Project
It is Tuesday and time for a new challenge over at Cutting up with Class. I hope you will join us this week. The challenge is to use this great fireplace cut that you can pick up over on the site. Be sure to stop by and check out all of the projects by the design team and pick up the file to enter your own project here: http://www.cuttinupwithclass.blogspot.com/
Remember that you need to create a new project for this challenge and link it back to CUWC. :)
For my project, I wanted to make a candy bar slider with the Santa coming out of the chimney. I covered my candy bar in red paper and used white paint to add a crick effect. I then hand cut a little piece to look like snow and used puffy paint on it to get a snowy effect for the top. The fireplace cut for this week at CUWC was cut and painted with the same bricks for the bottom of the candy bar holder. I then added some yellow paper, mini lights and small pieces of skewers cut to look like wood. The Santa cut is from Lettering Delights Santa Express set and was glued to the back of the wrapper.
 Here is a pic where you can see how the candy bar comes out of the package.

Remember that you need to create a new project for this challenge and link it back to CUWC. :)
For my project, I wanted to make a candy bar slider with the Santa coming out of the chimney. I covered my candy bar in red paper and used white paint to add a crick effect. I then hand cut a little piece to look like snow and used puffy paint on it to get a snowy effect for the top. The fireplace cut for this week at CUWC was cut and painted with the same bricks for the bottom of the candy bar holder. I then added some yellow paper, mini lights and small pieces of skewers cut to look like wood. The Santa cut is from Lettering Delights Santa Express set and was glued to the back of the wrapper.


I am also entering this into the following challenge:
My Craft Spot: Christmas Treat Packaging: http://craftspotbykimberly.blogspot.com/
Monday, December 5, 2011
Frosty the Snowman Outfit
Who doesn't love the song Frosty the Snowman. We are big fans of Frosty around here, so my ornament party I had last weekend was snowman themed, I thought it would be really fun to make a Snowman Outfit to wear. I wanted to do this for Kaylee and was so excited to keep it a secret from her until the party. The look on her face was priceless when she came in the room and saw me dressed as a snowman. :) Here is a picture of me and her.
 For the costume, it was really simple and pretty inexpensive. To make the hat, I went to Party City and purchased a $1 plastic top hat. I then cut a small piece of a leaf and holly berries from a decorative piece that I purchased at Hobby Lobby and hot glued it to the hat.
 I then went to Walmart and bought a plain white sweater for $5. I then purchased some large buttons from Hobby Lobby for $2.50 each and hot glued them to the center of the shirt.


For the nose, my hubby helped me out with this. We took a scrap piece of orange cardstock and rolled it up into a cone shape and taped it in place. We then added elastic to the cone so it could fit over your nose.

To finish the outfit off, I had the rest of the items already on hand. I added some white gloves, white lounge pants a red scarf and some black boots. My hubby says that I am not a snowman, I am a snow"mam", lol.

I am entering this into the following challenges:
Frosted Designs: Music Inspired: http://frosteddesigns.blogspot.com/
I am also linking this up to:
Penguin Square Cards
Well, I still have not started on my own Christmas cards, but I did manage to finish some that my sister asked me to make this weekend. She needed five simple cards for the 5 men that live in the group home where one of our uncles lives. Hopefully, I will get a chance to work on my own cards later this week. :)
For her cards, I decided to make square cards that looked like a penguin face. I used the Wild Card Cricut Cartridge to cut the base of the card. I then cut a white heart from the George and Basic Shapes Cartridge and trimmed it to fit how I wanted the face to fit on the front. I cut another smaller orange heart for the beak and added two google eyes. I cut a basic square from George and Basic Shapes out of white cardstock for the inside so she could add her sentiments.
 I am entering these into the following challenge:
Creative Cutter Room: Animals: http://www.creativecutter.org/
For her cards, I decided to make square cards that looked like a penguin face. I used the Wild Card Cricut Cartridge to cut the base of the card. I then cut a white heart from the George and Basic Shapes Cartridge and trimmed it to fit how I wanted the face to fit on the front. I cut another smaller orange heart for the beak and added two google eyes. I cut a basic square from George and Basic Shapes out of white cardstock for the inside so she could add her sentiments.

Creative Cutter Room: Animals: http://www.creativecutter.org/
Saturday, December 3, 2011
Candy Cane Advent Calendar
I try to make Kaylee a new countdown or advent calendar every year. I came up with this idea a while ago, but just finished it, because I had the hardest time finding the tiny clothespins. Everywhere I went they had a space for them but were sold out. I finally was able to get some at JoAnn's right after they got some in and was able to get the calendar finished. Here is how it turned out.
 I started out with a frame that I purchased from a thrift store for $2 and a red piece of poster board to put inside the glass for the backing.
 Next, I hot glued 24 mini clothespins to the frame. I laid out the candy canes first to make sure they were spaced correctly.
 Now, I attached the candy canes and needed to make the countdown numbers. I used the George and Basic Shapes cartridge to cut circles that were .33inches out of white vinyl. I used a sharpie to add the numbers to the circles adn then placed them above each clothespin counting down the days.
 Then, I cut my label and hot glued it to the top of the frame. I used the Storybook Cartridge and the same red posterboard to cut the marquee shape and then I used the Batman Cartridge font and white vinyl to cut: "A Candy Cane A Day Means Santa Is On His Way".
 I am entering this into the following challenge:
She's A Sassy Lady: Anything Christmas/Must have Red or White: http://shesasassylady.blogspot.com/
I am also linking this up at:


She's A Sassy Lady: Anything Christmas/Must have Red or White: http://shesasassylady.blogspot.com/
I am also linking this up at:
Subscribe to:
Posts (Atom)