I am so excited to be a Guest Designer for this week's challenge over at Die Cuttin Divas. This week's challenge is to use an elephant on your project. Be sure to stop by and check out all of the wonderful projects by the ladies and enter the challenge here: http://diecuttindivas.blogspot.com/.
For my project, I decided to make a layout of the Circus. I used the Create a Critter Cartridge for most of my cuts on this page. I used it for the title, the train, the elephants and the lion. I then used the Batman Font Cartridge for the words on the train. I used a white gel pen to add some faux stitch marks to the train and added some mini white buttons to the wheels. To finish it off, I added some google eyes to the animals.
Thanks again to the ladies of Die Cutting Divas for allowing me to be a guest designer this week. :)
Tuesday, September 18, 2012
Friday, September 14, 2012
Elton John Concert (not a craft)
So, I don't have a craft project to share today, but I wanted to share this with everybody. On Wednesday night, my hubby took me to see Elton John. It was amazing. I thought you guys may like to see some pictures.
Wednesday, September 12, 2012
2nd Grade Class Photo
Catching up on another layout from last year. For this one, I went really simple and made a background page with the school name on it to be the focus. I then cut a blue mat for the photo and added faux stitch lines and did the same for a premade 2nd Grade diecut I got at the local craft store.
Sunday, September 9, 2012
Popping into 3rd Grade
I made this layout with Kaylee in her 3rd Grade shirt I made her at the end of the last school year. I actually got the idea for this layout from a billboard that I saw. I used the Carousel Cricut Lite Cartridge for the Popcorn Box on the bottom. I then used black vinyl and the Batman Cricut Font to cut the title "Look Who's Popping Into 3RD Grade". For the popcorn, I took three circles and welded them together to look like a piece of popcorn. I then layered these in the popcorn box and put a few on the page. I used white puffy paint and a heat gun to give the texture of popcorn on the pieces. Finally, I put a red mat behind the photo and outlined everything with a black pen.
Monday, September 3, 2012
Skull T-Shirt
I have seen a few different skull shirts on Pinterest and I wanted to make my own. I had a plain white shirt that I didn't mind cutting up, so I decided to make one this afternoon. I started with a plain white t-shirt and let my hubby free hand a skull face on the back with a marker. (Be sure to put some cardboard on the inside of your shirt so that the marker won't bleed through to the front).
Next, I took some fabric/sewing scissors to cut the pattern out. You could use regular scissors, but you may have fraying.
I then cut the sleeves off and cut the neck line in some. This is really up to you how wide you want the arms of your shirt to be.
I am going to wear this shirt over a black tank top, so here is how it looked when finished.
Sunday, August 26, 2012
Catching Up Christmas Layouts
I worked on this Christmas Layout from last year's pictures. I used the Lettering Delights cut set "Bah Humbug" to cut all of the little festive bugs out with. To add detail, I used some glitter paper and added a bow to the present in the corner. I also used a white pen to add some faux stitching and details to the cuts. For the title, I used Black Vinyl and the Batman Cricut Cartridge for the font. I thought "Catch the Christmas Bug" would be cute on this page.
Sunday, August 19, 2012
More Halloween Layouts
Here is another layout that I caught up from last Halloween. I had a page that I bought at JoAnn's that I wanted to match a second layout page to. So, I used the Drippy Goo punch around the edge to make a matching border for my page. I then used the Lettering Delights Cut Set Spooky Souiree for the Frankenstein in the corner. Using SCAL, I cut the title out of black vinyl with the Cheri Font. Finally, I added a green mat to the two photos.
This is the page that I was matching. I added no details to the page other than just putting green mats on all of the pictures.
This page is from the Scarecrow Trail at the local Botanical Gardens that we visit every October. We have lots of layouts from years in the past, so I just wanted to include a few pictures. The scarecrow and corn I used on these pages were premade classroom decorations that I found at the Dollar Tree and added to the page. I then used the Don Juan Cartridge to cut the title out and outlined it in black.
Monday, August 13, 2012
Brains, Brains: Catching Up on Halloween Layouts
So, I have been catching up on scrapping some Halloween Layouts from last year and I needed to do our Zombie pictures. I did two different two page layouts for the pictures. For the first one (which is my favorite), I used the Lettering Delights SVG set Zombie Land for the title, brain and zombie. I took the Martha Stewart Drippy Goo Punch across the bottom of the two pages to look like a blood drip and put it on top of a sheet of purple paper. To dress up the title, I added some red lines, outlined in black and then inked the letters with white and red ink.
For the next layout, I used some pictures from when Kaylee was getting made up like a zombie, because I loved the face she was making. She was so excited. :) I used the Happy Hauntings Cricut Cartridge for the font and the October 31st Cartridge for the hand. The dirt mounds are from the Paper Dolls for Everyday Cartridge. I used Black Soot Ink on the mounds to make it look more like mud. The details on the hand were hand drawn by my hubby. I added a half circle to the top of the second page to add some journaling to the page. Finally, I printed a zombie clip art from the Plants vs. Zombies game to add to the side corner to finish it up.
For the next layout, I used some pictures from when Kaylee was getting made up like a zombie, because I loved the face she was making. She was so excited. :) I used the Happy Hauntings Cricut Cartridge for the font and the October 31st Cartridge for the hand. The dirt mounds are from the Paper Dolls for Everyday Cartridge. I used Black Soot Ink on the mounds to make it look more like mud. The details on the hand were hand drawn by my hubby. I added a half circle to the top of the second page to add some journaling to the page. Finally, I printed a zombie clip art from the Plants vs. Zombies game to add to the side corner to finish it up.
Sunday, August 5, 2012
Workout Journal
So, one of the reasons I have been busy lately is because I have been working out with a trainer and doing some Crossfit classes at the gym. I wanted to keep track of what all I am doing for this month, so I made a workout journal. I started with a sketchbook sized 8x8 and added some stickers to the front to put Peanut (a nickname) on the front. I then cut some squares of paper to date each page. I made a weight tracker for every Saturday when I weigh in. I think this will be good to look back at the end of the month and track my progress.
Tuesday, July 31, 2012
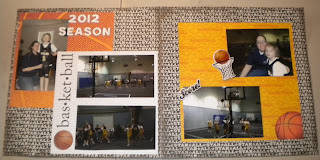
Basketball Layout
Once again, I have been busy and haven't had much crafting time. I did do this simple basketball layout to share today. I used the cricut to cut some of my papers into an 8x8 squares to add some layers to the pages. I then used the Batman Font to cut the title out of white vinyl and used some stickers to add to the page. The pictures are from Kaylee's basketball season earlier this year.
Saturday, July 21, 2012
My Stache Savings Jar
My sister asked me to make this for her and Kaylee to save money in. I could not resist making one for myself too! I bought these jars at Hobby Lobby and used black vinyl to decorate them. The mustache is from the Lettering Delights cutset "Mustache Mania" and I used the Batman Cricut Font for the saying. I think these would be great to give with a gift if you were giving money as the present.
Sunday, July 15, 2012
R2D2 Shoes
My hubby made me the coolest shoes. He started with white flats from Walmart (only $5) and then traced out the design on them with a marker. He then painted them with acrylic paints. The second picture of the shoes is with a R2D2 trash can that he made me a few years ago to use for giving out candy at Halloween.
Monday, July 9, 2012
Scrabble Tile Coasters
I made these coasters for my dad for Father's Day. I saw the idea on Pinterest. I used hot glue to attach the Scrabble Tiles to Cork Roll and then cut around them to make the coaster. Once I had that attached, I used a couple coats of Mod Podge over the top of the tiles and let that dry. Finally, I sprayed them with water sealant that I purchased at Hobby Lobby so they would hold up to drinks being set on them. He has a bar in his garage that he is going to use these in.
Thursday, July 5, 2012
Memo Board Picture Frame
I am back from my mini vacation. I got the idea for these on Pinterest. I bought the picture frames at Hobby Lobby and put a piece of notebook paper inside the frame. I used black vinyl and the Batman Cricut Cartridge to cut (To Do:) for the top of the paper. I then used a velcro circle to attach the dry erase marker to the back. I made these for my sisters to go with their birthday presents. My hubby drew a little picture on them for the girls. (I thought I took a picture of the back, but realized now I didn't. I just placed a velcro circle on the frame and on a dry erase marker to attach it.)
Thursday, June 28, 2012
Going out of town
Just wanted to stop in and let everybody know I am heading out of town for a few days. I will be back with more projects and to see what everybody has been up to later next week.
Tuesday, June 26, 2012
Batgirl Layout
I made this layout with a picture of Kaylee wearing her Batman mask. She usually puts it on when she is watching tv and eating her popcorn. I used the Batman Cartridge and black vinyl for the title at the top of the page and I also used the Batman Cartridge for the bat symbol. The cityscape is from the Paper Doll Dress Up Cartridge. I used a shimmer cardstock for the background and used the I-Rock to attach rhinestones for the stars.
Thursday, June 21, 2012
A Quick Layout
I have been pretty busy this summer, but here is a quick layout I made of Kaylee's Pet turtle. She has had him since January.
Saturday, June 16, 2012
Baby Onesies
I made these onesies for my cousin that just had a little boy. I used vinyl to make a stencil and then used fabric paint to fill them in. I used Paper Dolls Dress Up for the tie one, Batman Font for the est. one, and an svg file for the IPood. I just did a search for the image and traced it into SCAL. I think they all turned out pretty cute.
Tuesday, June 12, 2012
Kinect Adventures Layout
I made this layout with some pictures of us playing Kinect Adventures sometime last year. We were playing the white water rafting game, so I thought I would theme the page around that. I used a piece of blue paper as the background and added half a sheet of The Paper Studio clouds paper for the sky. I cut the title out from the Batman Cricut Cartridge font using black vinyl. For the waves, I used the Spongebob Cricut Cartridge and cut them from a glossy blue paper. I then used Campin Critters to cut the little guy for the bottom. That cartridge is quickly becoming one of my favorites with all of those cute critters! :)
I am entering this into the following challenge:
Bitten By the Bug: Water Challenge: http://heather-bittenbythebug2.blogspot.com/
I am entering this into the following challenge:
Bitten By the Bug: Water Challenge: http://heather-bittenbythebug2.blogspot.com/
Friday, June 8, 2012
4 Wheelin Cutie Layout
Here is a layout I did of Kaylee on her 4 Wheeler. She loves to ride it around my parents back yard. I used the Batman Font and black vinyl to cut the title for the top of the page. I put a border behind the picture with glossy red paper. I then used the Campin Critters Cartridge for the squirrel cut and used a white pen to add some faux stitch lines around him and added google eyes also. I then took a cotton ball and stretched it out to glue down and make it look like smoke coming from the four wheeler.
I am entering this into the following challenges:
Frosted Designs: Stitching Challenge: http://www.frosteddesigns.blogspot.com
Docerela Creations: Summer Challenge: http://blog.docerelashop.com/
Tuesday, June 5, 2012
Canvases
I made these canvases for Mother's Day Gifts this year. I purchased the 8x8 white canvases at Hobby Lobby and used acrylic black paint to coat them. The smaller canvases were also purchased at Hobby Lobby in a 6 pack. I printed out pictures of me and my sisters and then used Scrapbook Factory Software to make the family title and printed it out also. I attached those to the smaller canvases with Mod Podge and used a coat over them to seal the picture also. Once they were dry, I used hot glue to attach the smaller canvases to the larger canvas.
I also made these smaller canvases that are sized 6x6 for one of my grandmothers and for my sister. For these, I printed a picture out using a polaroid frame background and used Mod Podge to attach the pictures and seal them. I love how it looks like a large polaroid picture.
I also made these smaller canvases that are sized 6x6 for one of my grandmothers and for my sister. For these, I printed a picture out using a polaroid frame background and used Mod Podge to attach the pictures and seal them. I love how it looks like a large polaroid picture.
Friday, June 1, 2012
Awards Day Pocket Pages
Today, I have two layouts to share that I made to hold the awards that Kaylee gets from school. I am a little behind on some scrapbooking, so I needed one for 1st and 2nd Grade. For these Pages, I took a piece of cardstock and cut a rectangle to make a pocket on the pages. I then used the sewing machine to sew the pocket on so the awards would fit right down in there.
For the 1st Grade layout, the background paper is from the DCWV School Pack and I used the Cheri Font and with vinyl to cut the title. The little push pin guy in from the Lettering Delights set Pop School.
For the 2nd Grade Layout, the background paper is also from the DCWV School Pack. I used the Batman Cricut Cartridge and black vinyl for the font. The crab is a cut file from the Lettering Delights set School of Fish.
Tuesday, May 29, 2012
Awards Day T-Shirt
Kaylee's awards day for 2nd Grade is tomorrow and I made her a shirt to wear. The saying was her mom's idea. I used the Batman Cricut Cartridge Font to make a stencil out of vinyl and filled it in with blue fabric paint.
Thursday, May 24, 2012
Some Easter Layouts
I made this layout with a few pics from Easter. I used a polaroid frame template to print the pictures and put captions on the bottoms of them. The title on the layout is bubble stickers by The Paper Studio.
The second layout is from coloring eggs. I love how serious Kaylee seems about this. I used the Batman Cricut Cartridge for the font and the egg chick is a cut file from My Scrap Chic. I used a high gloss paper for the background so it would be bright and shiny.
The second layout is from coloring eggs. I love how serious Kaylee seems about this. I used the Batman Cricut Cartridge for the font and the egg chick is a cut file from My Scrap Chic. I used a high gloss paper for the background so it would be bright and shiny.
Monday, May 21, 2012
Working Hard Layout
Kaylee loves to help her grandpa when he is doing yard work on their land, so I made this layout of him and her working. I used the Batman Cartridge and yellow vinyl for the title. The truck is from B is for Boy and the dirt is from Paper Dolls Dress Up. I used Tim Holtz Black Soot distress ink on the dirt piles.
Saturday, May 19, 2012
A Layout
I am back with a project. :)
I had a chance to sit down and do some crafting. I made this layout of Kaylee at her mom's work. The frog on this layout is from Lettering Delights Toadily School set. The background paper is from the DCWV School stack and I used glossy green paper for the photo frames and journaling.
I had a chance to sit down and do some crafting. I made this layout of Kaylee at her mom's work. The frog on this layout is from Lettering Delights Toadily School set. The background paper is from the DCWV School stack and I used glossy green paper for the photo frames and journaling.
Sunday, May 13, 2012
Hello
Just checking in to say hi to everybody. Thank you so much for everyone who has checked in on me. I am still really busy, but I hope to have a chance to check in and see what everybody has been making and get back to crafting soon.
Sunday, April 15, 2012
Just checking in to let everybody know that I have been sick and had a lot of family stuff going on, so not much time for crafting. I am not going to be posting as much with everything going on, but I will share as I have time for crafting. I hope to be back in full swing soon, but I will still be checking in with everybody as I have time. Hopefully things will get back to normal soon, because I am really behind on scrapbooking at the moment.
Tuesday, April 10, 2012
Batgirl Shirt
It seems like all I have been making lately are t-shirts. Here is another shirt that I made for Kaylee. She loves Batman, so I wanted to make her a pink Batgirl Shirt. I used the Batman Cricut Cartridge for all of the cuts on this. I put the Bat Symbol on the front and I then put Batgirl across the back of the shirt.
Here is the front of the shirt.
Here is the front of the shirt.
Here is the back of the shirt.
Saturday, April 7, 2012
Easter Bunny T-shirt
This is the second easter shirt that I made for Kaylee. I used the Doodlecharms Cricut Cartridge for the base of the bunny and used white fabric paint for it. I then used George and Basic Shapes to make the ovals and triangle for the nose. The eyes and mouth were freehanded with a paintbrush and the fabric paint. I then used the Don Juan Cartridge for the font to put her name under the bunny face.
Thursday, April 5, 2012
Bunny Mailbox
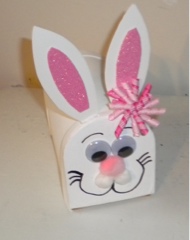
I bought one of the unfinished mailboxes at Hobby Lobby and turned it into a little bunny box for Kaylee to put some Easter stuff in. I removed the flag off of the side and painted the whole box white. I used fun foam to freehand and cut the ears and used hot glue to attach them. I then hot glued google eyes and some puff balls to the box for the details. Finally, I used a black paint pen to add the mouth and lines above the eyes.
I am entering this into the following Challenges:
Creative Cutter Room: Easter Challenge: http://www.creativecutterroom.com/
Scrappy Moms: Terrific Tuesday Easter Challenge: http://www.scrappymoms-stamps.blogspot.com/
My Craft Spot: Easter Challenge: http://craftspotbykimberly.blogspot.com/
Wednesday, April 4, 2012
Decorate to Celebrate Baby Shower Challenge: Design Team Project
It is time for a new challenge over at Decorate to Celebrate. This time, we are challenging you to make a decoration or party supply for a baby shower. Be sure to stop by and see all of the projects by the design team and enter the challenge here: http://www.decoratetocelebrate.blogspot.com/.
For my project, I made a little table decoration for a baby shower. I found these little mini lanterns at hobby lobby and decorated them to look like hatching baby chickens. I used the Create a Critter Cartridge to cut the face and egg shell and then used hot glue to attach them. I also added a small premade bow with hot glue to the front. For the sign, I used the Storybook Cartridge and welded the marquee shape in the Gypsy to make it stand up and used the Batman Cartridge for the font. This was cut with white vinyl and outlined in black. I finally added some faux stitch lines around the edge of the marquee shape.
For my project, I made a little table decoration for a baby shower. I found these little mini lanterns at hobby lobby and decorated them to look like hatching baby chickens. I used the Create a Critter Cartridge to cut the face and egg shell and then used hot glue to attach them. I also added a small premade bow with hot glue to the front. For the sign, I used the Storybook Cartridge and welded the marquee shape in the Gypsy to make it stand up and used the Batman Cartridge for the font. This was cut with white vinyl and outlined in black. I finally added some faux stitch lines around the edge of the marquee shape.
Subscribe to:
Comments (Atom)


