Saturday, July 31, 2010

OTWC Challenge #18


The colors this week for OTWC are blue, white and yellow. I have had these flower patches for a while now. I bought them at a fabric outlet store I went to with my sister and I had bought all of them they had and then never used them. I thought this would be the perfect time to use them since they fit the white and yellow part of the challenge. Other than the patches on the page, the only other thing I added was a frame from the Live Simply Cricut Lite Cart. I sized it on the gypsy to fit the picture how I wanted.

Be sure to check out the Off the Wall Craftiness blog for lost of great projects and weekly challenges. http://offthewallcraftiness.blogspot.com/

Friday, July 30, 2010

Candy Apple


I really liked this picture of Kaylee and her mom with this candy apple, so I wanted to make a page with only the one pic on there. I used this cute patterned paper that I picked up at Michael's for the background and matted my picture in the green with white polka dots paper that I got from Hobby Lobby. I put a larger frame around the picture than I usually would, but I wanted the green to stand out. The letters are green with polka dot stickers that I also found at HL. (They have lots of colors and I think they work well with many layouts) Anyways, the apple was cut from the Carousel Lite Cartridge. Once cut, I colored the stick in, did some shading on the shadow part and then covered the entire apple with glossy accents. This worked just how I wanted and made the apple look shiny like a real candy apple. (I had to let this dry overnight, because there was a large area covered by the glossy accents.)
Update: Aug. 2nd, I am adding this page to the FC challenge for this week. The challenge is barbeque or summer foods. I thought how summer is a candy apple! Be sure to check out their site here: http://fantabulouscricut.blogspot.com/

Crayon Wreath


Well, I have seen a few of these on the internet and I thought I would give it a try. I made this for Kaylee's new first grade teacher. The base of this is the inside of two crotchet hoops (8inch and 12inch). I purchased three boxes of 24 crayons, however, I only used a little over 2. I chose not to use the white, black or brown from each box. If you used those, you could make it with 2 boxes.

I began by painting the crotchet hoops red and letting them dry. Then I layed the smaller one in the center of the bigger one and laid my crayons out how I wanted them to be on the wreath. Next, I hot glued the crayons down. I added the ribbon around the edge of the crayons by securing one end with a glue dot and then just looping it in and out around the edge and securing the end again. The apple is a wooden shape that the name was painted on and I tied the bow from the same ribbon I used to make the hoop for her to hang it up with. All items are hot glued to make sure they will hold tight.
Update 8/7: I am entering this in the back to school challenge on My Sheri Crafts. http://myshericrafts.blogspot.com/2010/08/my-sheri-crafts-challenge-17-back-to.html

VBS Layout


Kaylee went to the VBS at my grandmother's church and the theme was Blast Off. They took this picture there and I thought it was just too cute, so I had to add it to her scrapbook. I cut the letters and numbers from Don Juan and embossed them with the Divine Swirls folder. The planets and stars are stickers.

Thursday, July 29, 2010

Cookie "Mom"ster


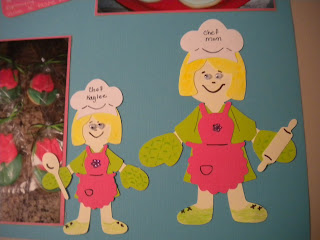
Since my sister Melissa has began cookie making and decorating, I wanted to add Kaylee helping with cookies to her scrapbook. I was thinking of Cookie Monster and thought it would be fun to do a play on words and do Cookie MOMster instead. I printed the title onto this page. The little chefs are made completely from Everyday Paper Dolls and the words and oven mitt that I used for the journaling are from From My Kitchen. The hearts by the title are also cookie cuts from Everyday Paper Dolls. I used the white gel pens on the cookies and on the words. Then, I also added some stickles on the hearts. I love the colors that I used on this one.

SOUS Layouts


I am still not feeling 100%, but I thought I would get up and try to work on some layouts. I used the sketch from Stuck on U Sketches for these layouts. http://stuckonusketches.blogspot.com/ I flipped it for one page so that I could do a 2 page 12x12 layout using the sketch on each page.

The pictures are from when Kaylee, her mom and one of my other sisters went to Gatlinburg last weekend. I used the Gypsy to layout the sketch and cut all of my paper pieces and then I used Zooballoo for the vines that I cut. They were inked using Tim Holtz stained walnet distressing ink and a fantastix coloring tool. The letters on the page are stickers. I was thinking there was too much green and similarity with the papers I layered in the background at first, but I like how it came together.

Tuesday, July 27, 2010

Just Checking In

Hope everybody is having a good week so far. I have not posted any projects in the past few days, because I have been sick. Had a horrible day today, was sick all day, slipped in the shower and hit my bad knee (the one that I had surgery on), and then took the trash out and got stung by a bee. I was thinking what else can happen!! Anyways, hoping to be feeling better by tomorrow, so hopefully I will have some crafting done later this week. Just wanted to take a minute to check in on here.

Saturday, July 24, 2010

A Few New Layouts


For this layout of Kaylee at gymnastics, I used the Carousel cart for the girl on the bars and the Featuring title, the oval was cut from George with stickers for the name, and I hand cut the mats for the photos.

For this layout, I put some little tabs on each picture and the bow wow is a sticker. The Toby was cut from the Don Juan cart and I welded the letters together with the Gypsy. I embossed it with the Tim Holtz Rays folder and then inked it with some red ink.

Go wild on this layout was cut from the Create a Critter Cartridge and then I added some buttons, googly eyes and used a marker on the monkey image that was already on the paper just to spruce him up a little bit.


This is pretty simple layout. Just used a cute background paper and added a vellum saying about the sand. No cricut used on this one.

Friday, July 23, 2010

My sister's cookie blog

My sister Melissa has recently got into making cookies and she just started a blog. She only has one post so far, but she is going to be adding more cookies to the blog at the beginning of next week. She is planning on making a new batch of different designs and techniques each week. If you are interested in baking, check her out.

http://melissaiscrazyaboutcookies.blogspot.com/?spref=fb

Thursday, July 22, 2010

Picture Frame


This was a wooden picture frame from HL. It holds a 5x7 photo. I started by painting it white. I was going to add a second coat of white paint, but I decided that it kind of had a vintage/antique look how it was, so I left it. I cut the swirls in the corners out of vinyl from Gypsy Wanderings. The flower on the corner is a wooden shape from HL that I hot glued on.

Owl Paperweight


This is one of the paperweights that you can put a picture in. Instead of a picture, I used the Gypsy to make a circle and cut this little owl from the Sugar and Spice cart. I love how it turned out. I have been having to keep the fan on high in the craft room because it is so hot here, but my papers and pictures I am working on fly everywhere, so this was definitely something I needed.

Pirate Layout


This is my niece and two of my sisters at Peg Leg Pete's in Florida. (These are my two sisters that are twins, hard to believe I know, because they do not look alike at all) Anyways, I used mini monsters to make the pirate monster that is on this page. The hat he is wearing is a sticker that I added to him.

Wednesday, July 21, 2010

Smarty Pants


This is a layout of Kaylee and her Kindergarten teacher after her graduation. The title was made on the Gypsy and I welded the letters together. The little pants are from Everyday Paper Dolls and I added some eyelets and white ink to them to make them look more real. I just hand cut the little rectangle that I put the journaling on. The background paper came from Michael's.

Funny Layout


Okay, this is something that I just had to make a layout for. At my mom's birthday, Kaylee ran across the room and grabbed a diaper for her Eeyore doll. I asked her what she was doing and she said that sometimes Eeyore gets excited. We all laughed and I said hold on and let me get the camera to take a picture of this. The words on this layout are computer generated and the dots around the page were made with the Martha Stewart Screw Punch. (I just got this on Monday and I love it). I put yellow paper on the back of the sheet after I made the holes.

Simple Layout

This is a layout of Kaylee on Take Your Daughter to Work Day. I printed the words directly onto the paper. I then just added a Gruffies (House Mouse Line) stamped image that I colored and cut out. I had wanted this stamp for a long time, but never had a use for it, so I decided this would be the perfect excuse, lol. I kept this one simple, because the picture with her paragraph about the day took up most of the page. She had to write a paragraph about the day she spent with her mom for school. Her mom is the office manager for Southland Trucks, so she loved seeing all of the big trucks there on the day she spent at the office. I love that this has her handwriting on the bottom, because I think that will be great to show her when she gets older.

Guess Whooo Graduated?


I made the title for this layout using the Don Juan cart and welding the letters together with the Gypsy. The branches are from the Live Simply cart and I embossed them with branches and then used Tim Holtz Walnut Stain Distress Ink on them. The owls were actually some patches that I have had sitting around for over a year and finally found a use for them on this layout. The little hats I added to them are from the Locker Talk cart and I used the white opaque pen on them. I was trying to keep this page sort of simple and have the title as the main detail on the page. I think it turned out cute.

A quick tip for you guys, I used Joint Tape to lay out the words on and then put my adhesive on the back and layed them on the page. This way, I could line them up how I wanted and the joint tape comes right off without messing up your cuts or leaving them sticky. You can find it at Walmart in the paint department.

White Compact Case Albums

I am in a Girly Girl Swap on the Cricut MB and I signed up to make compact case albums like I made previously for my sisters. Problem is, I searched everywhere and could not find any black mirror cases like I used for theirs. I was beginning to think that I was going to have to get an actual make up case and try to get the make up out of it. Luckily, I found some white compact cases, so problem solved. I was wondering how they would look, but I actually like them better than the black ones. I put quotes about friendship in these and just used my Gypsy circle album I had made previously. The quotes on the white circles were printed on the computer and I hand cut those. (Very tedious, because I had to make 5 of the mini albums, so I had to hand cut 25 little circles.) I liked how they turned out, but I can tell you that I do not want to hand cut anymore circles for a while, lol.

Tuesday, July 20, 2010

I just recieved this blog award from Audrey at http://cuteandsome.blogspot.com/. I love her blog and she is a great friend, so I want to thank her for passing this award on to me and encourage you to visit her blog if you have not seen it before. She has great projects to share and you will love her blog!!


The rules in accepting this award are: you must thank the person who passed it on to you, copy award to your blog. list three (3) things you love about yourself, post a picture that you love on your blog, and pass award on to five (5) others

Again, thank you so much Audrey. I am so glad that I have gotten to know you through our blogs and love seeing your new creations.

Three things that I love about myself:
1) I love having a great family and friends around. I am blessed to know all of you.
2) I love that I am pretty easy going and can get along with most anybody.
3) I love that I have time to work on all of my scrapbooking and crafting, because it is what I love to do. :)

This is a picture that I took on the 4th of July of my husband, George and Kaylee. She also has Cloe in this pic as well. I love this pic, because Kaylee and George are both in it and she always says he is her bestest friend, so I thought this was a very cute picture of them together.


Now, I have to pass this on to 5 people. This is the hard part, because I do love all of the blogs that I visit. I have chosen these 5 because they always have great projects and I enjoy visiting them, be sure to check them out.

1)http://scraphappenswithrhonda.blogspot.com/
2)http://offthewallcraftiness.blogspot.com/
3)http://disneyscrapping.blogspot.com/
4)http://craftygolucky.blogspot.com/
5)http://cokiepopaper.blogspot.com/

Monday, July 19, 2010

OTWC Challenge #16


The Off the Wall Craftiness Challenge this week is to use the colors pale pink, grey and cream or white. I made this butterfly card for my grandmother's birthday using the Gypsy and the Stamping Cartridge. I cut the base in grey and then the top layer in pale pink. For the white, I added some flat back adhesive pearls to the center. On the inside, I wrote the following sentiment: "Just fluttering by to say, Have a Happy Birthday!".
Be sure to check out the OTWC site to see great projects and join in on the weekly challenges.

Cloe the Cat


This is my sister's new cat that she named Cloe. (I almost made the layout wrong, because I was spelling it Chloe, but she corrected me before I glued it down, lol) Anyways, this was a cute pic that I took of Kaylee and the cat on the Fourth of July. The cat and yarn were cut from the Sugar and Spice Lite Cart and the letters were cut from Don Juan. The background paper is specialty paper I bought from HL that was pre-embossed. I added some faux stitching lines onto the letters with my MS Opaque Marker to add a little more to the letters. The cat cut also has a lot of added inking with black and white and some google eyes. I think it turned out really cute.

Hospital Visit Layout


A couple of weeks ago, Kaylee fell off of the bars at gymnastics and she ended up having to go to the ER to get checked out. She turned out to be fine and not have anything wrong and she was fine. She had no picture at the hospital, but she was adament that I add her hospital arm band to her scrapbook. I just got the Sugar and Spice Lite Cartridge and I found this cute paper that said X-Ray on it, so I thought this was a good way to scrapbook the day for her. I cut the background shape a second time and used that as my journal block to write about her visit to the ER.

Vinyl Pail


I found this blue pail in the dollar zone at Target for $2.50. I had bought my grandmother a few new tshirts, because she was needing some and I thought this would be perfect to put them in for her. I cut the butterflies from white vinyl and the image is from the stamping cart. I just added them on and they made the pail look so cute. I think she will really enjoy it and it is like two gifts in one. :)

Saturday, July 17, 2010

Get "Whale" Soon


Sorry, I have been missing most of the week, but it has been crazy around here. I do have a project to share today. My best friend had surgery on Monday, so I made her a card today to mail to her. The whale is from Create a Critter. I embossed the water with the Divine Swirl Cuttlebug Folder. I took an actual bandaide and cut it down to fit on the whale's head.

Tuesday, July 13, 2010

Team Edward Word Book


Since my whole family is addicted to Twilight, I thought I would make try to make a word book for it. I am working on a Team Jacob one right now, but I thought I would go ahead and share the Team Edward one with you guys. I cut the base on chipboard and all of the paper I found came from Hobby Lobby. The letters I used are from Don Juan.