Thursday, March 31, 2011

Easter Egg Wreath

I bought a ton of those glitter eggs from the Dollar Tree last month when they first put them out and finally got around to making my egg wreath yesterday afternoon.  Love the colors on this, because it looks so springy!!

To make this, you will need:
Eggs (mine came from the dollar store), Wreath Base, Ribbon, Stick Pins, Hot Glue, Scissors and Cricut Cuts if you want to embellish it.

I started out by wrapping my wreath in ribbon and using the stick pins to secure it in place.  This way, if you can see through some of the eggs, you won't just see the base of the wreath.

Next, I removed the eggs from the sticks they were on and layed them out to get an idea of how I would place them on the wreath.

Once I was happy with that, I used hot glue and began to place them around the wreath.  Here is that in progress.

Once all of my eggs were glued on (I used two bags each of the large, medium and small sized eggs from the Dollar Tree), I added some ribbon to the back to make a hanger.  (You could leave the wreath like this if you wanted and it would be fine)

I did want to dress mine up a little more, so I added a premade bunny diecut and used the Cricut Cartridges Jubilee and Designer's Calendar to make a little banner that said Easter.  I hot glued these directly to the wreath.

I am entering this into the following challenges:
My Sheri Crafts: Spring: http://myshericrafts.blogspot.com/
Serenity Scrappers: Pastel Colors: http://serenityscrappers.blogspot.com/
Creative Cutter Room: Spring: http://www.creativecutter.org/
Fantabulous Cricut: Looks like Spring: http://fantabulouscricut.blogspot.com/

I am linking this up here:
craft

Wednesday, March 30, 2011

Cooking with Cricut Challenge 23: Make Me Laugh: Design Team Project

It's Wednesday and time for a new challenge at Cooking with Cricut.  This week, our theme is Make me Laugh/Nod to April Fool's Day.  With tomorrow being April Fool's Day, we want you to make us laugh.  Use your Cricut and use a funny poem, quote, sentiment, etc.  Be sure to stop by the Cooking with Cricut blog to see all of the great projects by the design team and enter your own project here: http://cookingwithcricut.blogspot.com/

I decided to make a layout.  I used Smiley Cards on the Gypsy for the emoticons and the LOL.  I added some little dots to the sentiment and outlined everything.  I then used George and Basic Shapes to cut the frames and outlined them as well. 


I am also entering this into the following challenge:
Wacky Wednesday at More than favors: Something Funny: http://morethanfavors.blogspot.com/

Tuesday, March 29, 2011

Branch Wall Hanging

I have to say that this is one of my favorite things that I have made.  I love how it turned out and I love the saying.
I started by going out in the backyard and picking up some sticks.  I got a good bit of them and then placed them down around the frame to make sure they were the right size and lined up.
I then went outside and spray painted the branches white.  I had to spray one side and then flip them over after they dried and spray the other side.
 Next, I hot glued the branches around the outside of the frame.
 I used Simply Charmed to cut a little bird for the corner.  I attached it to the front glass of the frame with pop dots.

 For the inside of the frame, I printed a brown square with white letters using the font BarenhandFashion.  Here is a picture of it hanging on the wall.

I am entering this into the following challenges:
Alphabet Challenge Blog: Up in the Air: http://alphabetchallengeblog.blogspot.com/
Frosted Designs: Reuse/Green Challenge: http://www.frosteddesigns.blogspot.com/
Getting Cricky with K Andrews: For the Birds Simply Sunday Challenge: http://www.gettingcricky.com/

I am also linking this up here:
Tip Junkie handmade projects

A Roaring Good Time Layout

Kaylee went to the circus recently, so I worked on some layouts for those pictures.  (I still have many more to work on)  For this layout, I used the Carousel Lite Cartridge for the cuts and the Batman Cartridge for the font.  I decided to keep this layout pretty simple.  I matted the pictures and added the tickets from the circus to the page as well.


Monday, March 28, 2011

Flower Frames for Etsy Inspired Challenge

I made a couple of frames today for the Etsy Inspired Challenge.

For these, I started out with some frames that came from the dollar store, brown pain, some pink rosettes and some pearls.

I painted the frames with acrylic paint in the color Chocolate Bar.
I then hot glued a small pearl to the middle of the pink flower and hot glued them to the corne of the frames.  For the larger frame, I hot glued a pearl to each corner as well.


I am entering these into the challenge over at Etsy Inspired Challenges.  For Challenge 132, the store for inspiration is Fresh Metal Jewelry.  I picked the below picture for my inspiration.  Be sure to check the challenges out here: http://etsyinspired.blogspot.com/

Saturday, March 26, 2011

You Crack Me Up Layout

For this layout, I used the Smiley Cards Cartridge for the egg, George and Basic Shapes for the frame, and the Robotz Cartridge for the title.  I added some google eyes to the egg to finish it up.

I am entering this into the following challenge:
Scrappy Moms Terrific Tuesday Challenge: Smiley Cards: http://www.scrappymoms-stamps.blogspot.com/

Easter Egg Bag

I made this bag for Kaylee to give her teacher for Easter.  I used the Martha Stewart Score Pal to make the box.  I then used the Easter Cartridge to cut the eggs and then cut them in half.  I embossed the main part with Spots and Dots and then embossed the stripe with Swiss Dots.  I thought it needed something else, so I used some glitter pens to add some color to the circles on the eggs.  After the eggs were finished, I hot glued them to the box and then hand cut a handle.  I used the EK Success Swiss Cheese punch on the handle and then stapled it to the box.  Finally, I cut a tag with Tags, Bags, Boxes and More and added the sentiment "Thanks for being an Eggcelent Teacher" to it.  I filled it with some candy eggs and Easter Grass.


I am entering this into the following challenges:
Celebrate the Occassion: Thank you with a tag: http://celebratetheoccasion.blogspot.com/
Creative Sisters Monday Challenge: Punches: http://lindascreativity.blogspot.com/

Friday, March 25, 2011

Smile - Puppy Dog Layout

Chloe over at http://chloeandherclipons.blogspot.com/ is celebrating and having a challenge to make a layout with a smile on it or showing something that makes you smile.  When I saw this, I knew exactly what to do.  I have had these pictures of my sister's dog Boomer and I loved them, because he looked like he was smiling. 

I took a few of the lyrics from the Smile song by Uncle Kracker and printed them at the top of my page using the Barbie Font.  I then used the Don Juan Cricut Cartridge to cut Smile to go up the side of my page.  I matted the pictures in yellow and then as a final touch added a star cut from the Home Decor Cartridge.  I then outlined all of the cuts and frames in black.

Thursday, March 24, 2011

Butterfly Shadow Box

I saw the cutest butterfly shadow box at Target that had different color butterflies in it and was $27.  I thought I would love that in Black and White and I could make my own for a lot cheaper.  I already had the shadow box on hand with an old picture in it, so I decided to redo it and I just used black cardstock for the butterflies.  I used the Create a Critter cartridge for the butterflies and bent the wings up to give them dimension.

 Here is a side view where you can see the dimension more.
I am entering this into the following challenges:
My Sheri Crafts: Monochromatic: http://myshericrafts.blogspot.com/
Tuesday Throwdown: Anything but a card: http://tuesdaythrowdown.blogspot.com/
Getting Cricky with K Andrews Simply Sunday: All a Flutter, winged creature: http://www.gettingcricky.com/

Wednesday, March 23, 2011

The Tweet Life Layout

For this layout, I wanted to use black, red and white colors only.  I used the Sentimentals Cricut Cartridge for the scallop circles on the page and then used a black gel pen to add faux stitching to the inside of the red and white and then a white gel pen to add faux stitching to the outside of the circles.  I hand cut the background for the pictures out of red cardstock.  The font is from the Jasmine Cartridge and the bird is from Home Decor.  I added some faux stitching around the bird, a google eye, and pop dotted it. 


I am entering this layout into the challenge at:
The Paper Variety: You can find the blog here: http://thepapervariety.blogspot.com/
Their theme this week is Tic Tac Toe and you have to use 3 elements in a row from the board (pic below).  I used the bottom row: layout, bird, and scallops


Cooking with Cricut Challenge 22: Lions and Lambs: Design Team Project

It's time for another challenge at Cooking with Cricut.  This week, our theme is Lions and Lambs. Your project needs to have a lion and/or lamb on it and use your Cricut.  Be sure to stop by to see all of the great projects by Melin and the rest of the Design Team and get your own project entered into the challenge here: http://cookingwithcricut.blogspot.com/

For my project, I decided to do a layout and I wanted to make it bright and kind of funny.  I decided to go with the saying "I'm not lion, I love ewe" so that I could use both a lion and lamb.  I used the following Cricut Cartridges: Batman for the title, Don Juan for the quotation marks, George and Basic Shapes for the frames, and Create a Critter for the lion and the lamb.  I used a black pen to outline the frames and the title. 


Tuesday, March 22, 2011

Blog Award


I want to say a special Thank You to Jade at http://www.thescrapyardrose.com/ for passing this award on to me.  Be sure to stop by and check her blog out for some great projects! 

I have previously received this award and passed it on, so this time I am going to pass it on to any of my followers who would like the award! :)   I love all of the blogs I follow and it is so hard to choose just a few of you, so since I have passed it on once before, this time I want to share it with everyone!

Update: 3/30/11:   I have also received this award from Ashley at http://welchcreations.blogspot.com/.  Thanks so much for thinking of me and passing this on.

Monday, March 21, 2011

Owl Tray

I went to the thrift store earlier today and found a cabinet door that was only $2.  I immediately thought that I would love to use it to make a tray.  So, after I left there, I headed to Home Depot which is right near the store to pick up two handles.  I found these that I used for $1 each.  I used a ruler to line the handles up on each side and used hot glue to attach them.  I used vinyl in various colors to cut the scene for the center area of my tray.  I used the following Cricut Cartridges: Gypsy Font for the name, Serenade for the branch, and Create a Critter for the owl.  I did not cut all of the layers of the owl, because I wanted to make it more simple.  Because this is a cabinet door, it is very sturdy and should hold up really well.  (I am hoping I might be able to find some more of these, because they would make great gifts.)

Here is a picture of how it looked to begin with.

I am entering this into the following challenges:
K Andrew's Simply Sunday Challenge at Getting Cricky: Winged Thing: You can find her here: http://www.gettingcricky.com/2011/03/simply-sunday-challenge-all-flutter.html

Etsy Inspired Challenge: EIC #131 {Dollbirdies} (my inspiration used below): You can find them here:
http://etsyinspired.blogspot.com/
Dollbirdies has many owl things in her shop and I love them all :), but I chose this as my inspiration:

Sunday, March 20, 2011

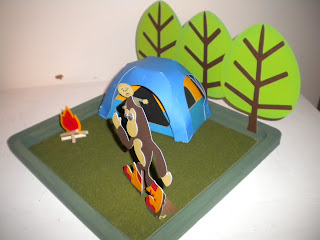
3D Camp Scene/ BigFoot Sighting :)

Well, when I saw the images on Campin Critters I just had to have it.  So, my hubby got it for me as part of my Valentine's Day gift.  Not that we go camping or anything, so I wasn't really sure how much I would use the cartridge.  When I was little, we did used to go camping but not regular camping, lol.  My dad and grandpa would load the boat up and get us a cabin by the lake, but we would take our tv and video games and hook them up.  Then, we would leave the campground and drive to the towns close by to go shopping.  So, not really traditional camping.

Anyways, I wanted to cut the 3D tent and make a little camp scene.  I decided to make a little guy looking out of his tent and seeing Big Foot walking by.  We watch the show An Idiot Abroad on the Science Channel and love Karl who is on that show, so my hubby drew the face on the guy to look like him. 

I started out with a wood base that I purchased at Michaels for $1.  I painted it dark green and covered the bottom with fake grass that was also purchased at Michaels.  I used Paper Doll Dress Up for the man cut at 2in and the hubby drew his face.  From Campin Critters, I cut the tent at a size of 7.59H and 9.08W, Big Foot at 3.75H (used cardstock to make a little stand on the back of his feet).  The trees are from Gypsy Wanderings cut at 5H and 3.61W and I chalked the edges with green.  For the fire, I cut the flame with Create A Critter out of vellum papers at a size of 1.47H and 2W.  I then took a wooden dowel and cut it into pieces to make my stack of fire wood.  Everything is hot glued to the base.


I am entering this into the following challenges:
K Andrew's Simply Sunday Challenge at Getting Cricky: Pack your bags, travel theme: http://www.gettingcricky.com/
Alphabet Challenge Blog: T is for Trees: http://alphabetchallengeblog.blogspot.com/
Paper Cutz Challenge: Your choice: http://papercutzchallenge.blogspot.com/

Saturday, March 19, 2011

Wampa Sony Reader Cover

I am so excited about how this turned out.  I wanted to make a holder for my Sony Reader.  I thought it would be really cute to make the front look like a Wampa from Star Wars.  
To make this, I started with: A mini purse from Hobby Lobby, red felt, black felt, brown felt, white stiff felt, solid black eyes, craft fur, scissors, marker, hot glue gun, and dremel tool.

I cut the handles/string off of the mini purse and then used a marker to outline the back of the fur to fit over one size of the purse.  I then cut the fur so it would be able to fit the purse.
Next, use the dremel to remove the backs of the eyse.  These eyes are Animal Eyes from Hobby Lobby and they have long screws on the back, so you need to make them flat to attach to the fur.

Next, use the felt to make the mouth and the horns out of fur.  I layed them out onto the fur to get the sizing and placement correct.  Finally, I hot glued all of the pieces together and then attached them to the front of the fur with glue.
Once the glue was set, I hot glued the entire piece to the front of the mini purse. Here is a view of the back which has a zipper and the Sony Reader fits right inside.


I am linking this up here:
craft